Written By: Kai Morgan
Last Updated: June 27, 2024
Setting up NordVPN on your devices and browsers is essential for enhancing your online privacy and security. This comprehensive step-by-step guide will walk you through the process of installing NordVPN on Windows, MacOS, Android, iOS, and browser extensions for Chrome, Firefox, and Edge. By following these detailed instructions, you can ensure your internet activities remain secure and private, while also gaining access to geo-restricted content. Dive in to learn how to protect your digital life with NordVPN.
NordVPN is a highly regarded Virtual Private Network (VPN) service provider known for its robust security features, fast connection speeds, and extensive server network. With over 5,000 servers spread across 60 countries, NordVPN ensures you can always find a server that meets your needs. It provides an array of advanced security features, including military-grade encryption, a strict no-logs policy, and an automatic kill switch. These features make NordVPN a top choice for users who prioritize their online privacy and security.
Using NordVPN is essential for protecting your online activities from prying eyes, especially in an era where cyber threats and data breaches are increasingly common. By encrypting your internet traffic, NordVPN prevents hackers, ISPs, and even government agencies from monitoring your online behavior. This ensures that your sensitive information, such as passwords, financial details, and personal communications, remains secure and confidential.
Furthermore, NordVPN offers additional benefits beyond privacy and security. It allows you to bypass geo-restrictions, enabling access to content that may be unavailable in your region, such as streaming services, websites, and social media platforms. Whether you are traveling abroad or simply want to access global content from home, NordVPN provides the tools you need to browse the internet without limitations.
Step 1
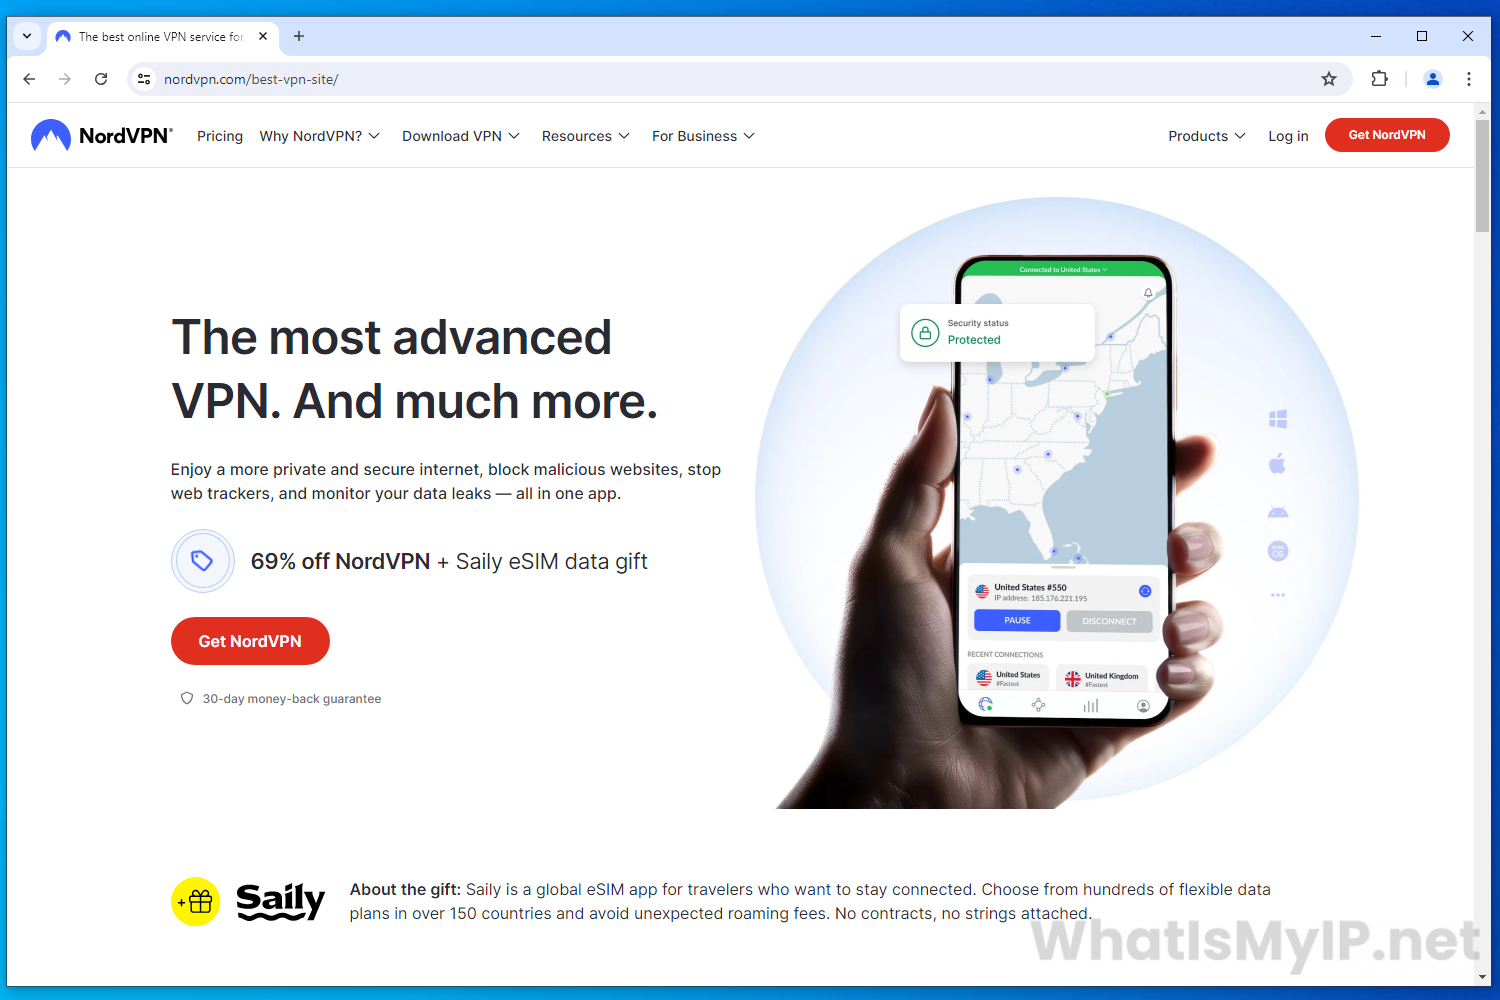
To sign up for NordVPN, visit the NordVPN website. Click on the “Get NordVPN or Get the Deal” button to view the available subscription plans. Choose a plan that best fits your needs.
Step 2
On the next page you will be asked to enter your email address, additional add-ons, and select a payment method so you can create an account. Set a strong password and complete the payment process using your preferred payment method (Credit Card, PayPal, Google Pay, Cryptocurrency, etc.).
Step 3
After completing the payment, check your email for a confirmation message from NordVPN, and click on the verification link if required. Then you should be good to go with an account.
We will guide you through the steps for downloading and installing NordVPN on your various devices. While the process is similar across most devices, each has its own specific configuration options that you can customize.
Step 1
Download the NordVPN App
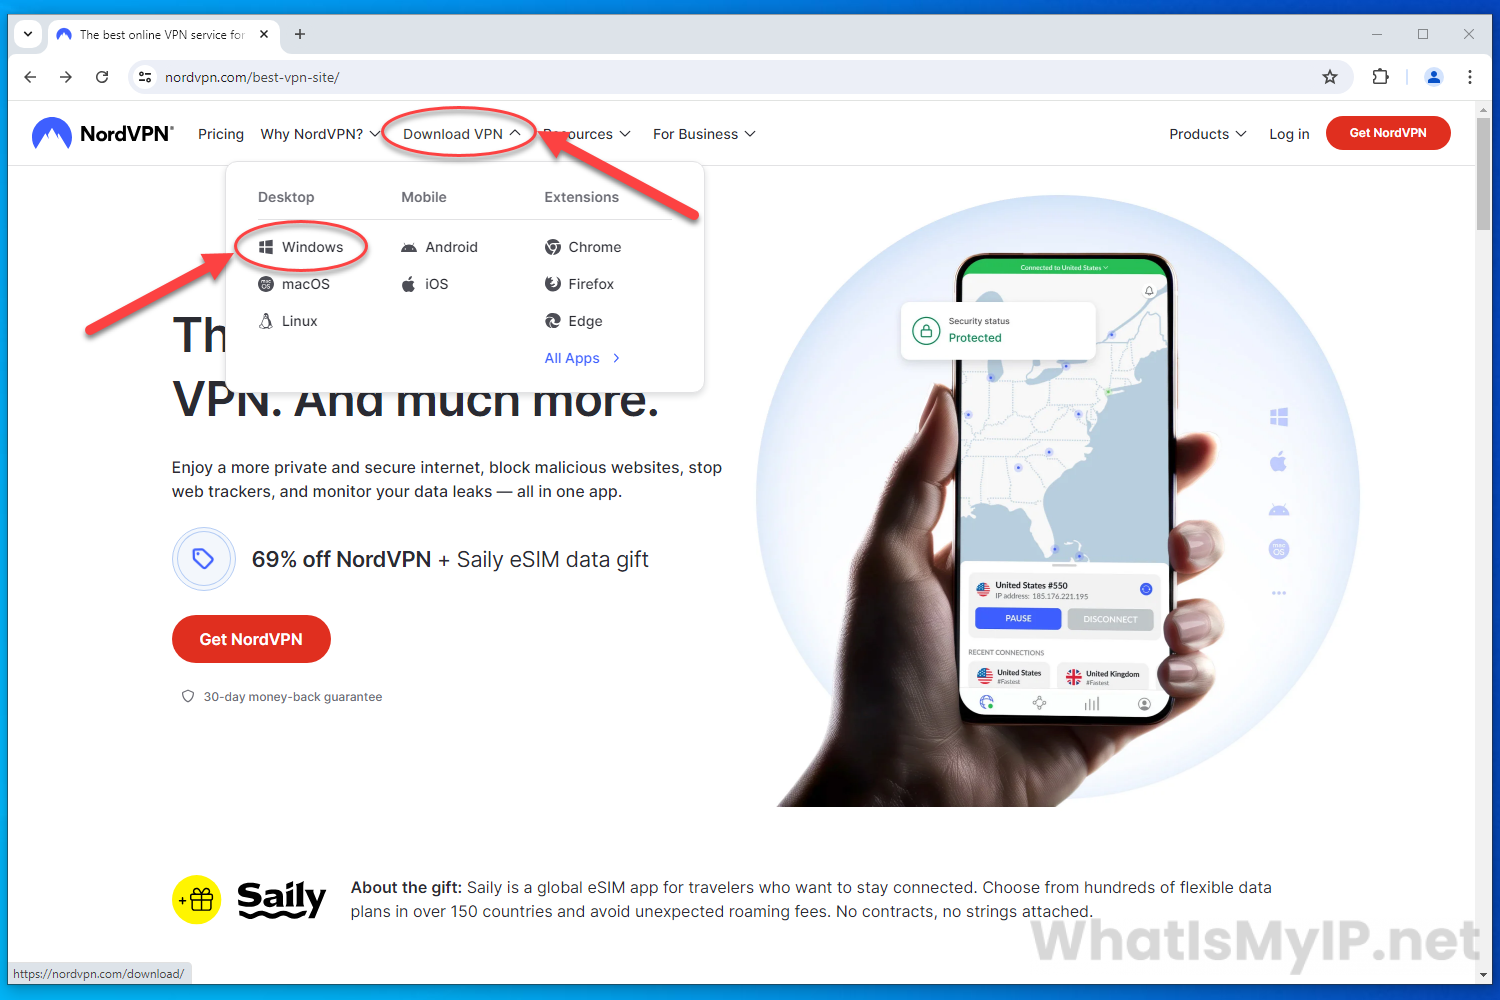
Go on over to NordVPN‘s website and hover over the “Download VPN” at the top.
Step 2
Download Windows App
Click on the “Windows” link under the “Desktop” section.
Step 3
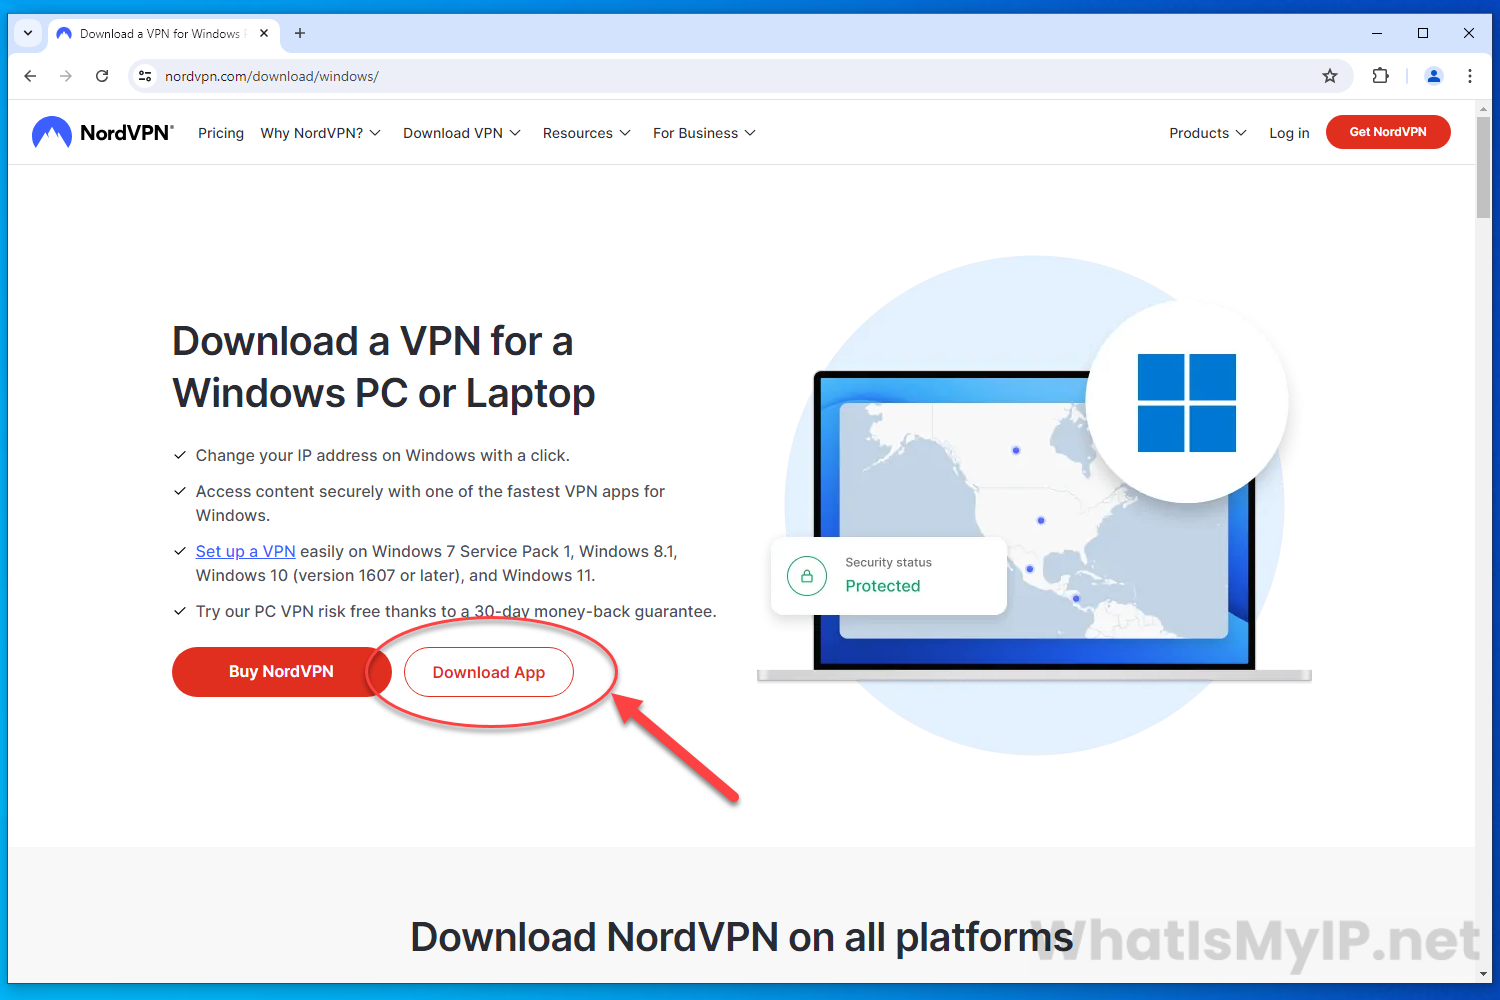
Download NordVPN Windows App
Click on the “Download App” button as shown in the screenshot.
Step 4
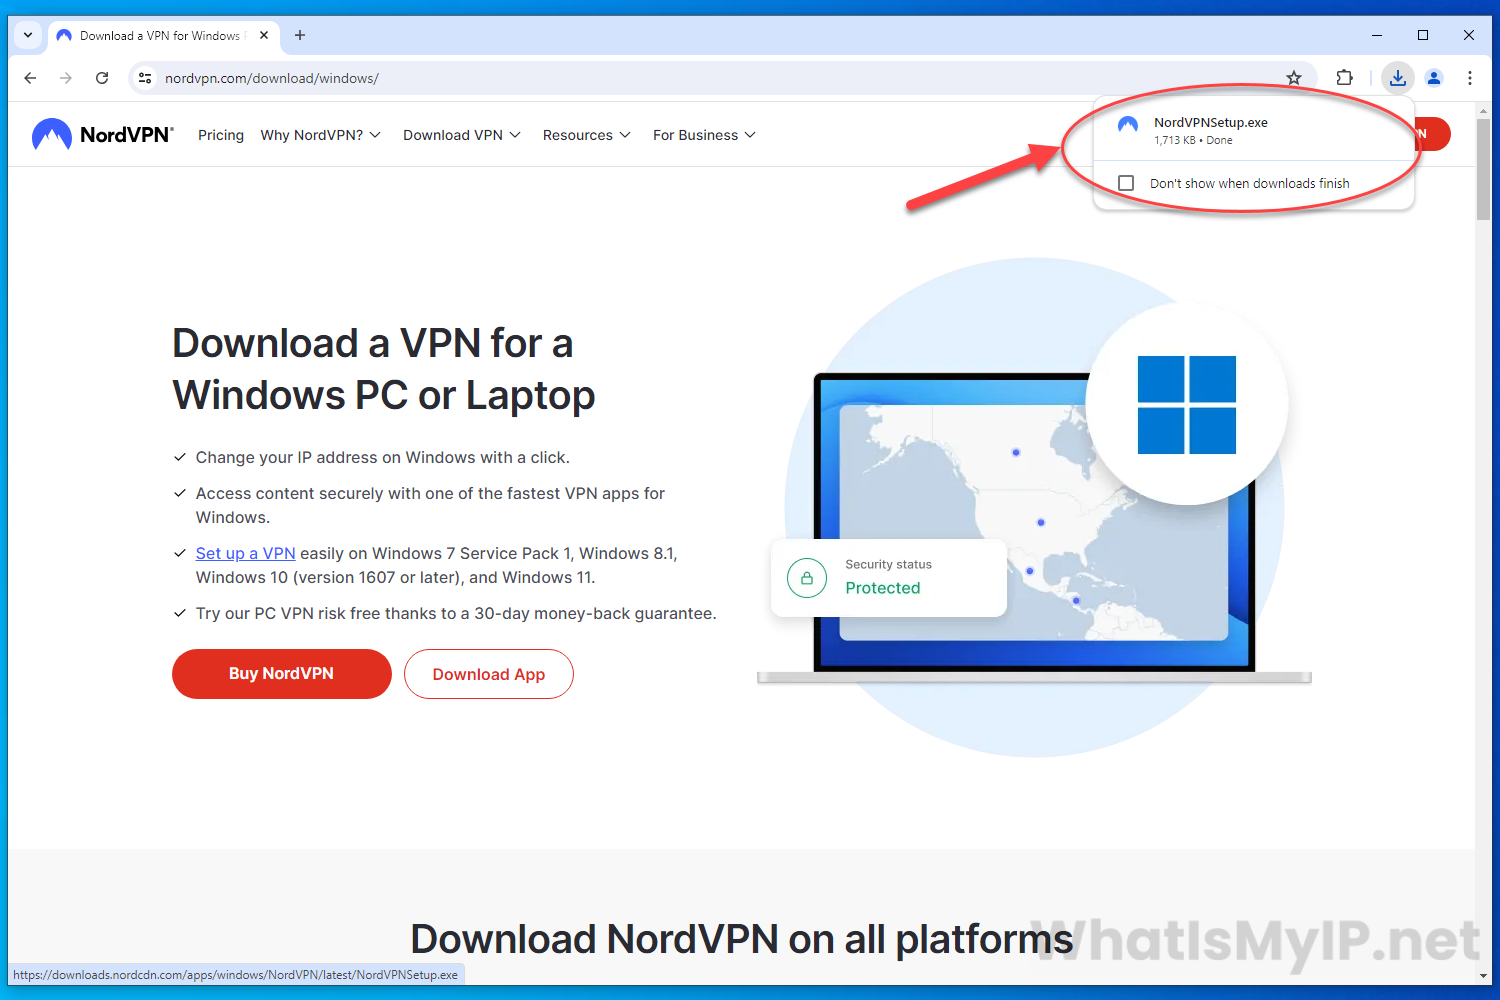
Download Complete
Once the download is complete, you will see the file in the upper right hand corner with the name NordVPNSetup.exe, Chrome will let you know once the download is complete and saved to your downloads folder. You can click on the filename in the browser to start the setup process of NordVPN.
Step 5
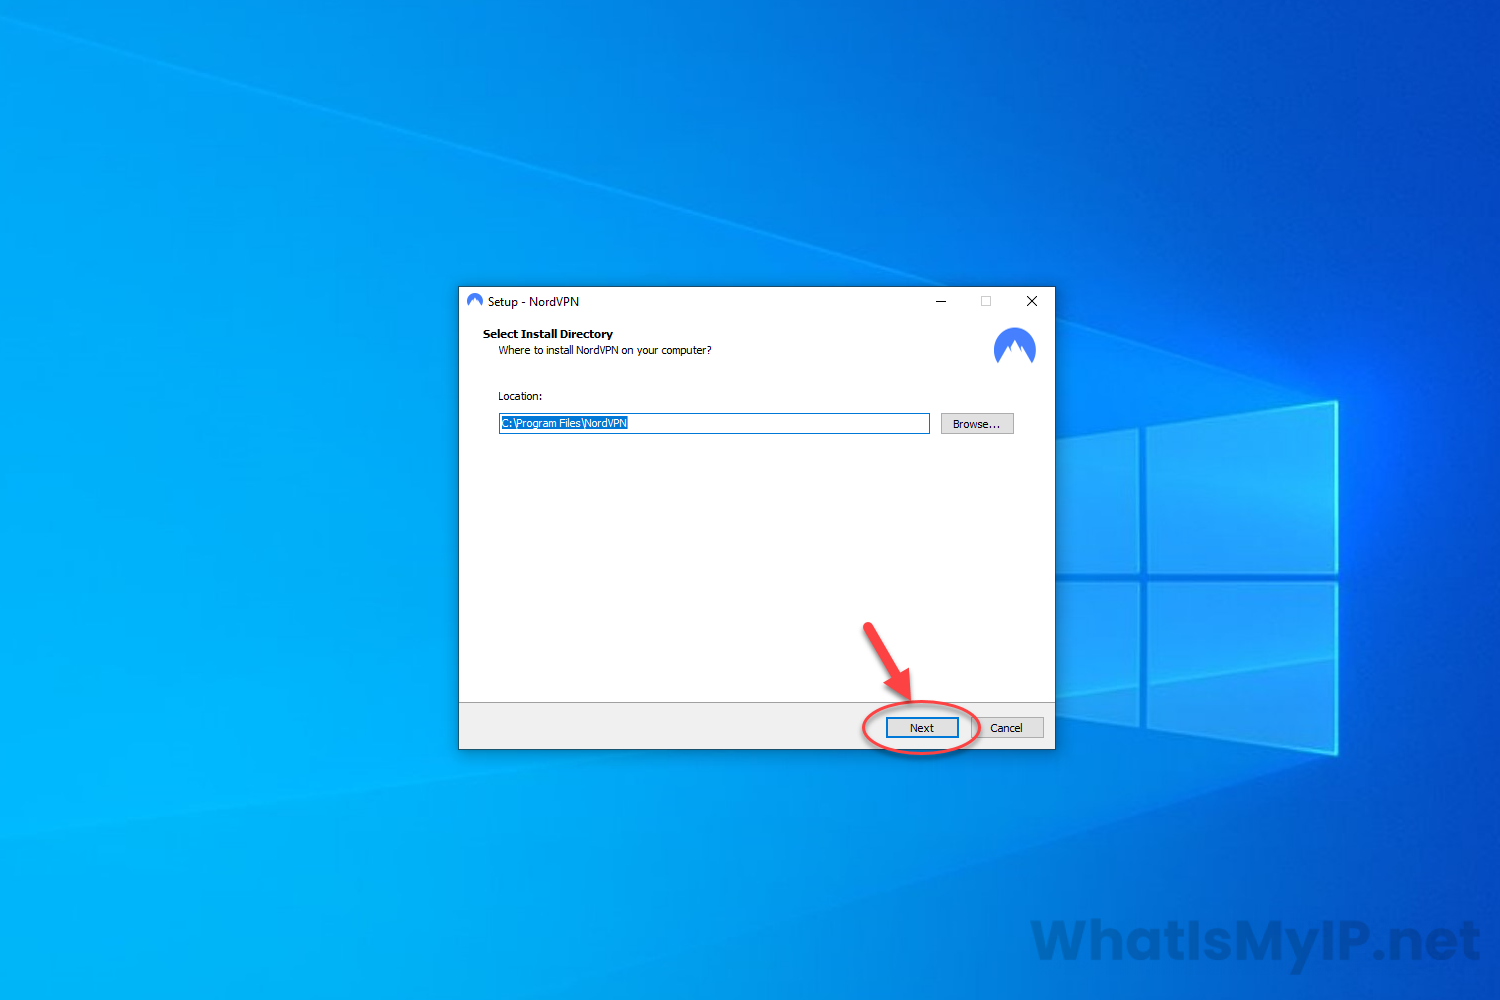
Installing the NordVPN App
Once the setup starts, you will be asked to select a install directory, you can leave this default and click the “Next” button to continue with the setup process.
Step 6
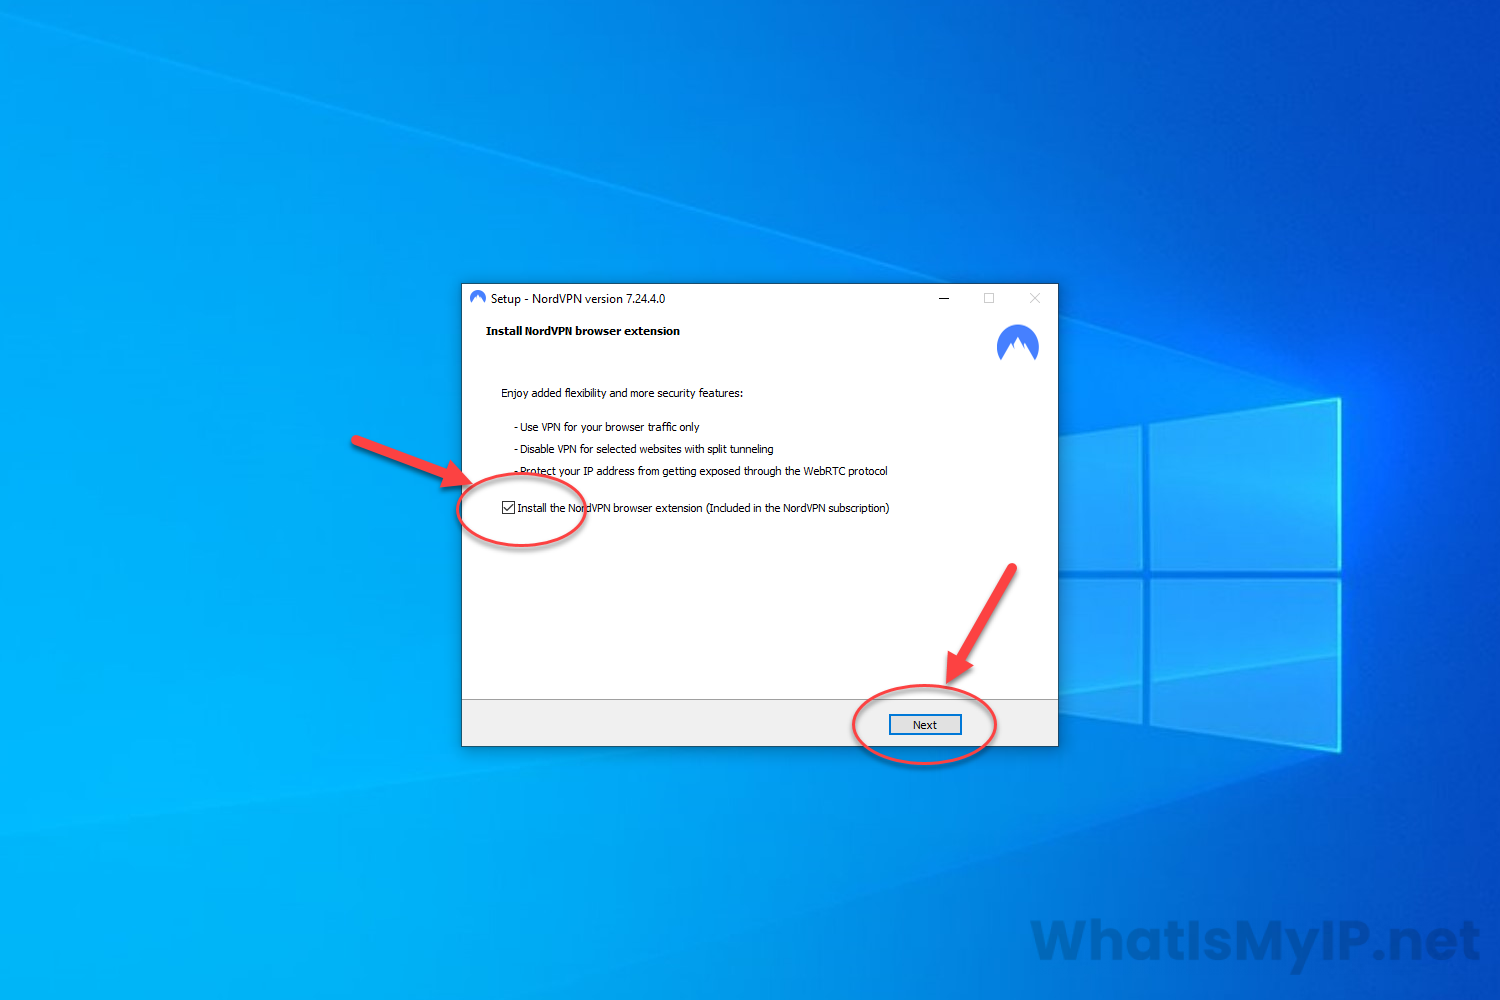
App Installation Process
During the installation process you will be asked if you would like to also install the NordVPN browser extension. You can uncheck this for now as we will show you in more detail at the bottom of this article about how to install the browser extensions for different browsers. Once you have unchecked the box, click the “Next” button to continue.
Step 7
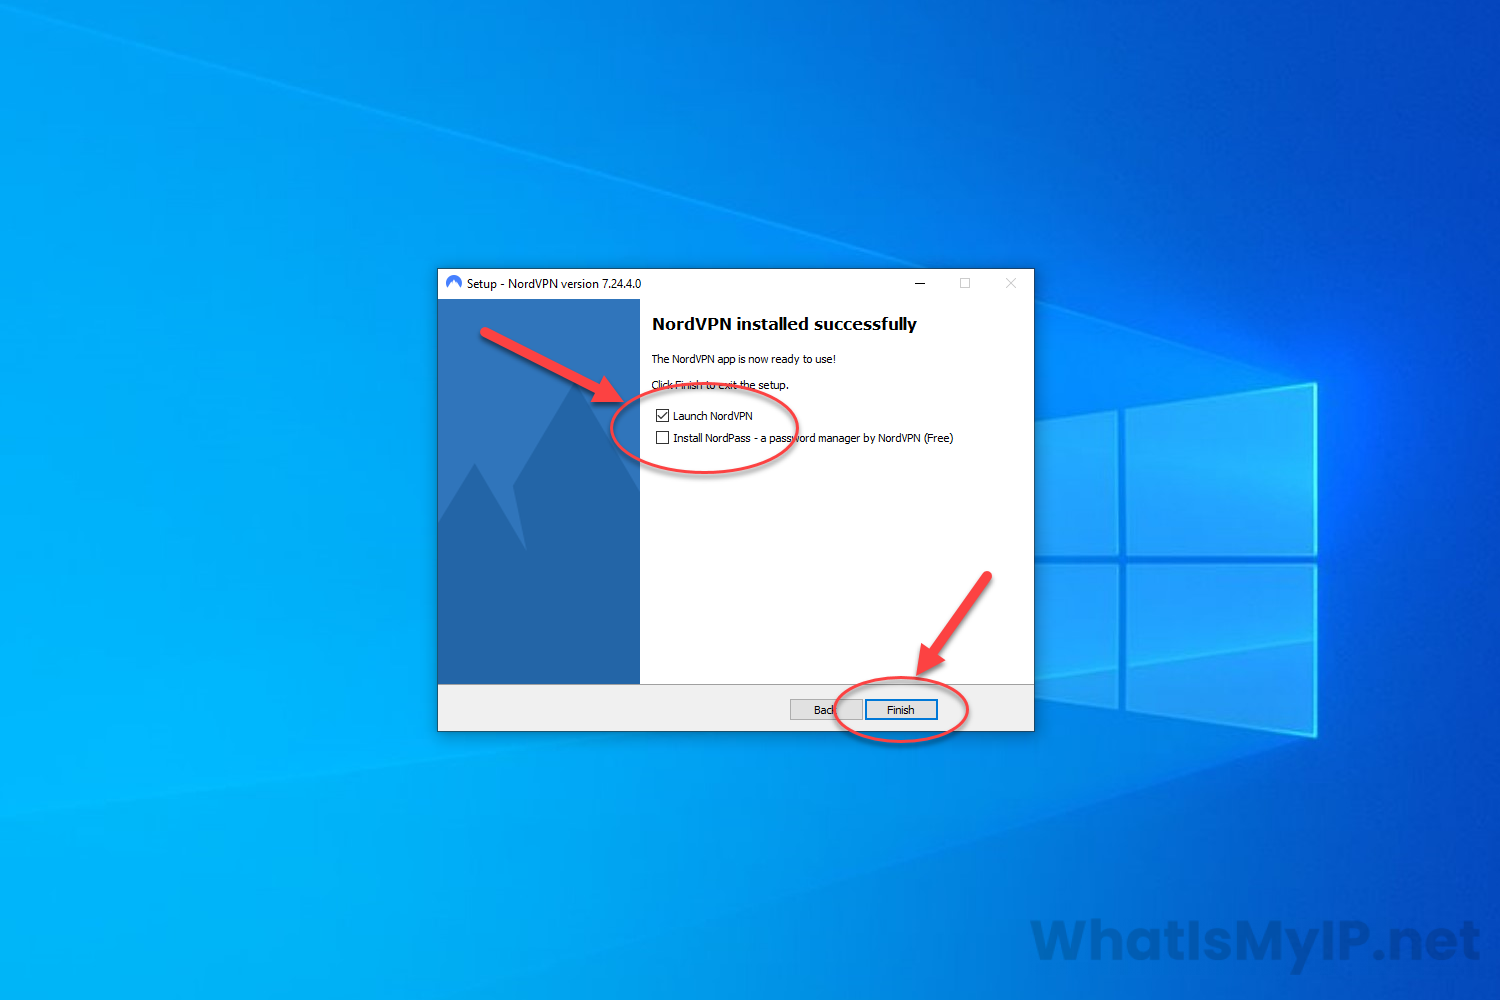
Installation Successful
Once the installation is complete, you will get a box like the screenshot below that will have 2 checkboxes on it. One is for launching NordVPN upon finishing, and the other is to install NordPass (a password manager by NordVPN) which you can uncheck if you like. Then click the “Finish” button at the bottom to close the installation.
Step 8
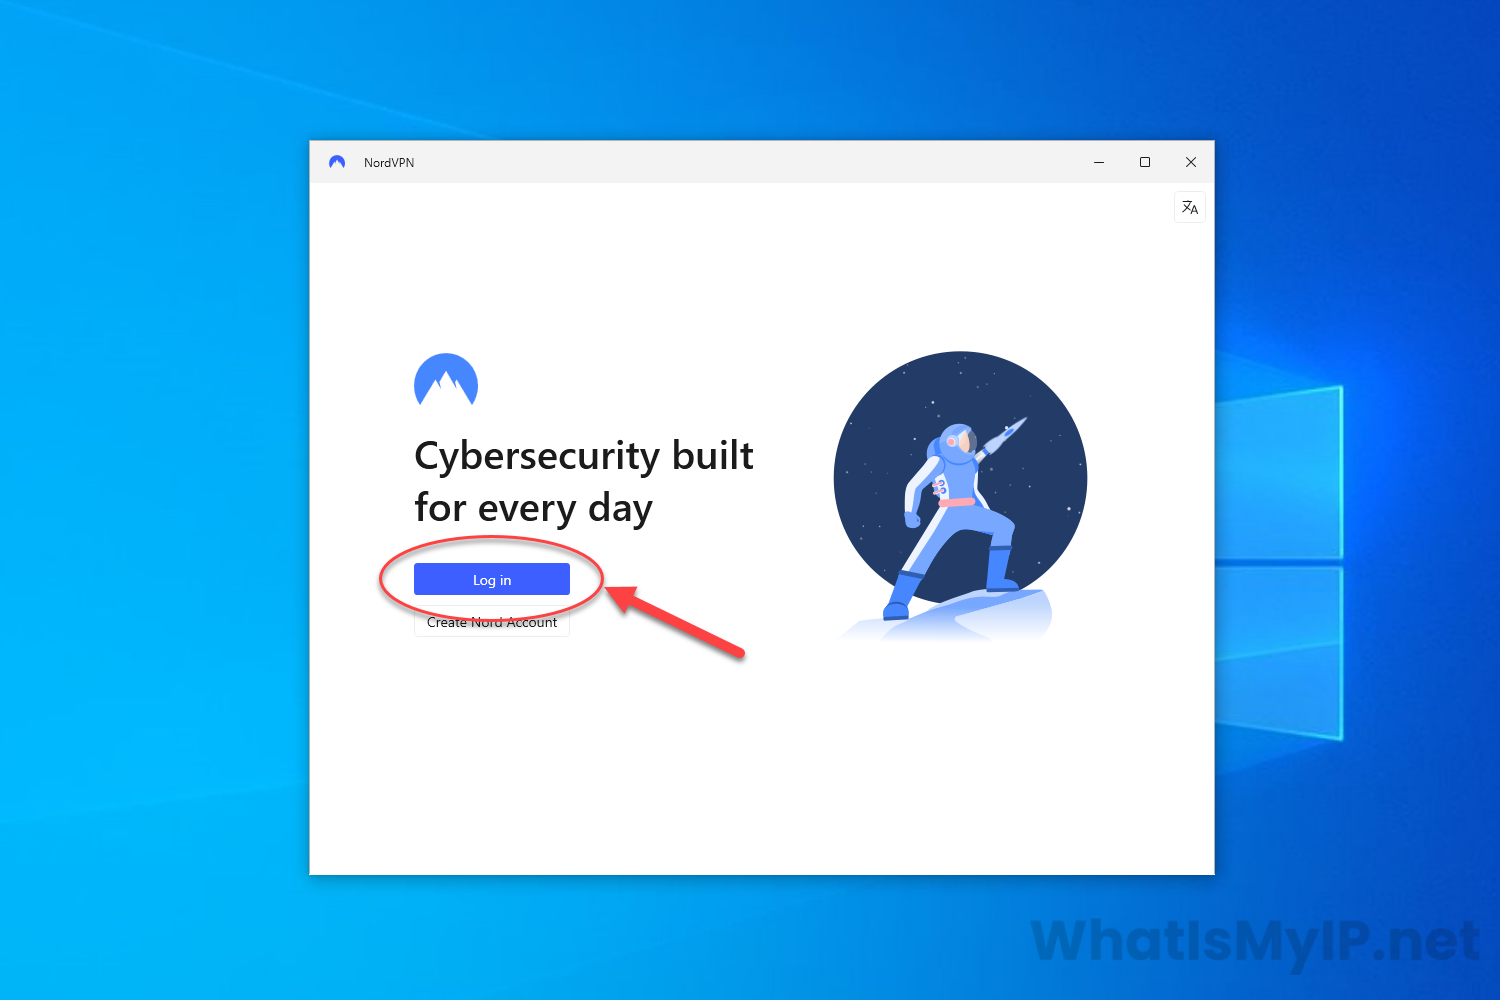
Login
Once the installation is compete, you will be presented with a window to either Log in or Create Nord Account. Since we already have an account we will click the “Log in” button to continue.
Step 9
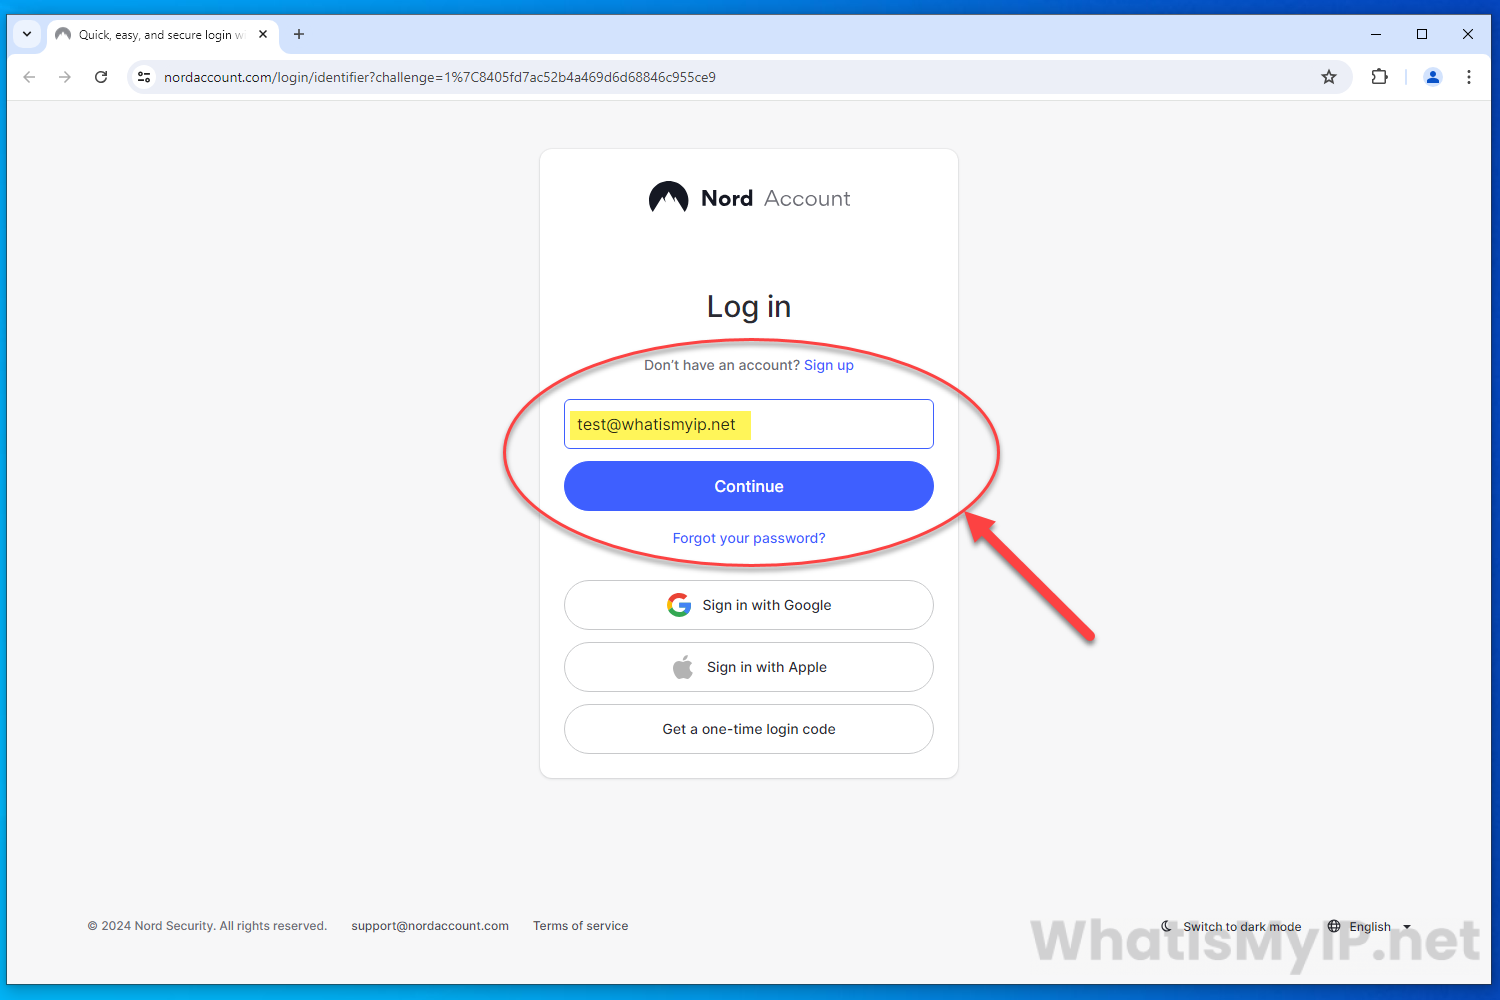
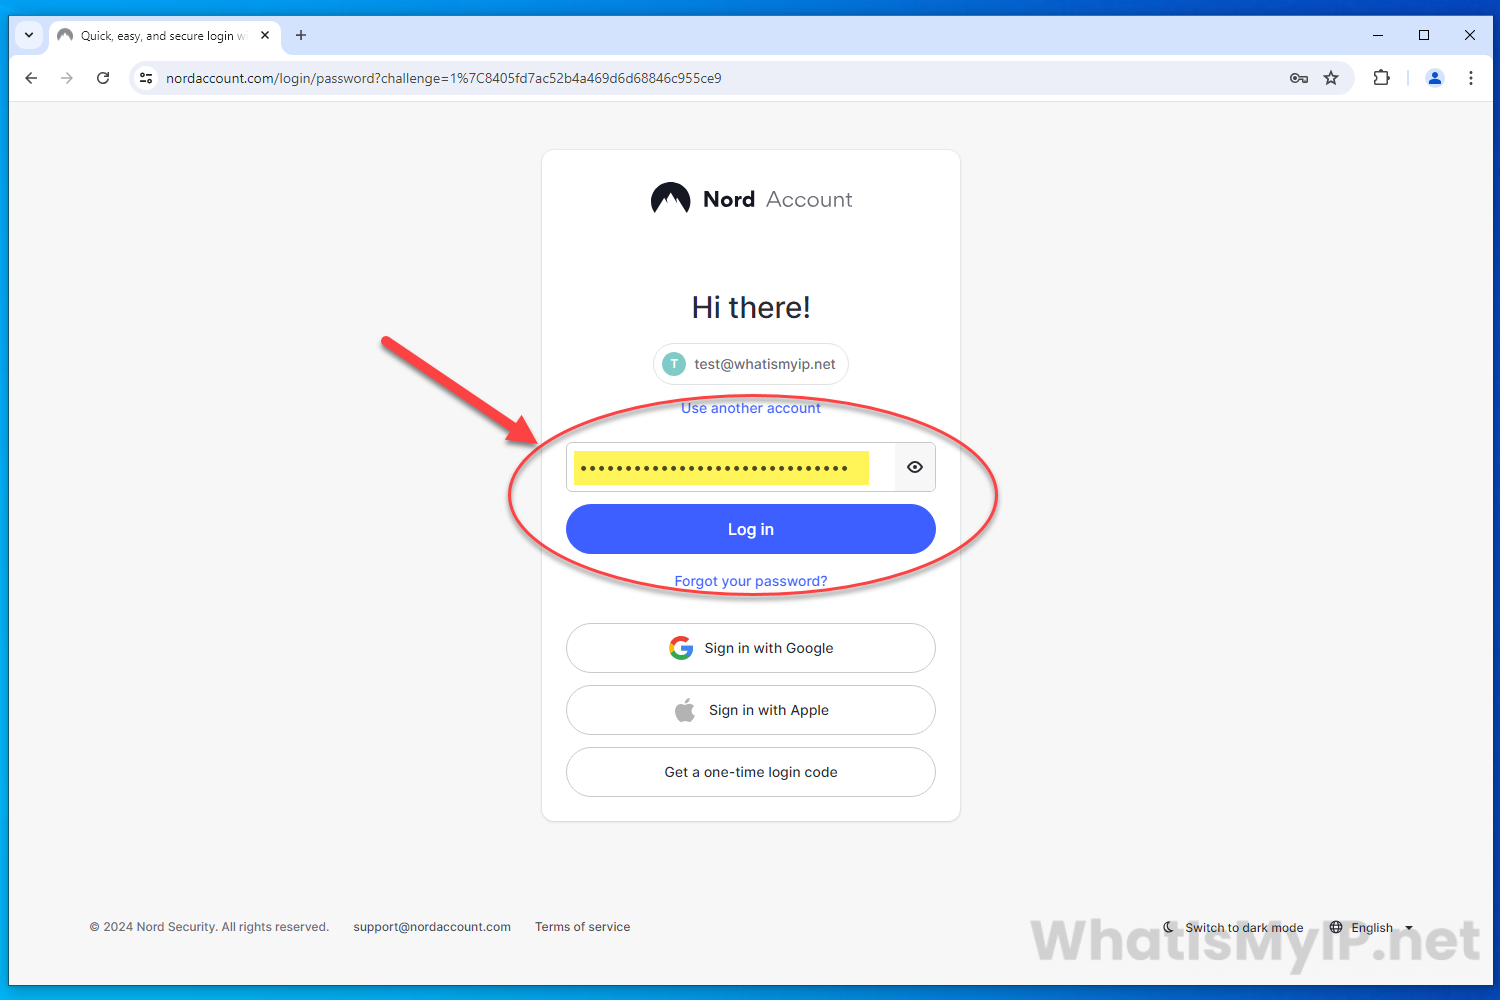
Login to Nord
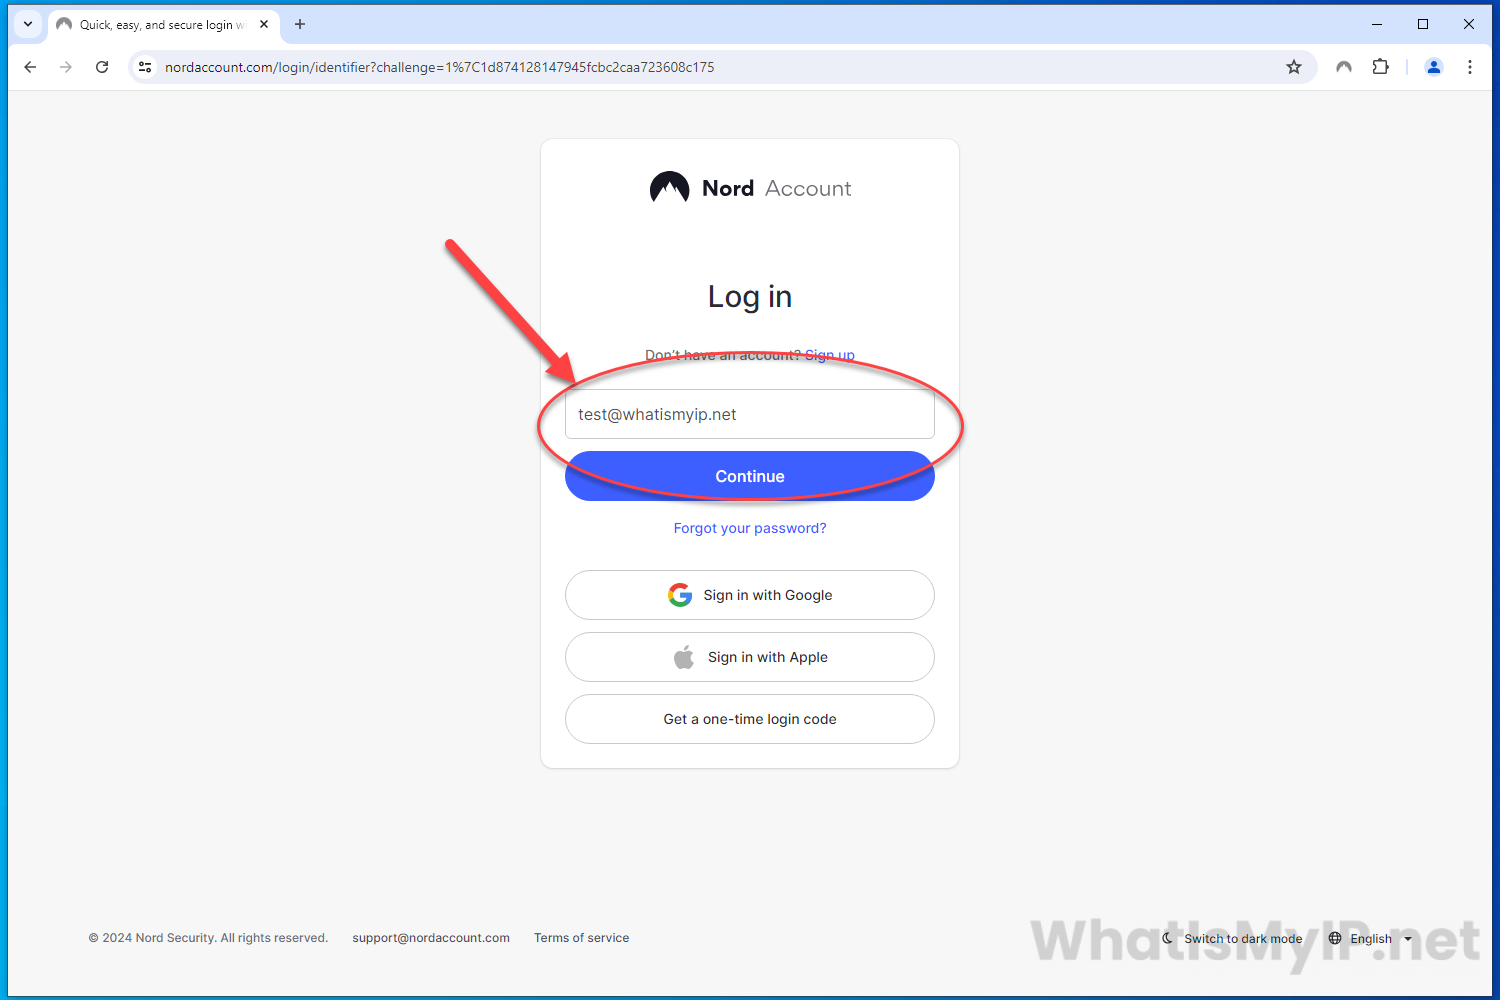
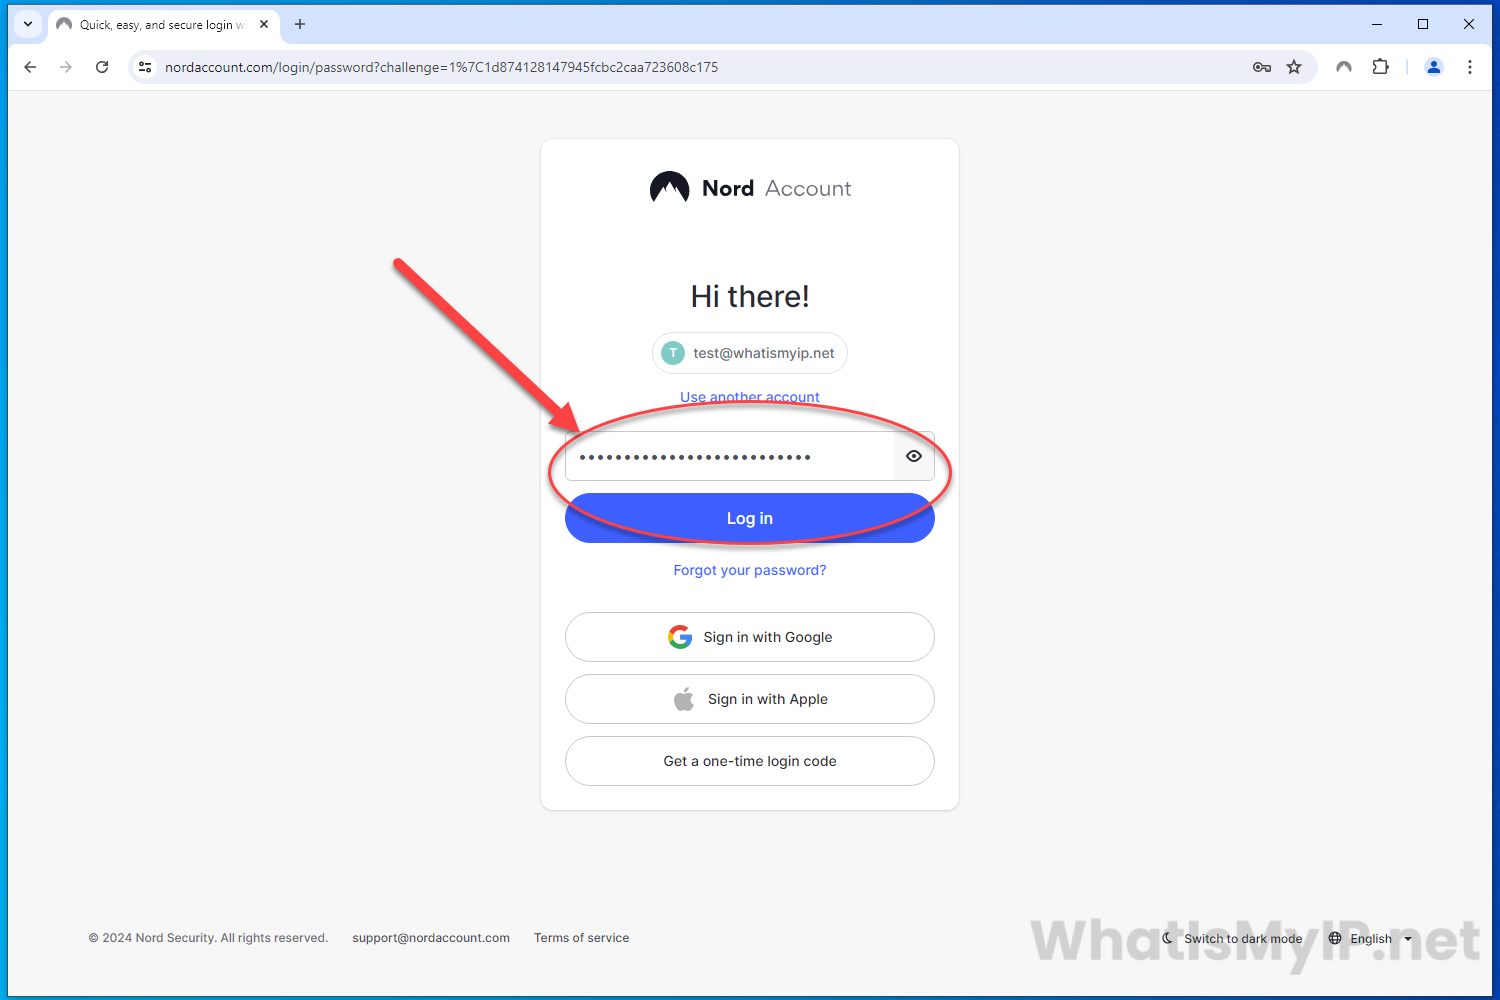
When you click the “Log in” button, a new browser will open in your default browser. It will redirect to the Nord Account login page where it will ask you for your username/email address and password. Once you have filled in your Username, click the “Continue” button, and on the next page fill in your password and hit the “Log in” button.
Step 10
Open App
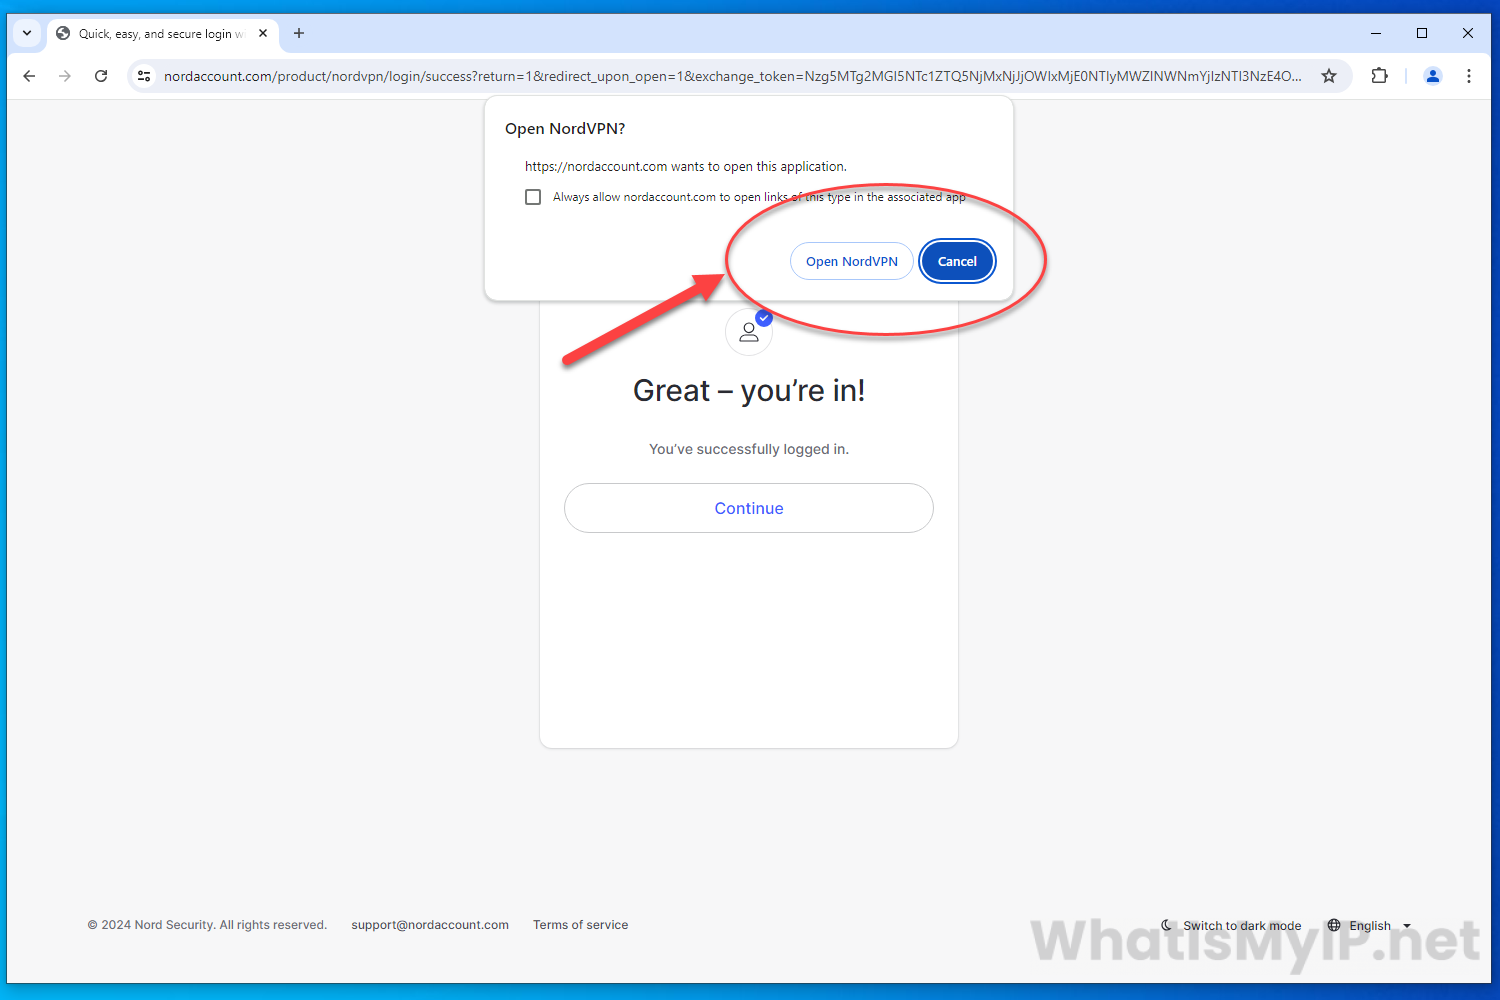
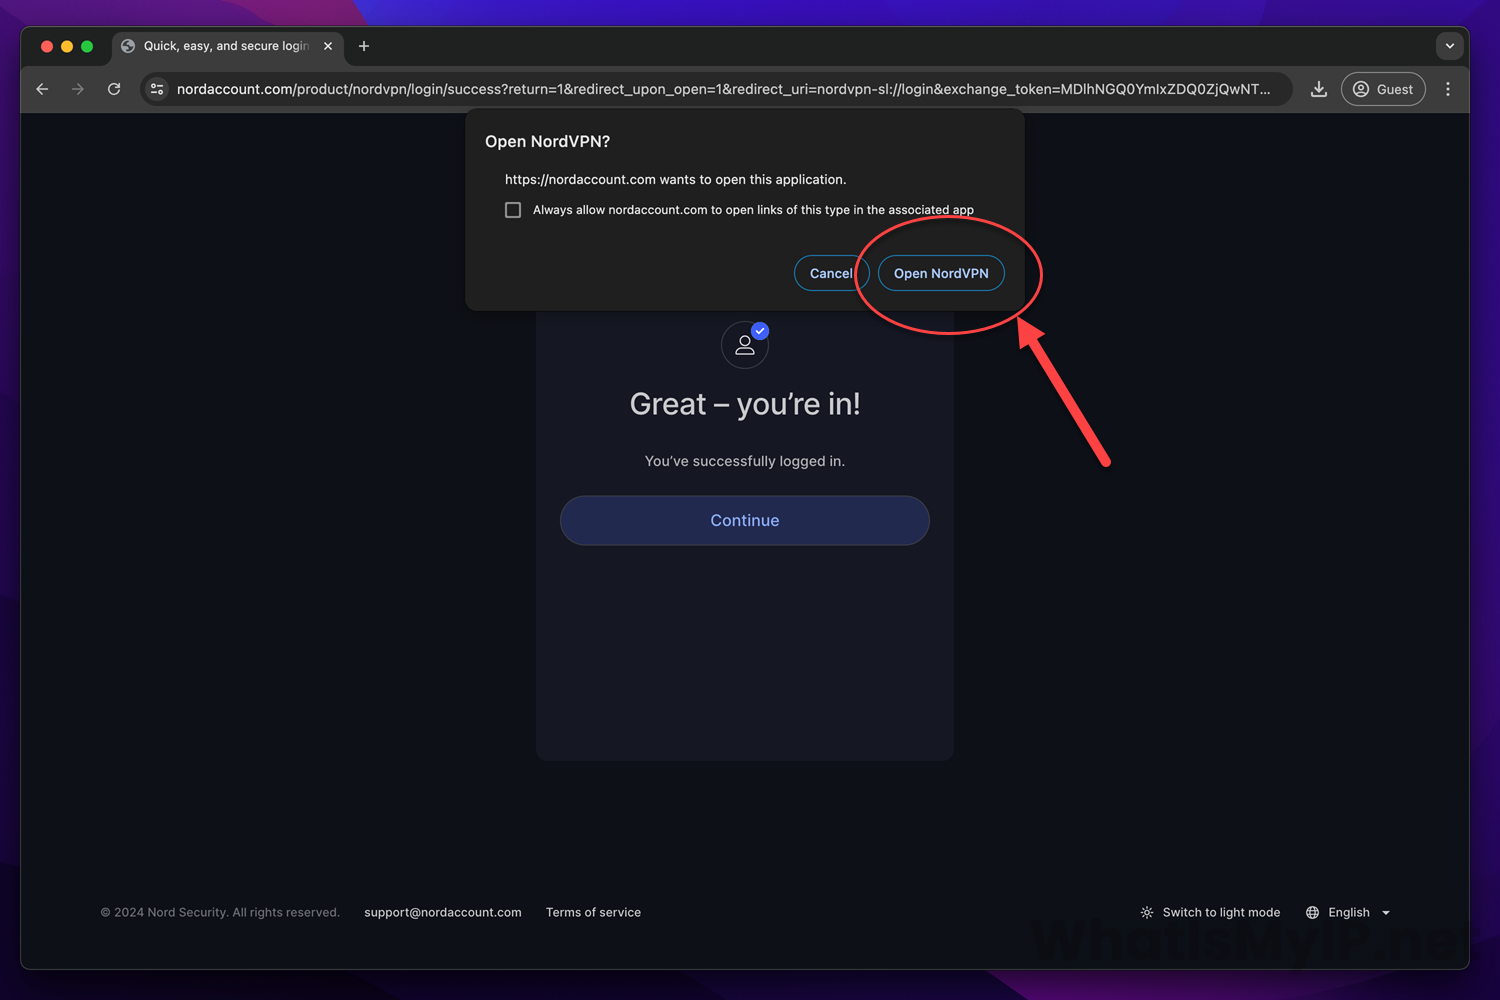
Once you have successfully logged in, you will receive a popup window in your browser asking you to “Open NordVPN” or Cancel. Click on the Open NordVPN button and you will be redirected back to the Nord Windows App.
Step 11
Setup NordVPN
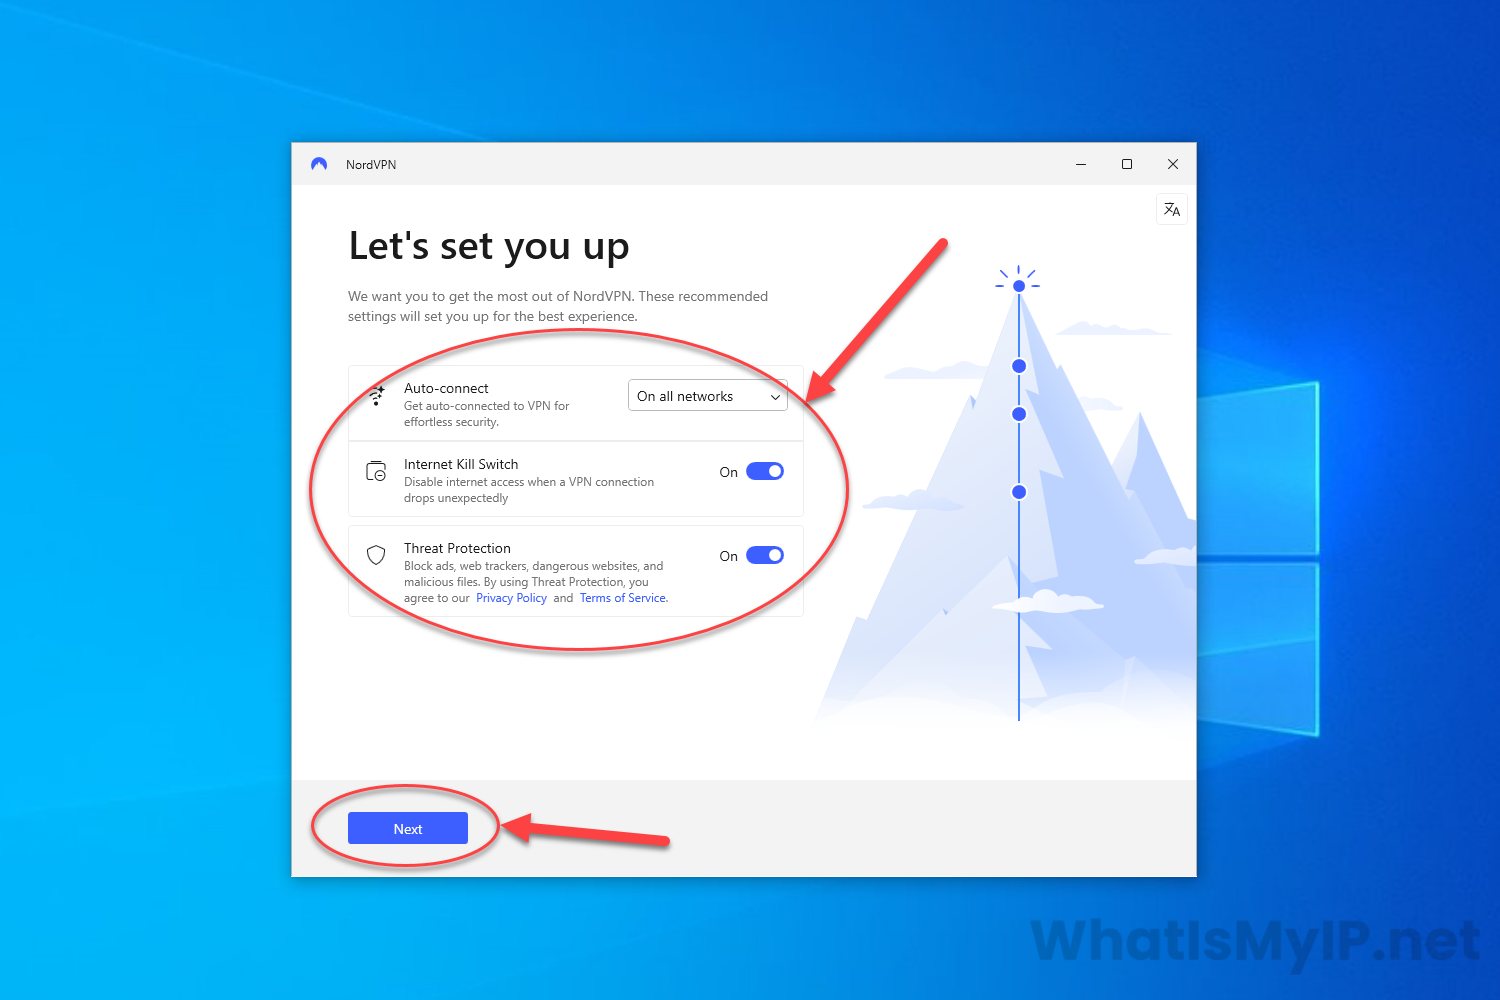
At this point we will be setting up some default settings for the NordVPN App. First we will get a screen with some recommended settings for Auto-connect, Internet Kill Switch, and Threat Protection. I would recommend setting the Auto-connect to “On all networks” and turning ON both Internet Kill Switch and Threat Protection. Once those are set, click the “Next” button to continue.
Step 12
Install Add-ons
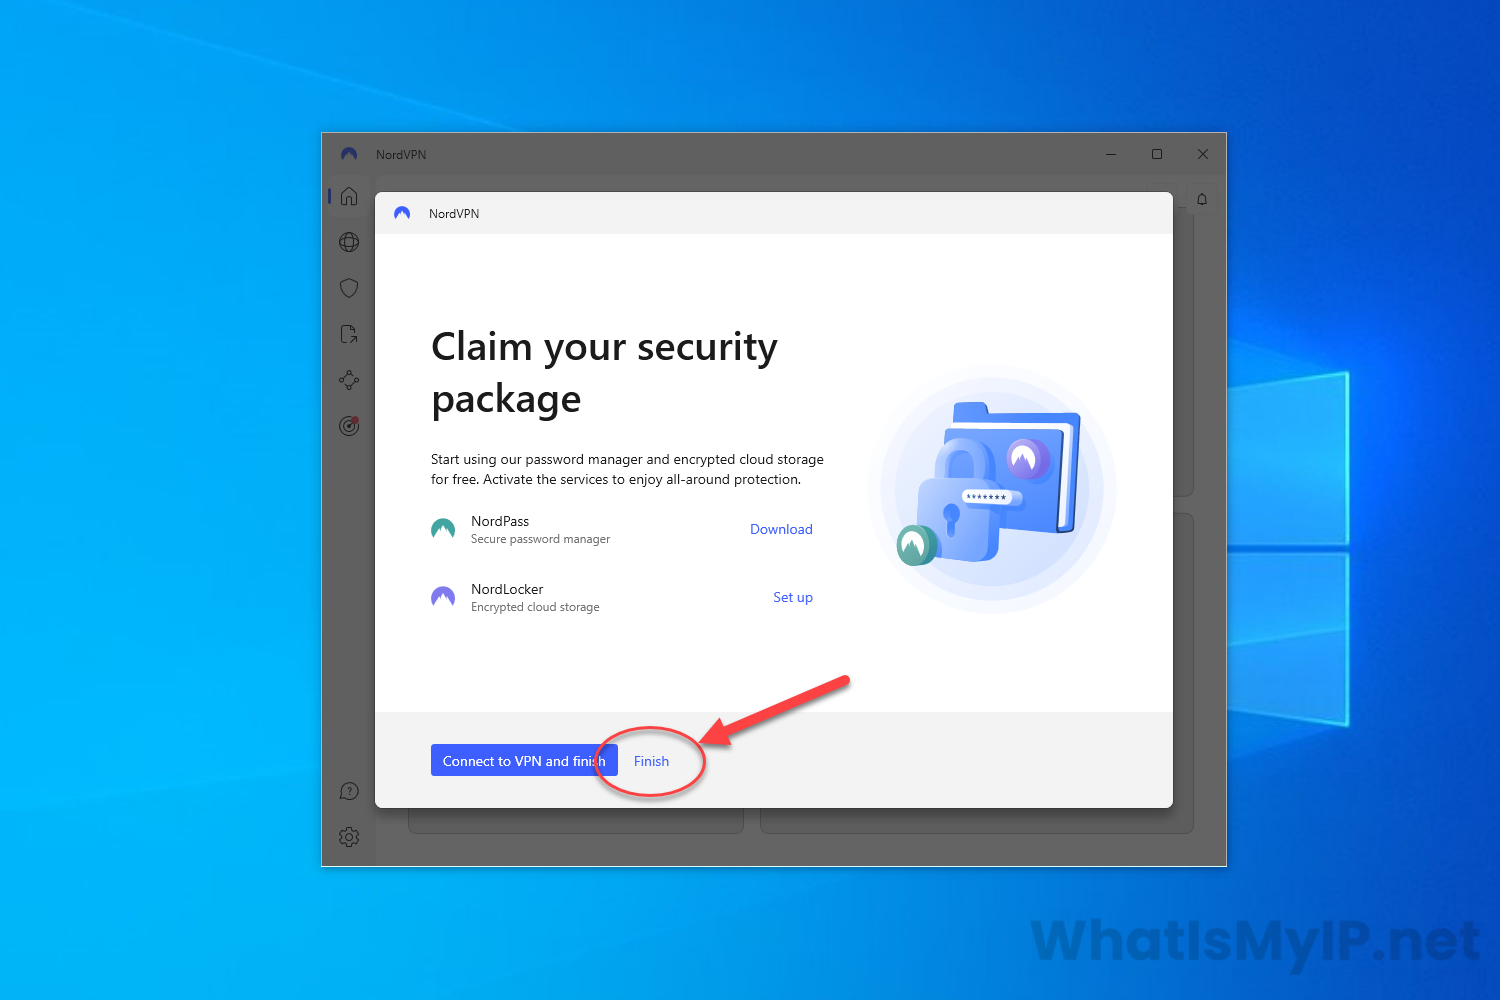
On this screen you will be ask if you would also like to install two other apps by Nord called NordPass and NordLocker. Info about these can be found on our other pages. At this point we are going to just like the “Finish” button at the bottom to end the install without installing any of these add-ons.
Step 13
Running the NordVPN App
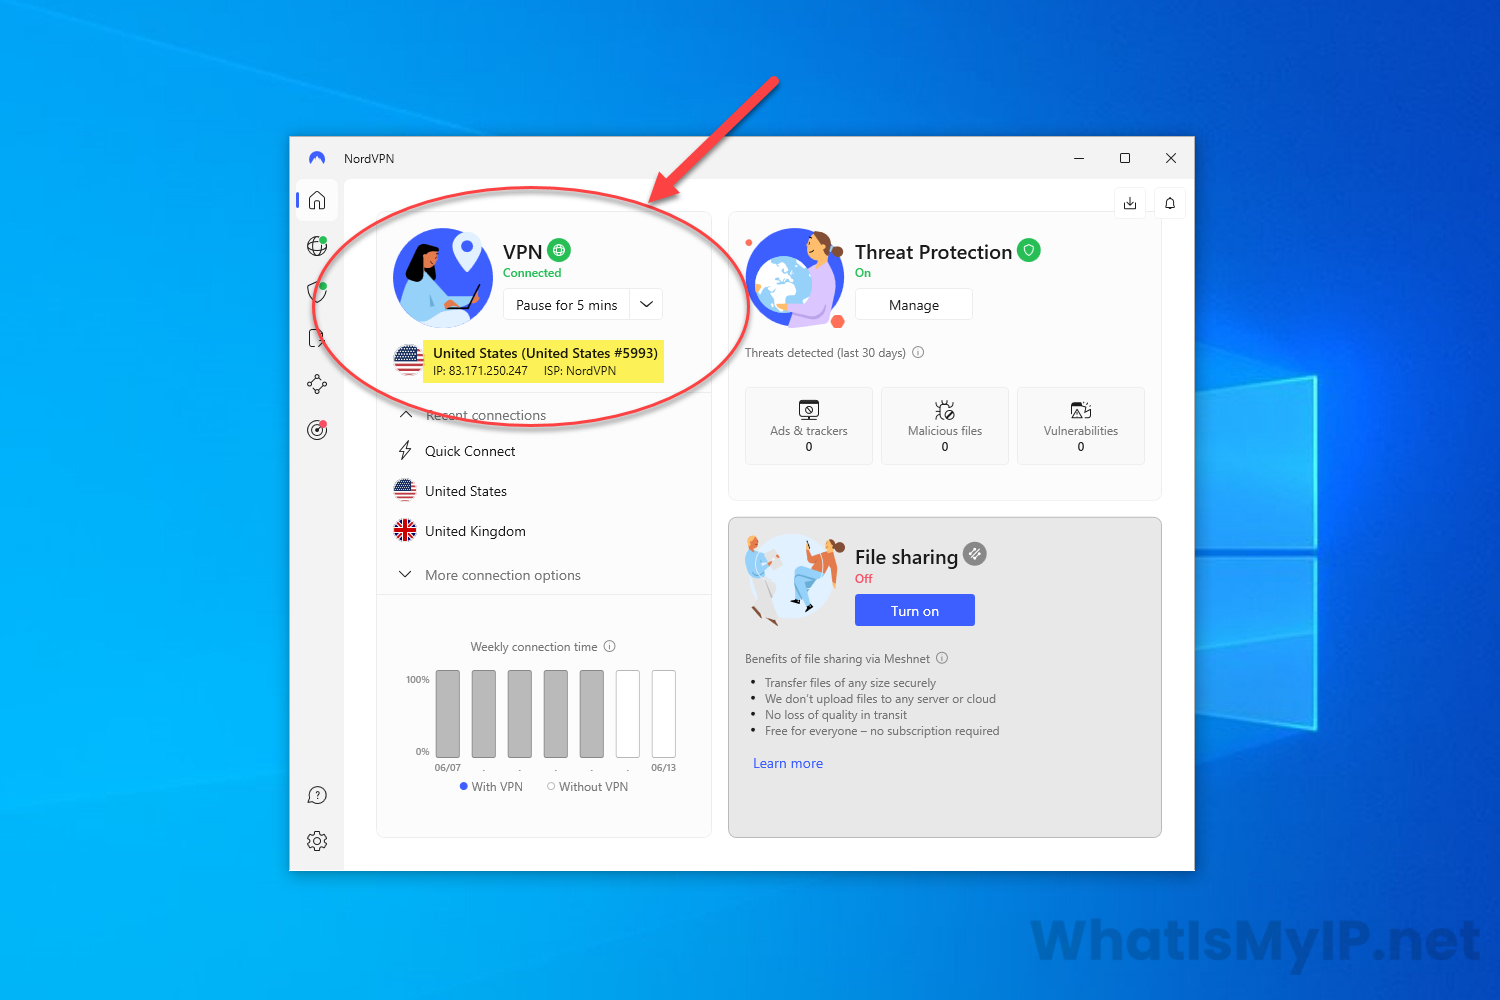
Now that we have finished with the install and the basic configuration of the NordVPN windows app, we will a screen like this where Nord will auto-connect to the best vpn server for you (since we had enabled the Auto-connect during setup). You will see at the top left your connected VPN server which should look something like our screenshot.
Step 14
Connecting to VPN Server
If you would like to connect to a different vpn server, here are the steps you need to take.
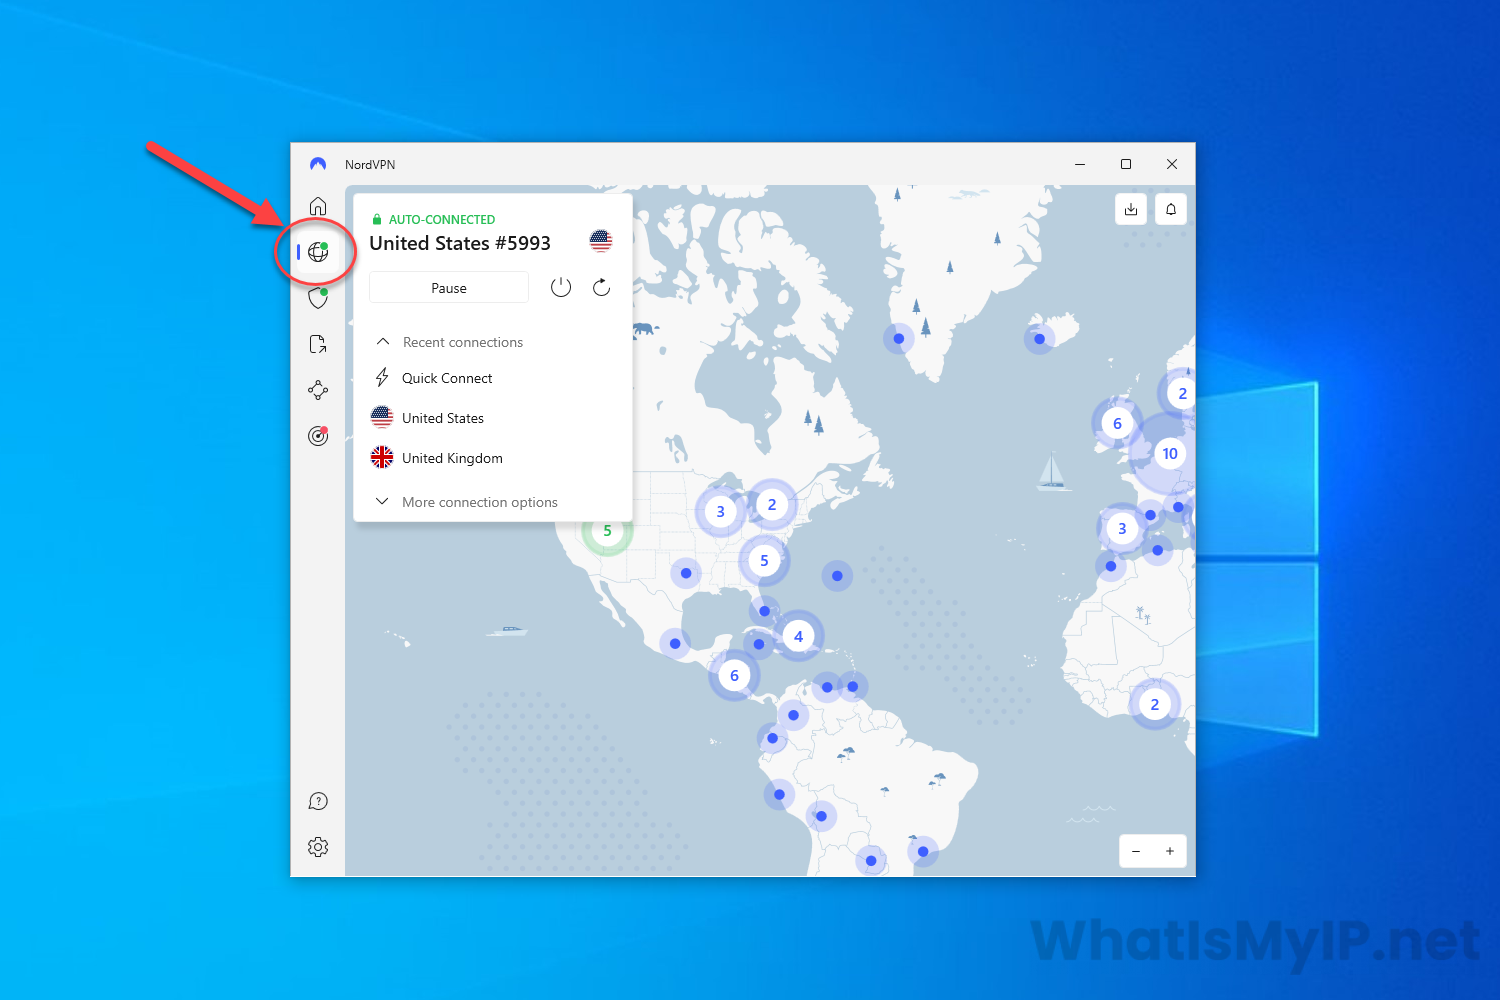
Step 14.1
Click on the icon that looks like a Globe on the left side of the app, if you are connected to a vpn server, it will have a green dot on it as well.
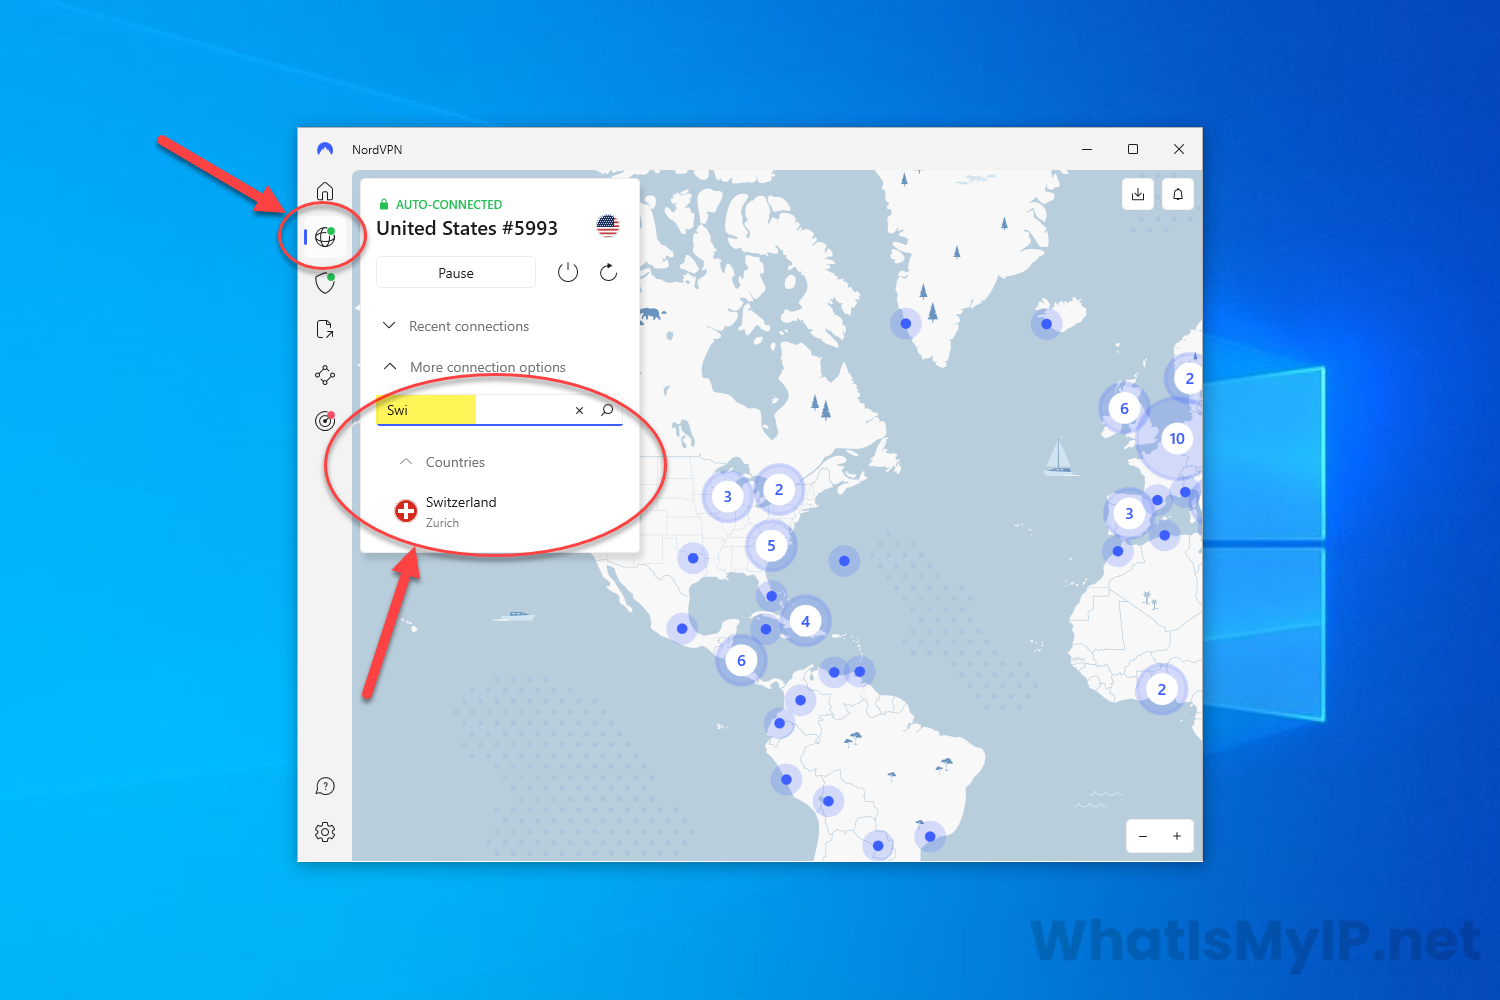
Step 14.2
Click on the “More connection options” link and you will be given a search box. In this example I am connecting to a VPN server in Switzerland.
Step 14.3
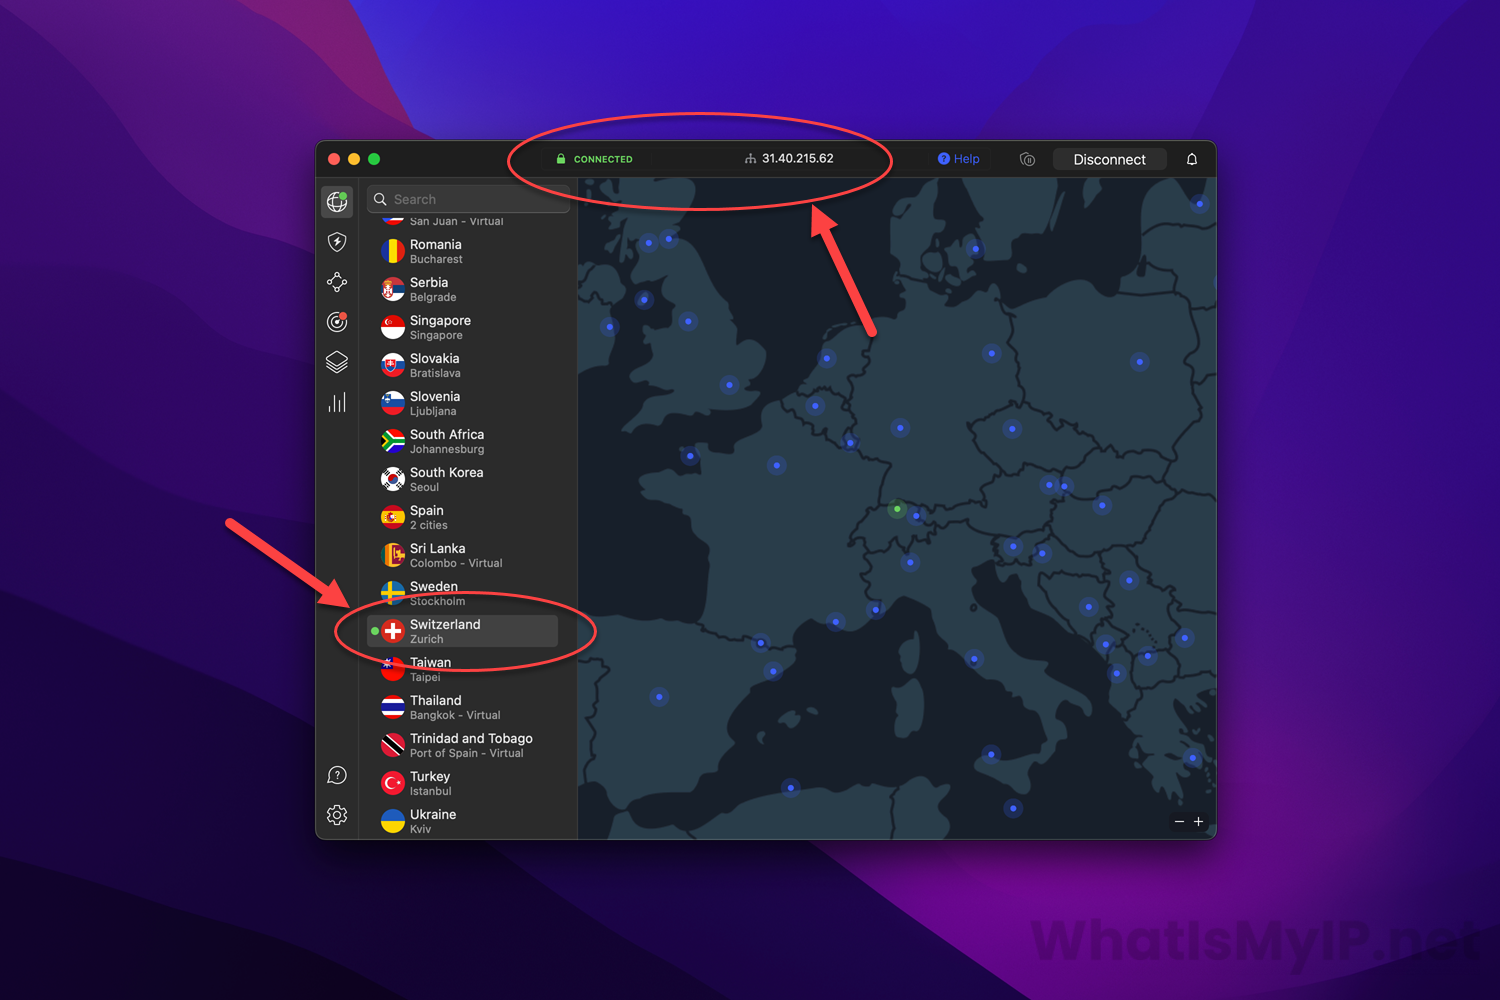
Start by typing in the name of the location you would like to connect to, mine I started typing “Swi” and Switzerland, Zurich server came up on the bottom list for it. You then just need to click on the name of the country and NordVPN will automatically find the best vpn server within their pool of servers in that location and connect to it.
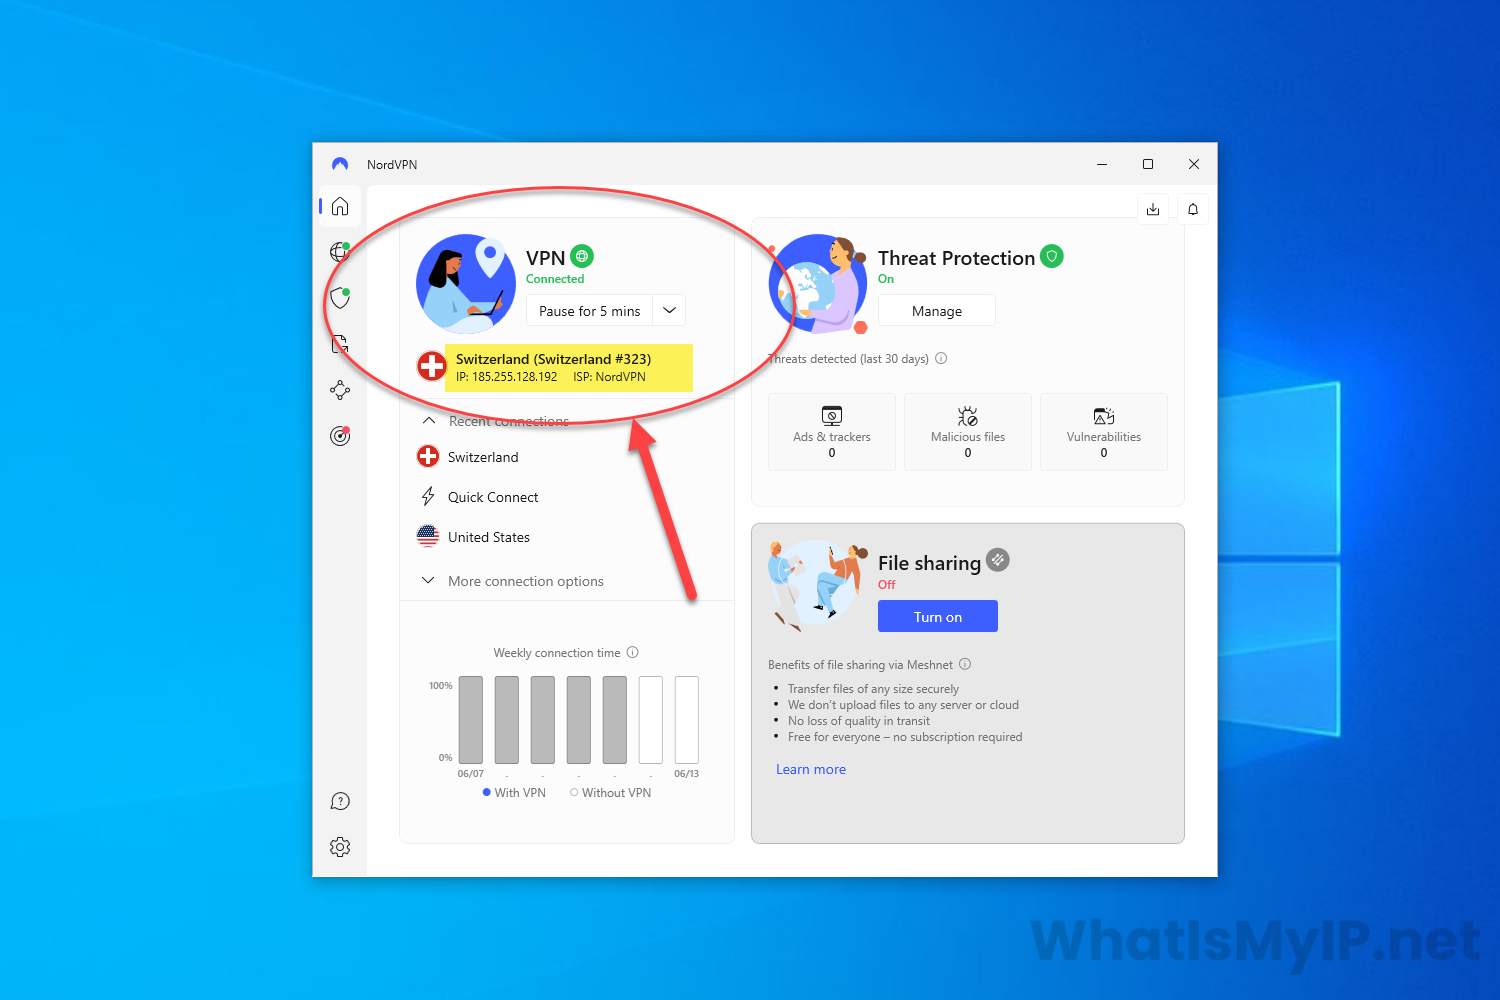
Step 14.4
Click back over to the Home icon on the left of the app and you will see in the upper left hand your connection details. As you can see from mine, I am connected to a NordVPN Server in Switzerland #323 and it will give you the ip address the vpn server assigns you.
Step 15
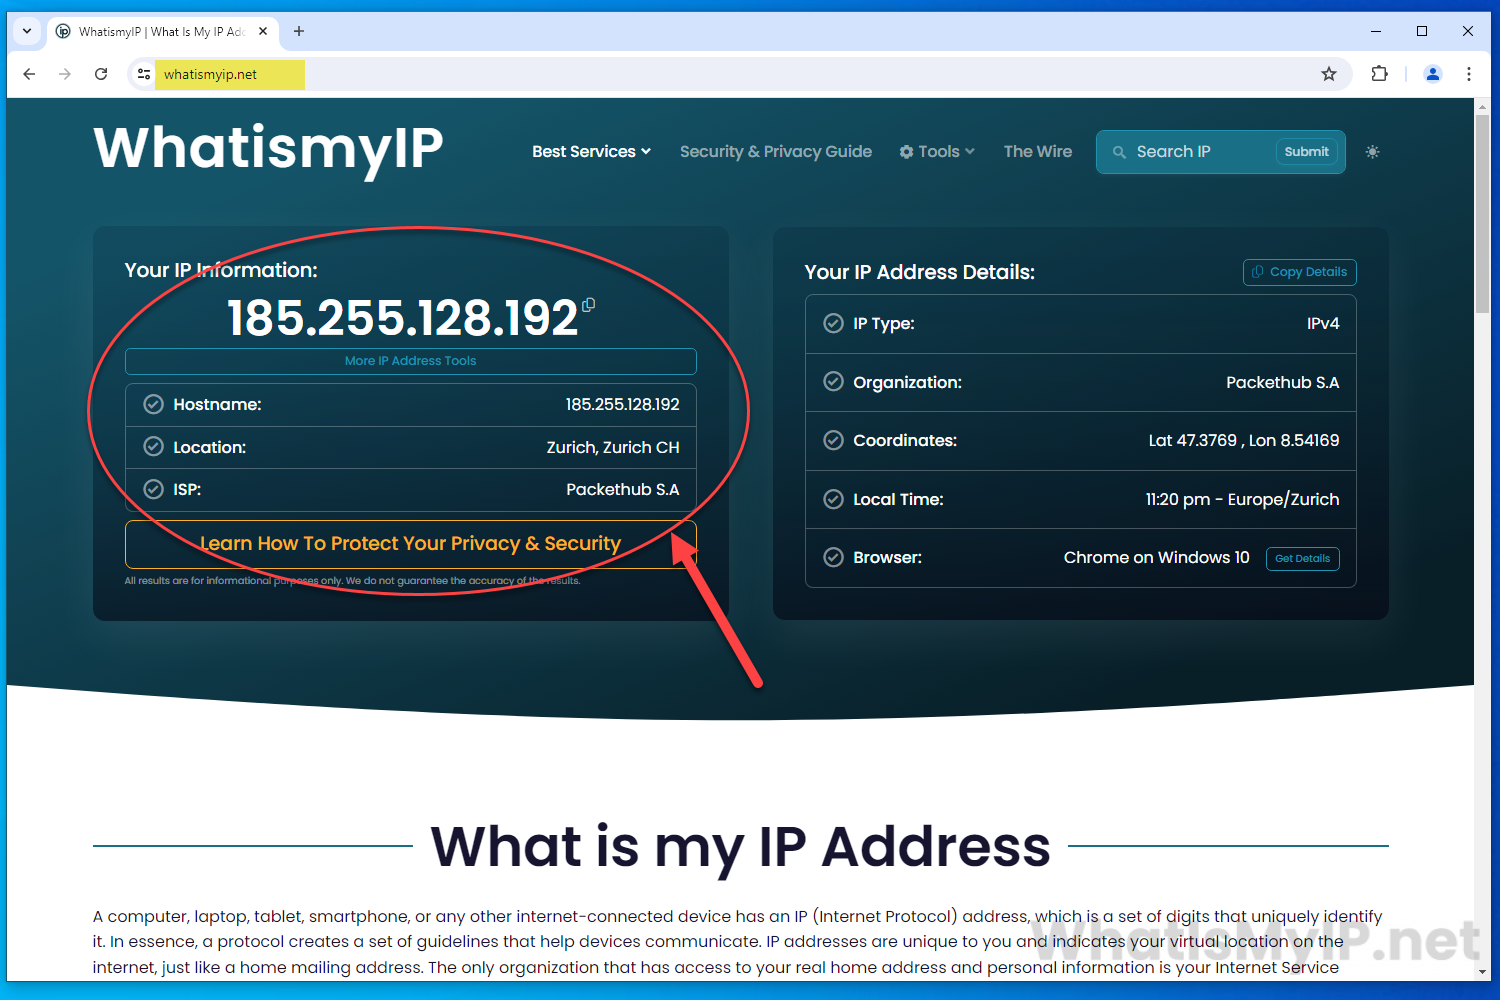
Test VPN Connection
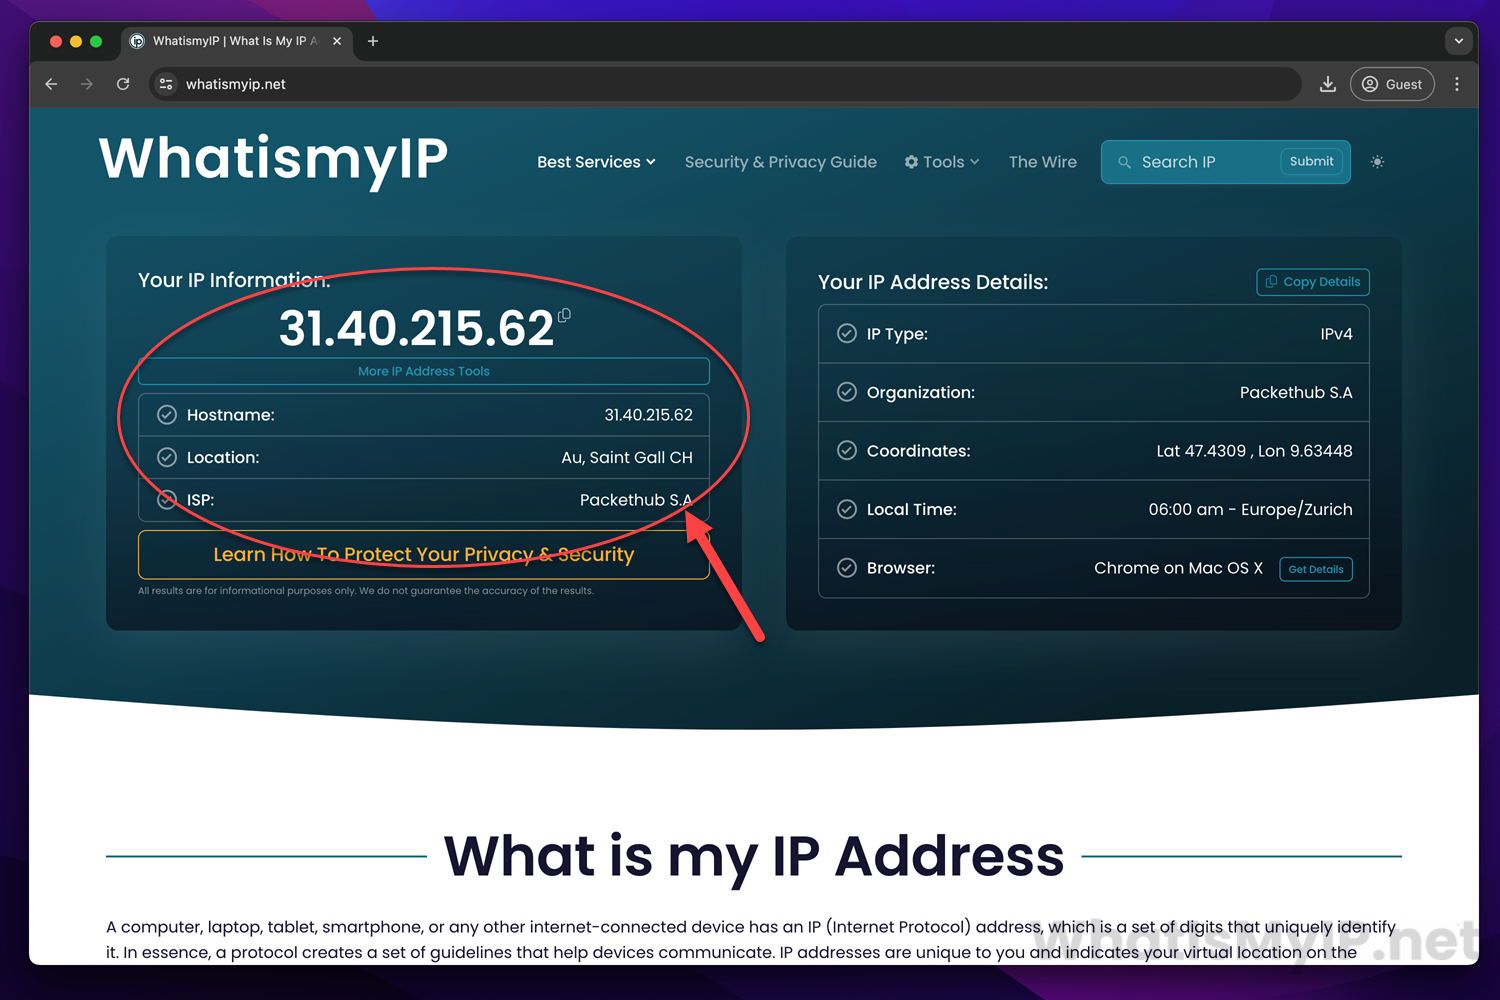
Once you are connected to your desired VPN Server, you can head over to our main website to see your ip address and detailed information. As you can see from my connection, it is showing the same ip address NordVPN app gave me when I connected to the Switzerland vpn server.
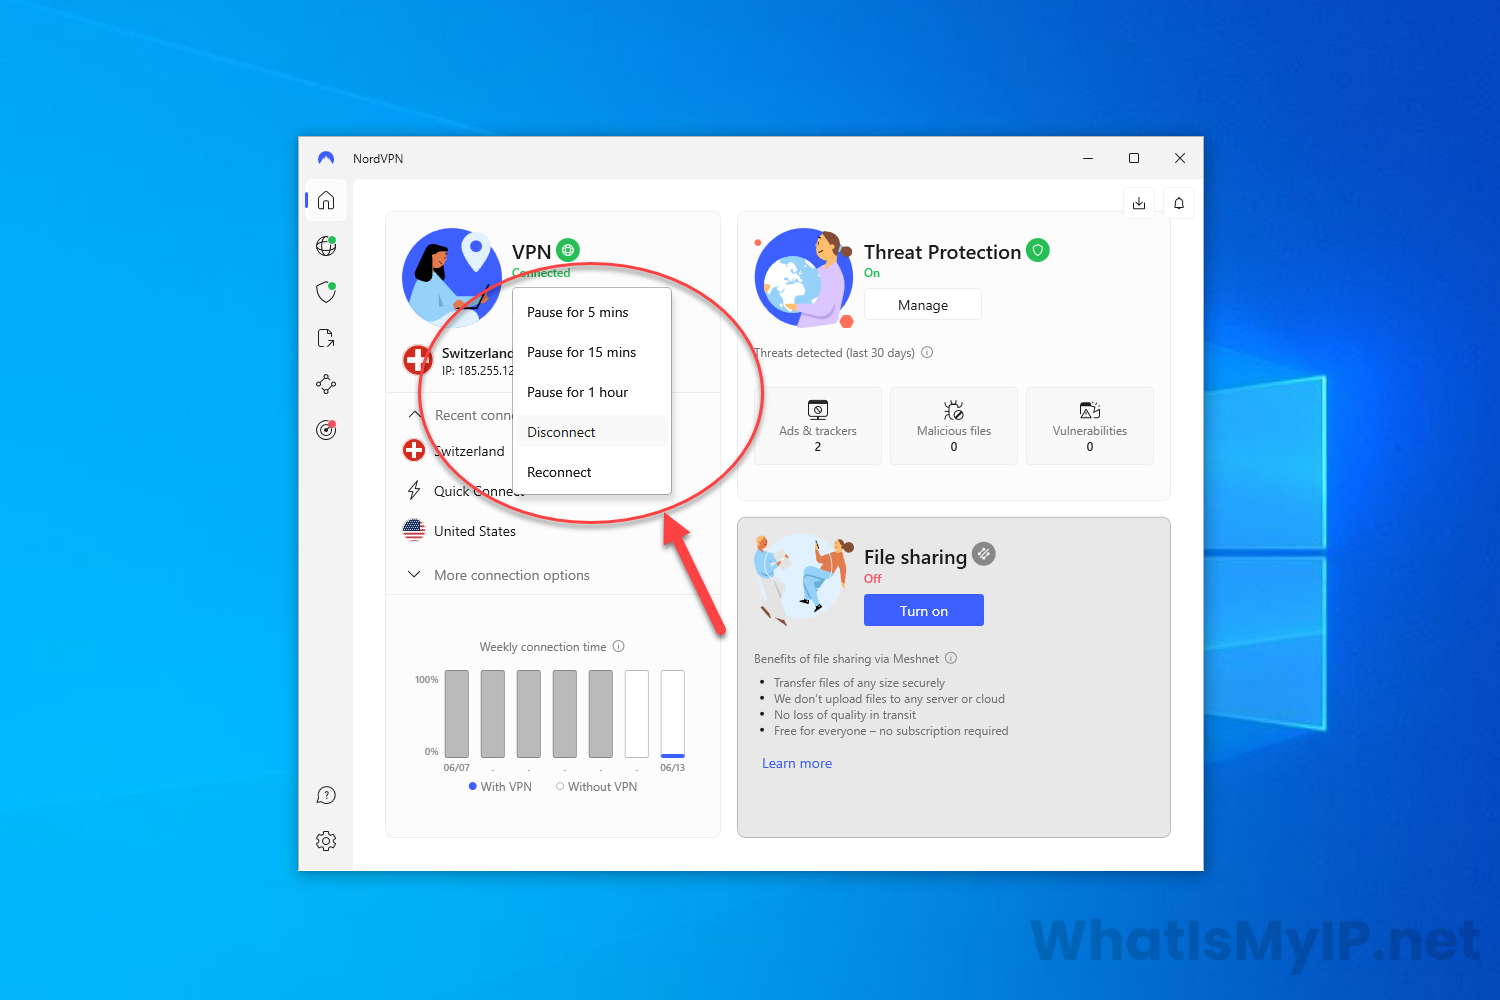
Step 16
Disconnect from the VPN Server
When you are ready to disconnect from the NordVPN server, just open the home dashboard of the app and click the little down arrow next to “Pause for 5 mins” and in the dropdown menu you will see the option for Disconnect.
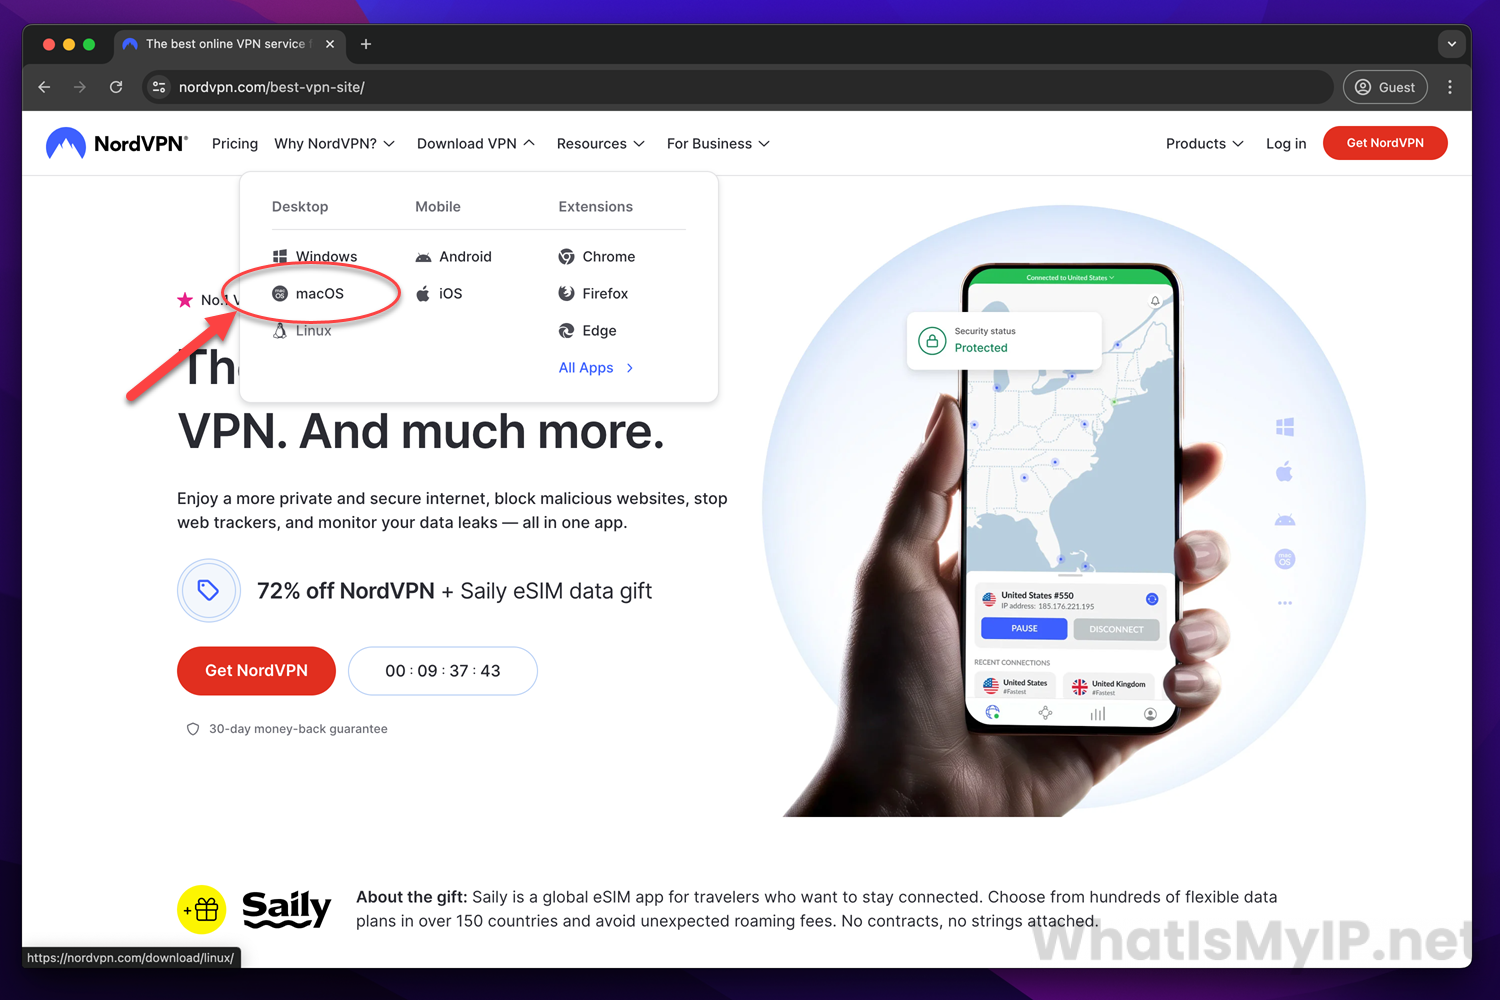
Step 1
Download the NordVPN MacOS App
Visit the NordVPN page and hover over the “Download VPN” link and select the “macOS” link under the “Desktop” section.
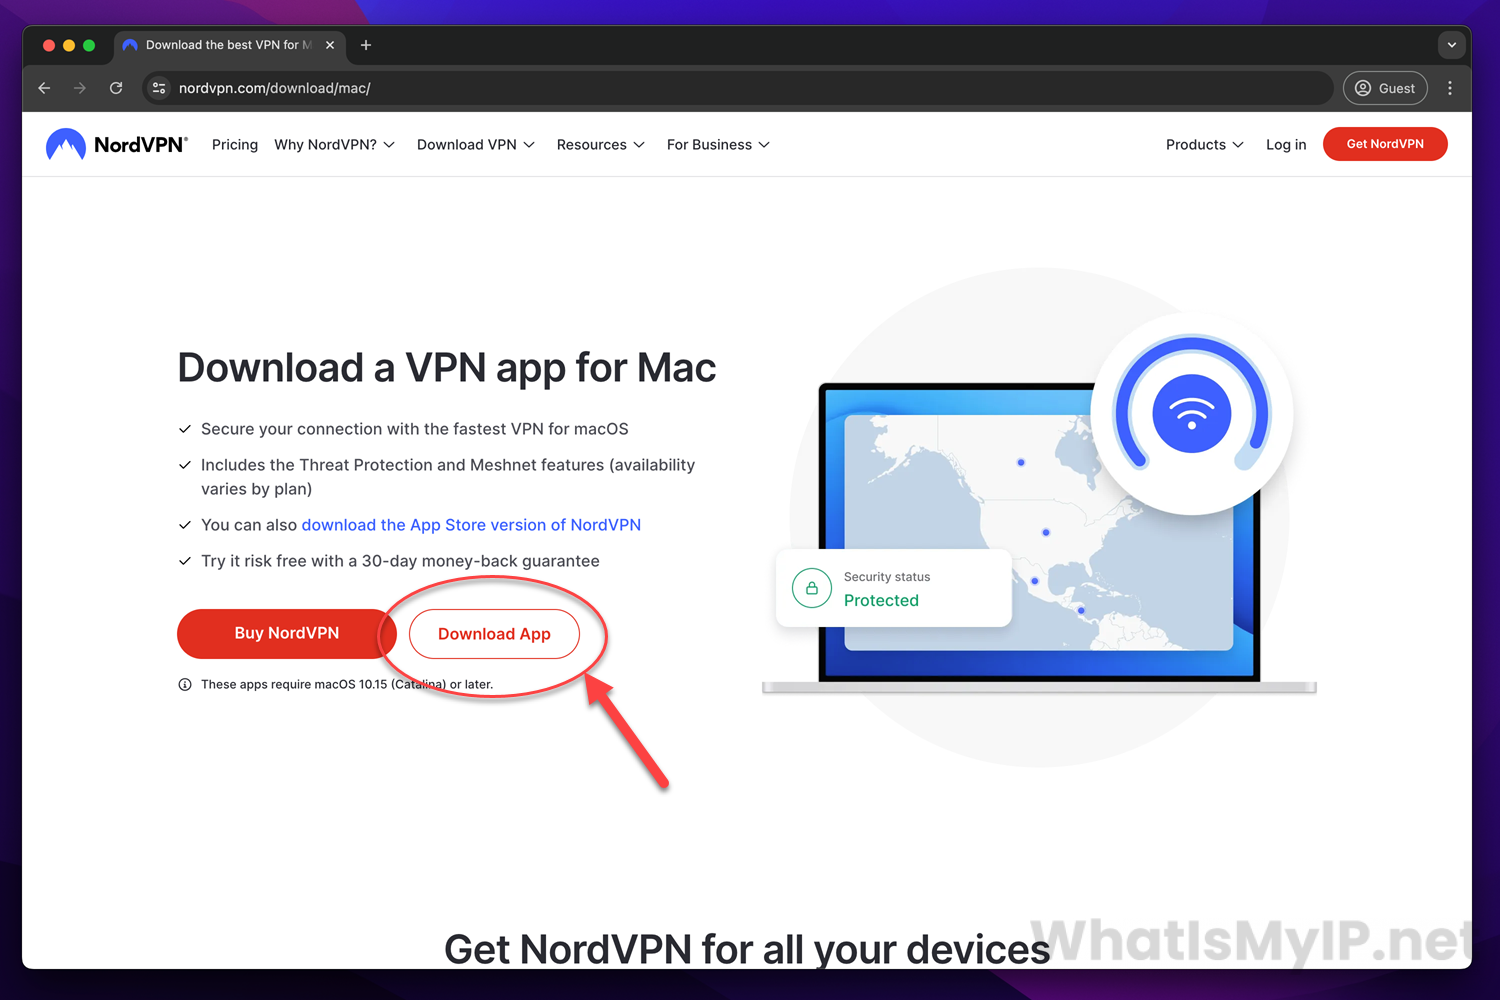
Step 2
Download MacOS App
Click on the “Download App” button to start the nord vpn client download.
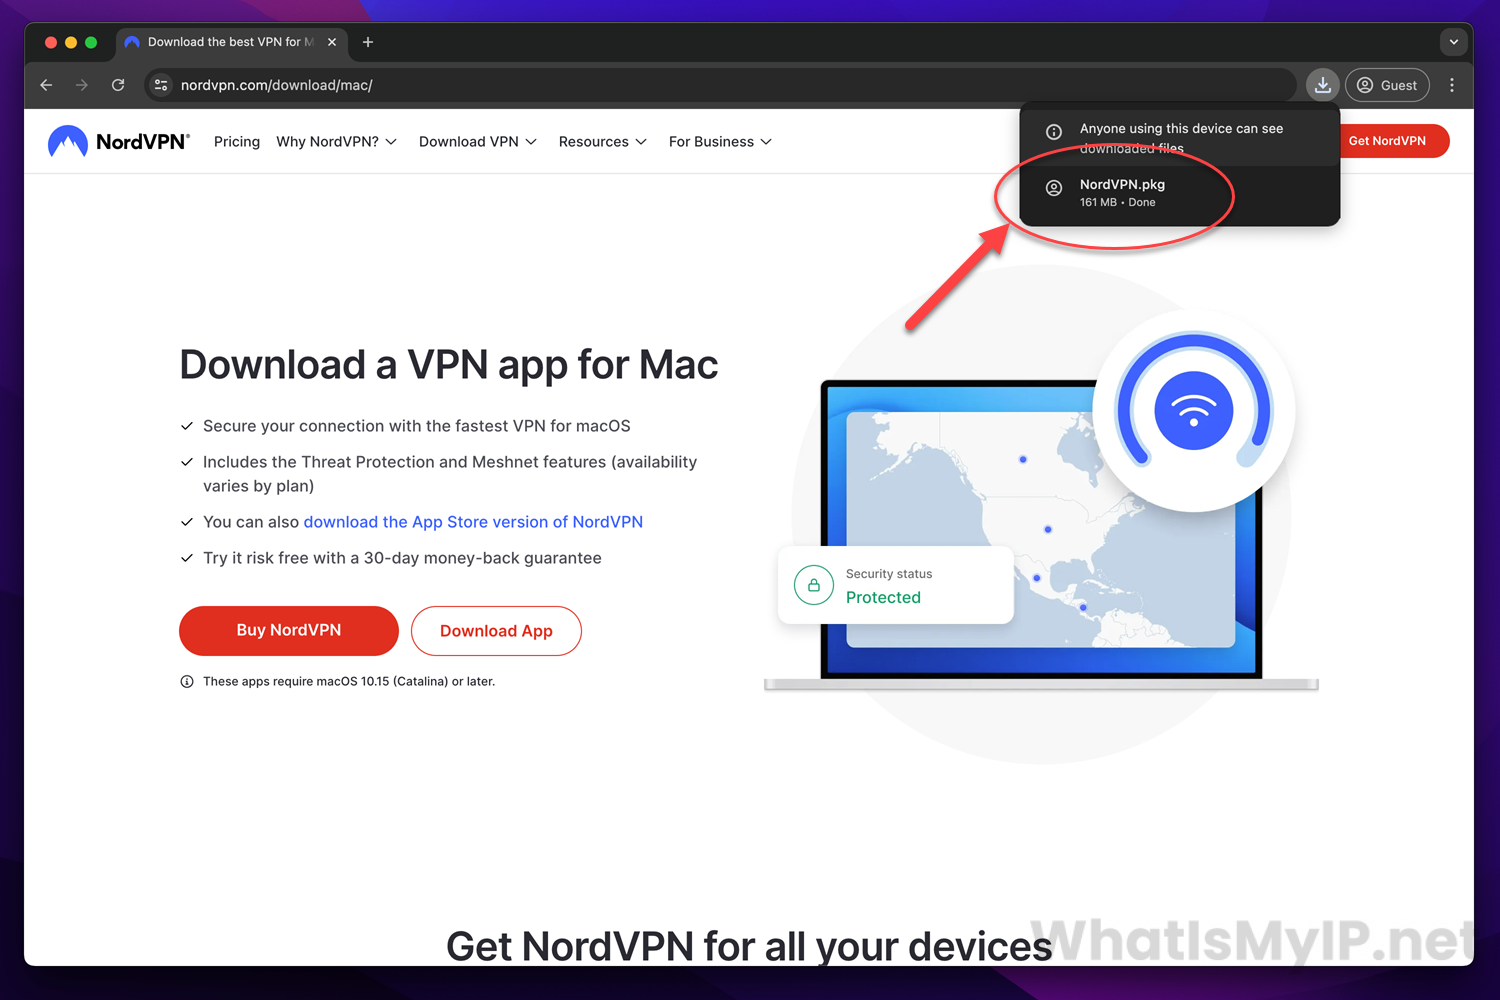
Step 3
Download Complete
Once the download has completed, you will get a popup message about the downloaded file called “NordVPN.pkg“. You can click on the filename to start the installation process for the vpn client.
Step 4
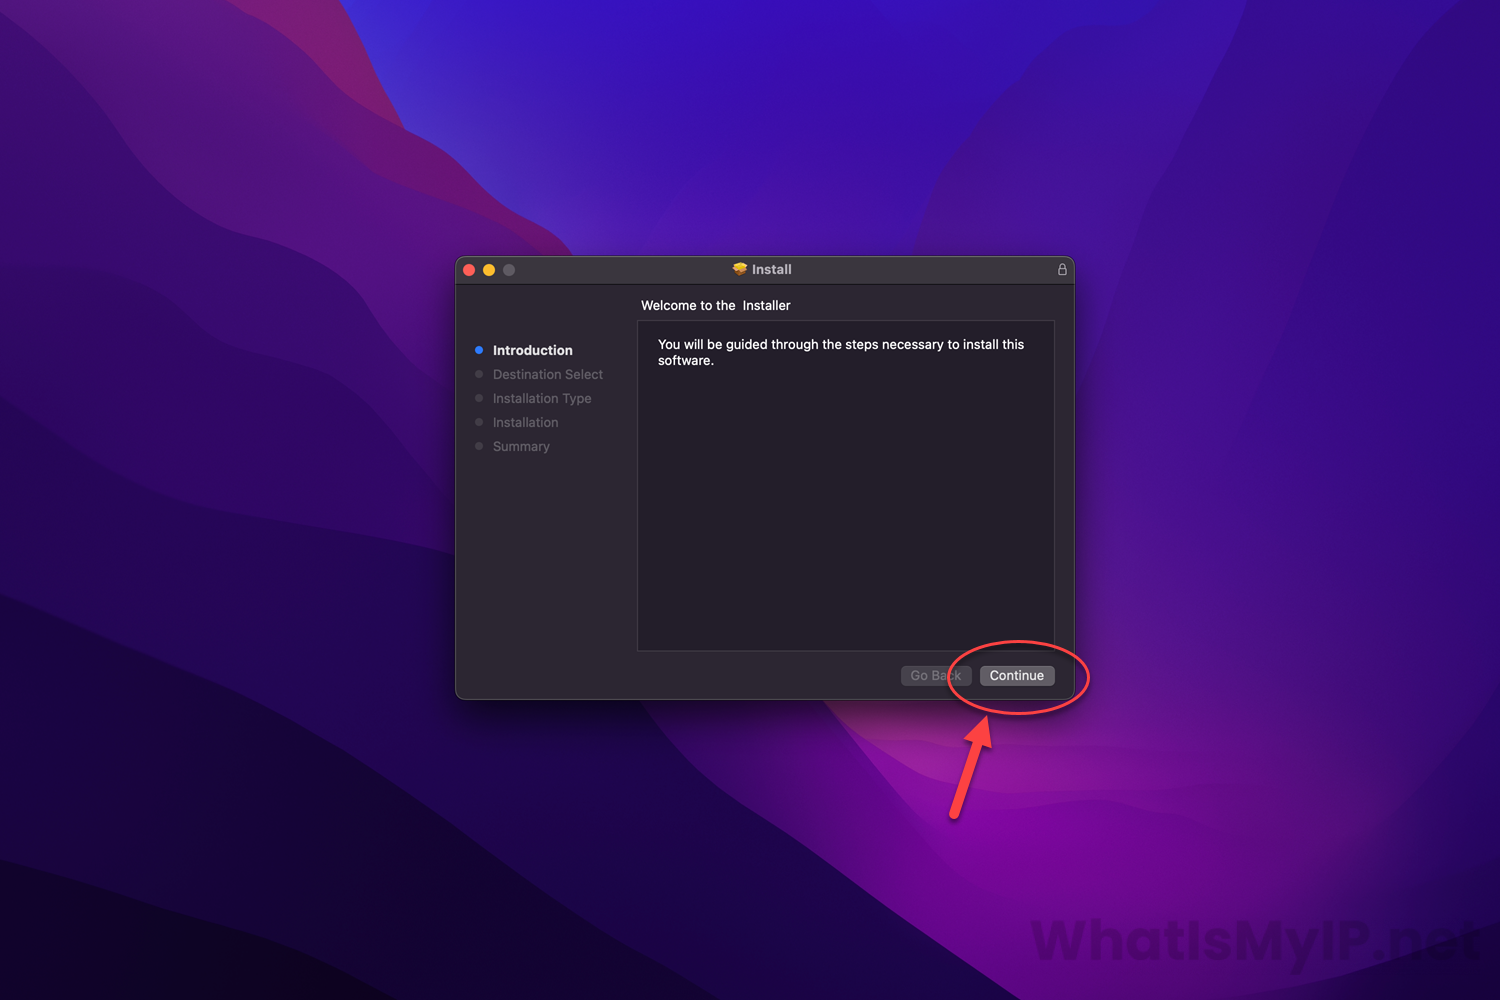
Installing the NordVPN Macos App
Once the installation starts, you will get a message that the installer will guide you through the steps to install the NordVPN MacOS client software. Click the “Continue” button to start the installation process.
Step 5
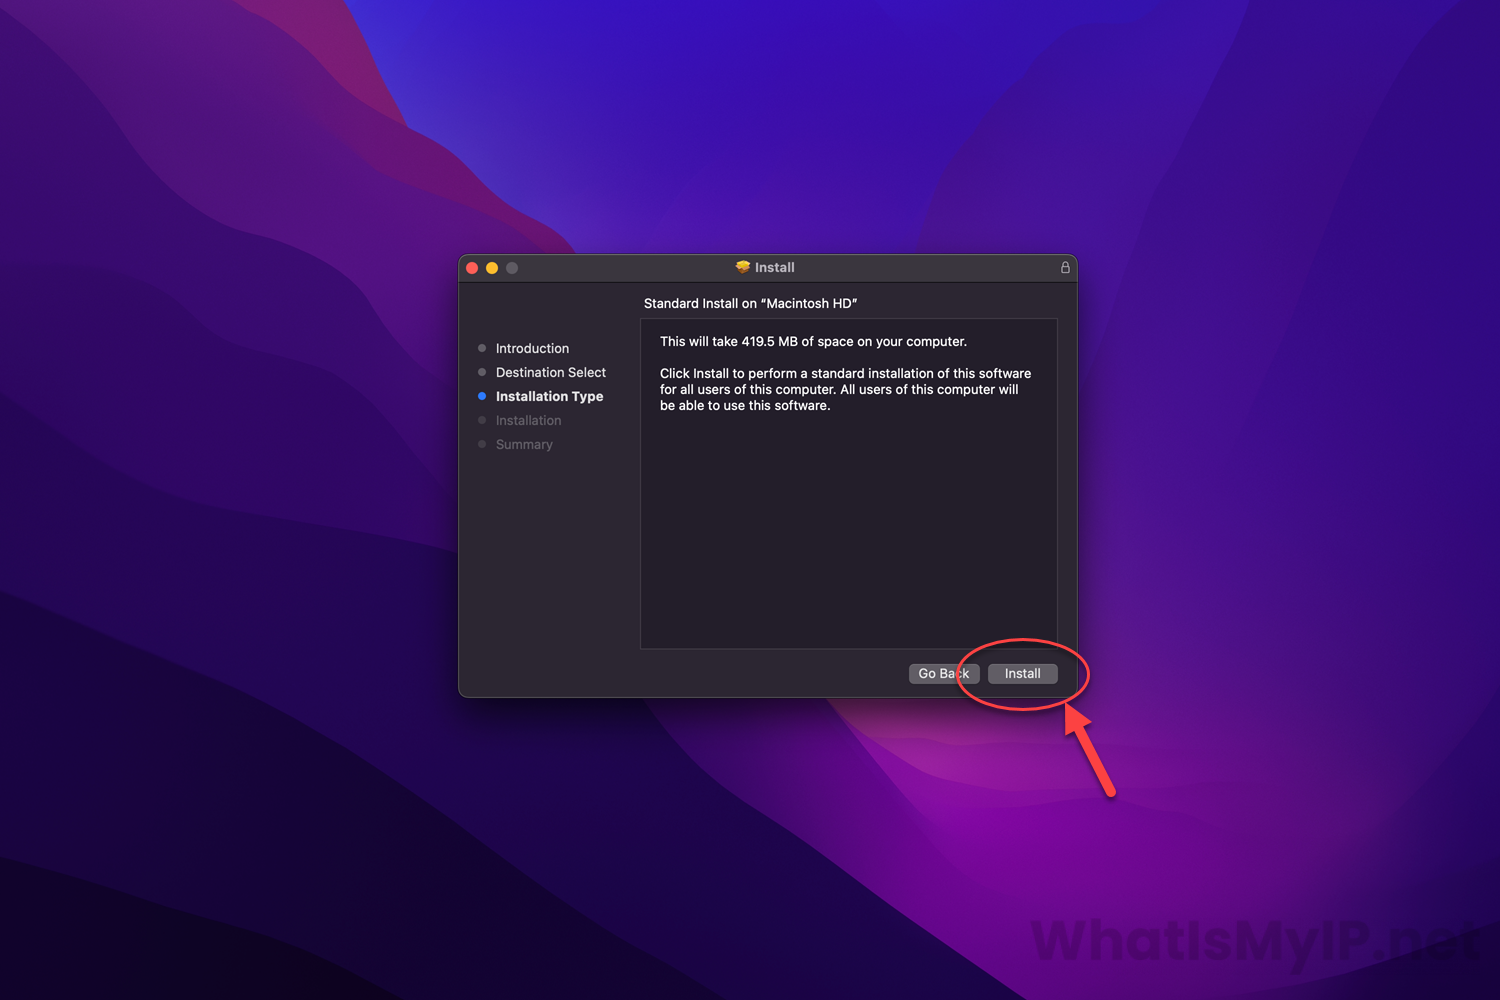
App Installation Process
On this step, your operating system will let you know how much space the NordVPN app will take up on your hard drive. You can click the “Install” button on the lower right to begin the process.
Step 6
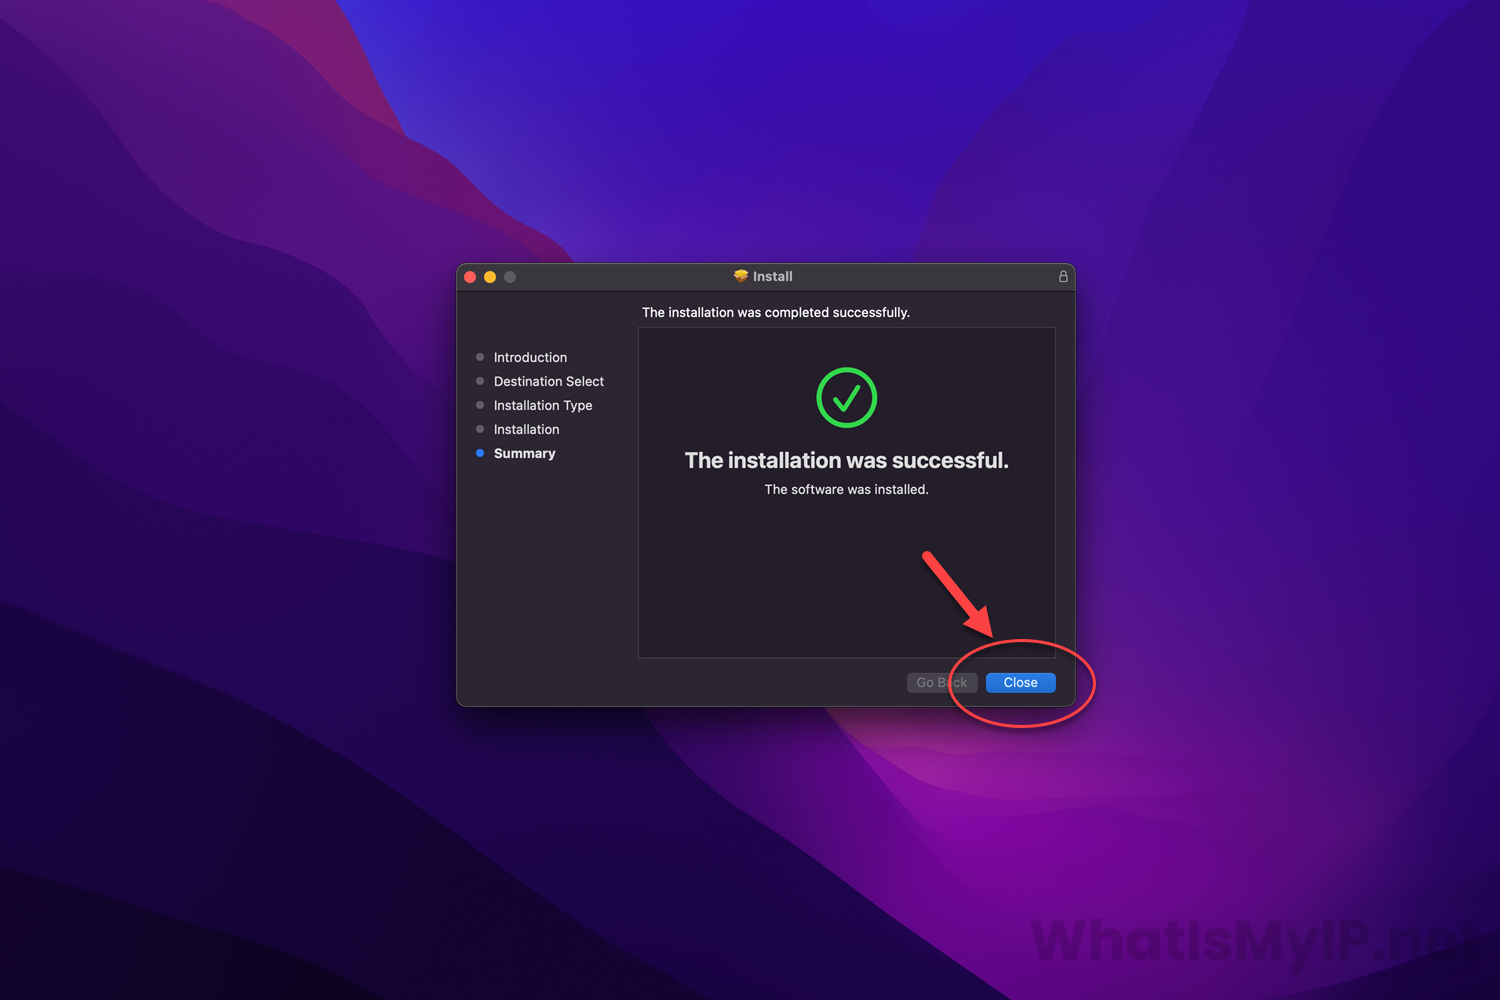
Installation Complete
Once the installer has successfully finished, you will get a screen like below. Click the “Close” button to continue with the process.
Step 7
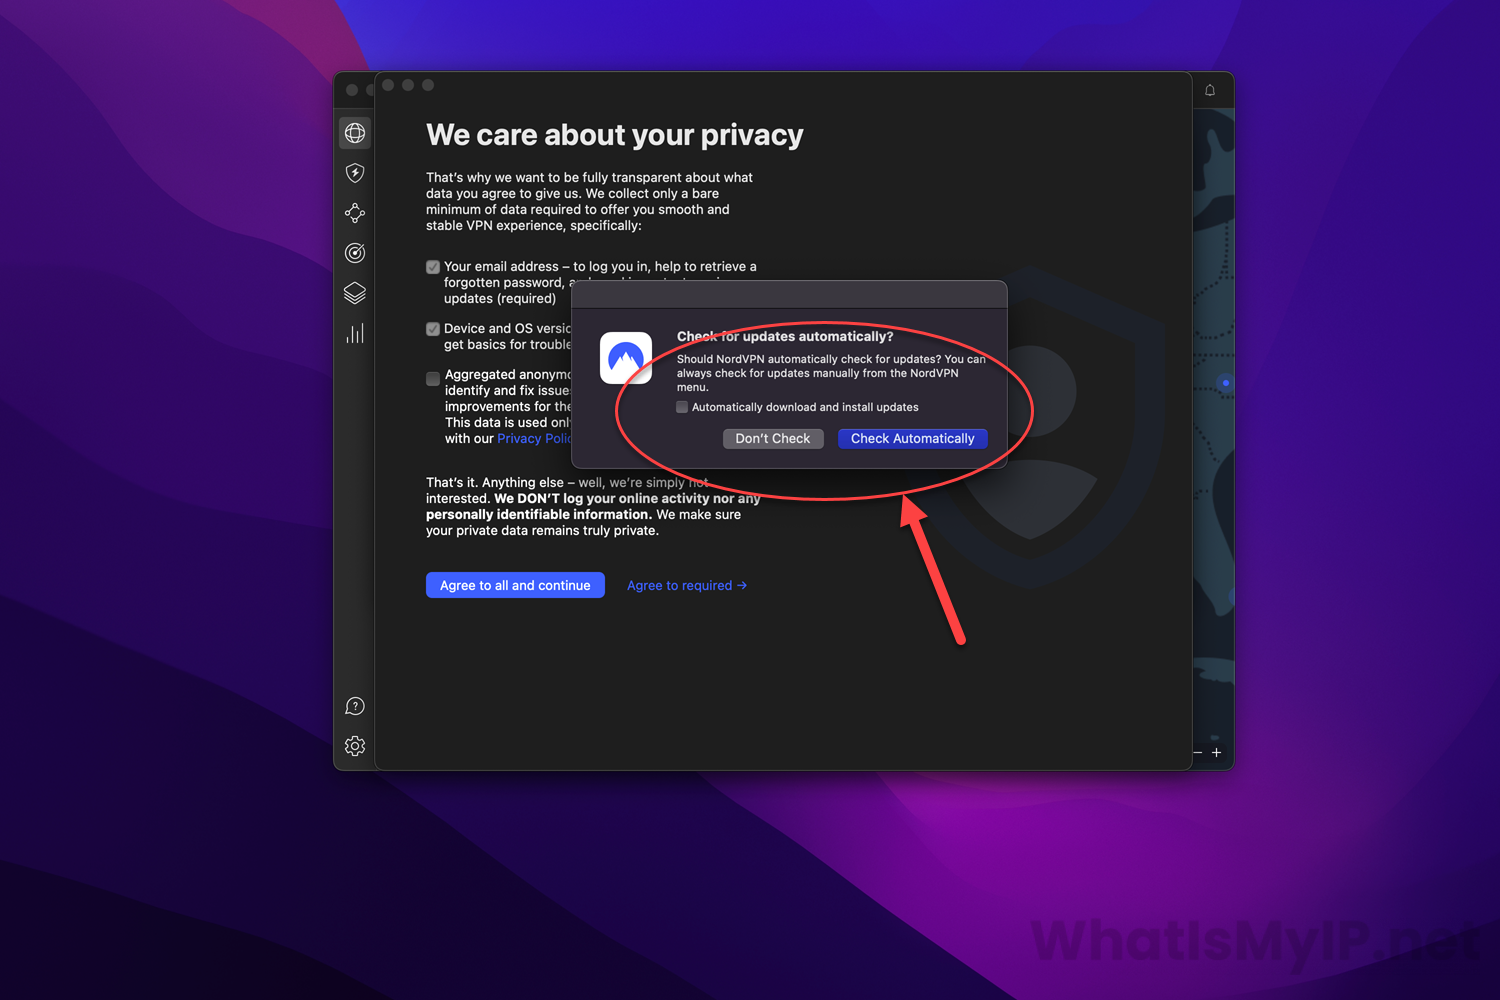
App Settings
Once the installation window closes, you will see the NordVPN client open and start you on some basic settings setup. On the first popup you will be asked if you would like the NordVPN MacOS client to check for updates to the software automatically. I would recommend clicking the “Check Automatically” button on this so your software will always be up to date.
Step 8
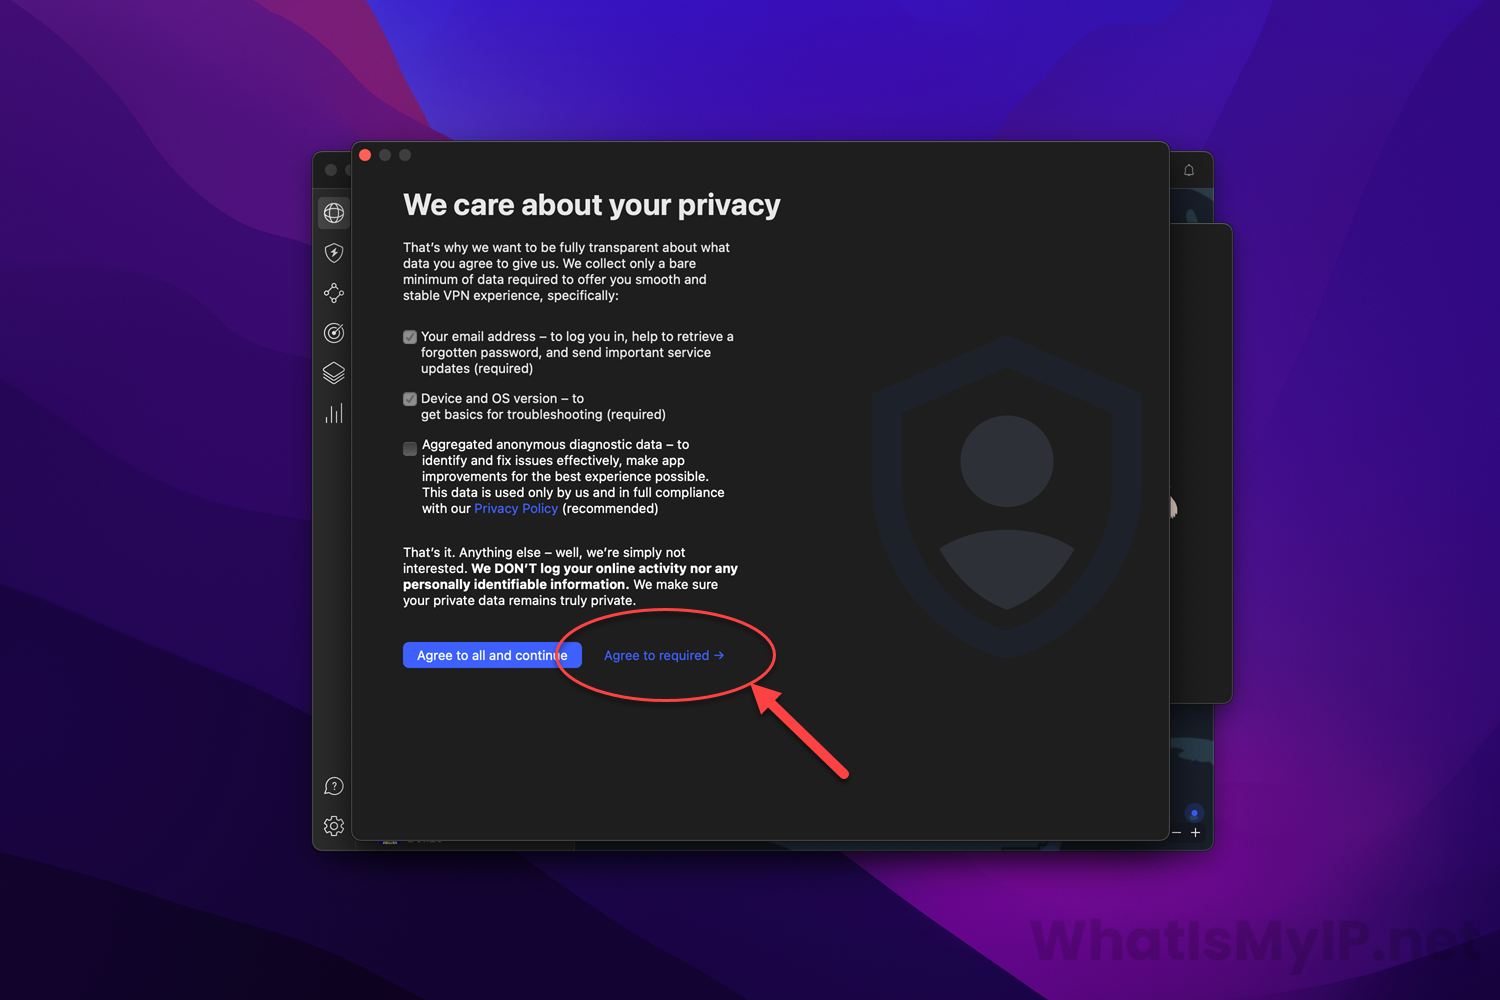
App Privacy
On this screen you will be asked to agree with some privacy settings. Here you will see that the top two checkboxes are checked by default because they are required for the client app to work correctly. The last checkbox is for “Anonymous Diagnostic Data“, I usually uncheck this so no data from my client is collected. You can then click the “Agree to required” link at the bottom to continue.
Step 9
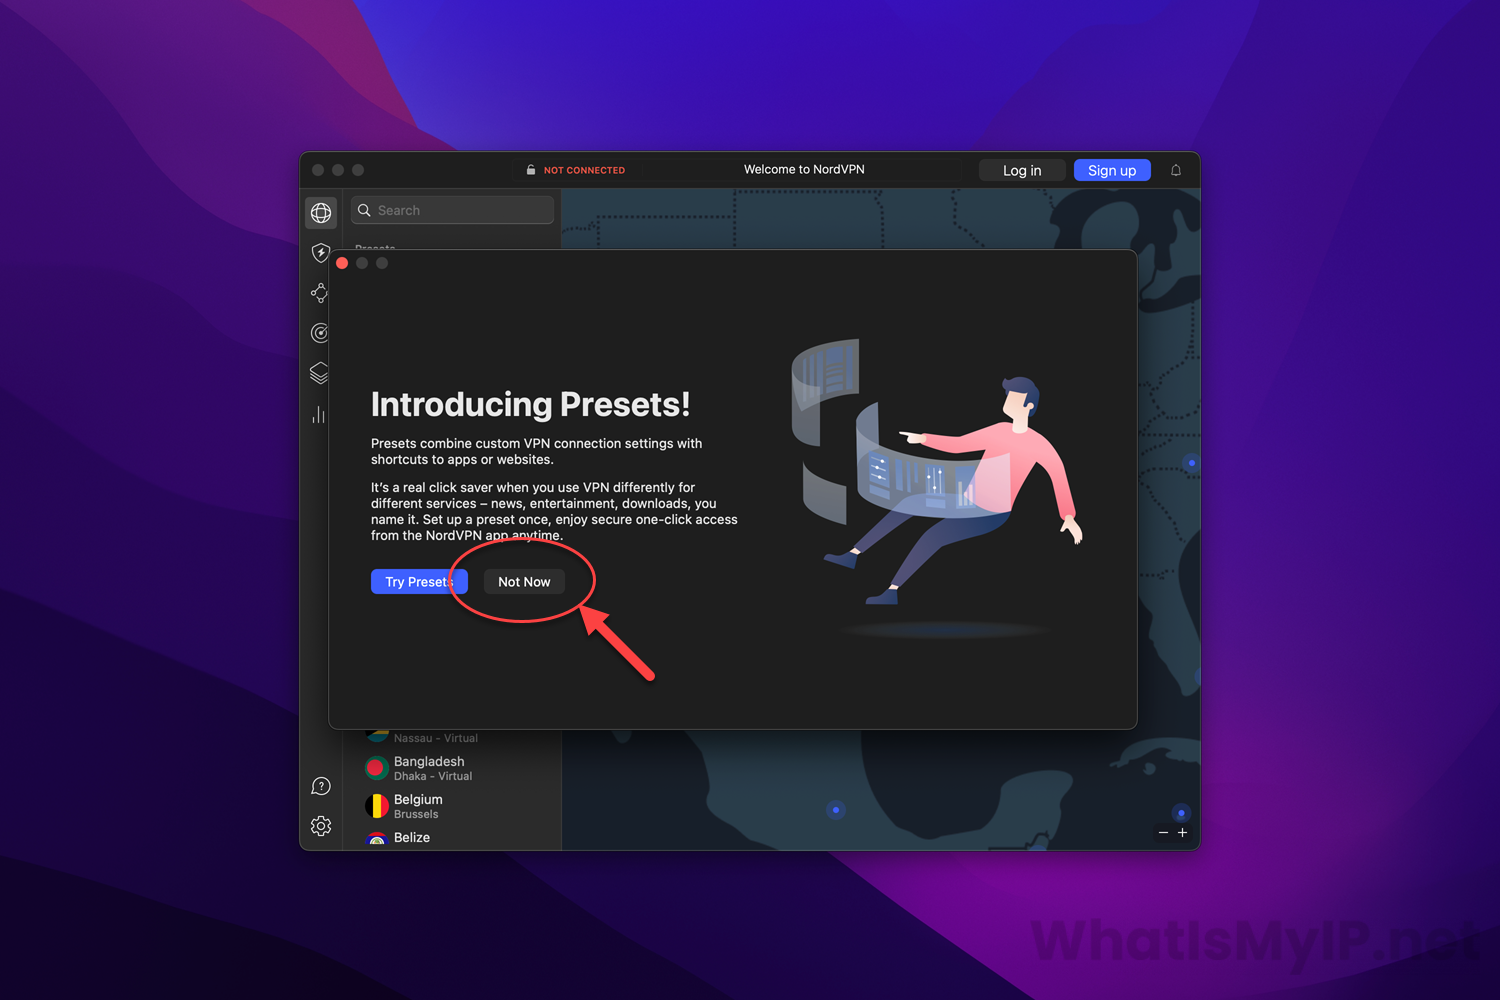
Presets
This section is for custom presets if you would like to set them up but since we are just doing a basic install and setup we can click the “Not Now” button to continue. You can always setup your custom presets later on in the client.
Step 10
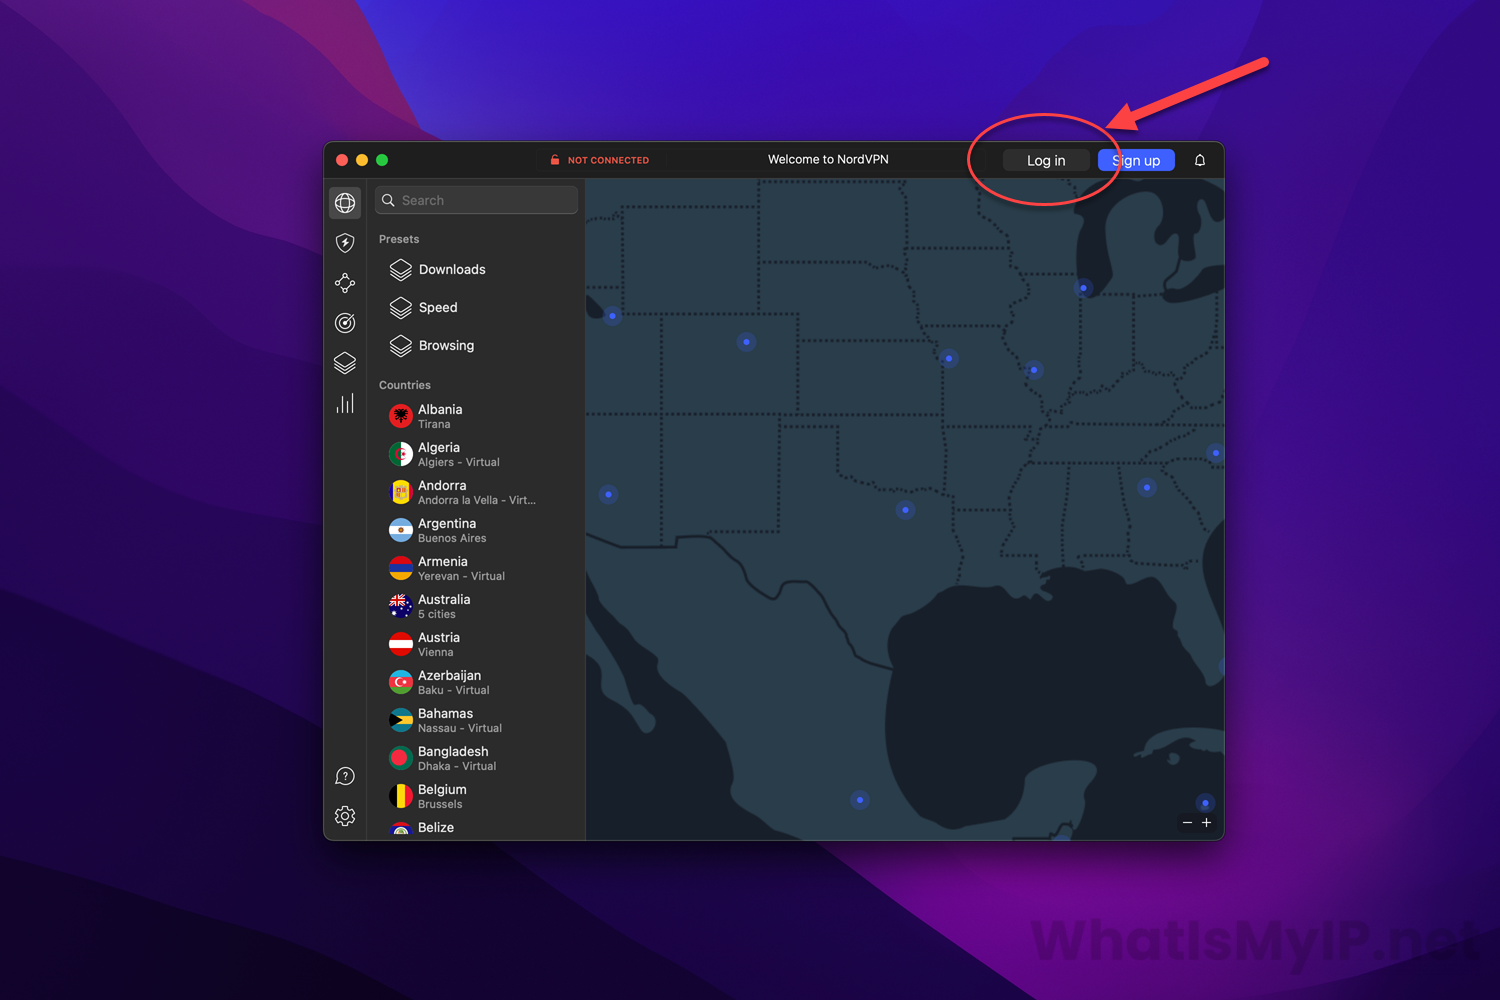
Login to NordVPN Client
After all the basic settings are done with, you will get the main home screen of the NordVPN app. At the top right, you will see a button for “Log in“. Click that link to log in to your account.
Step 11
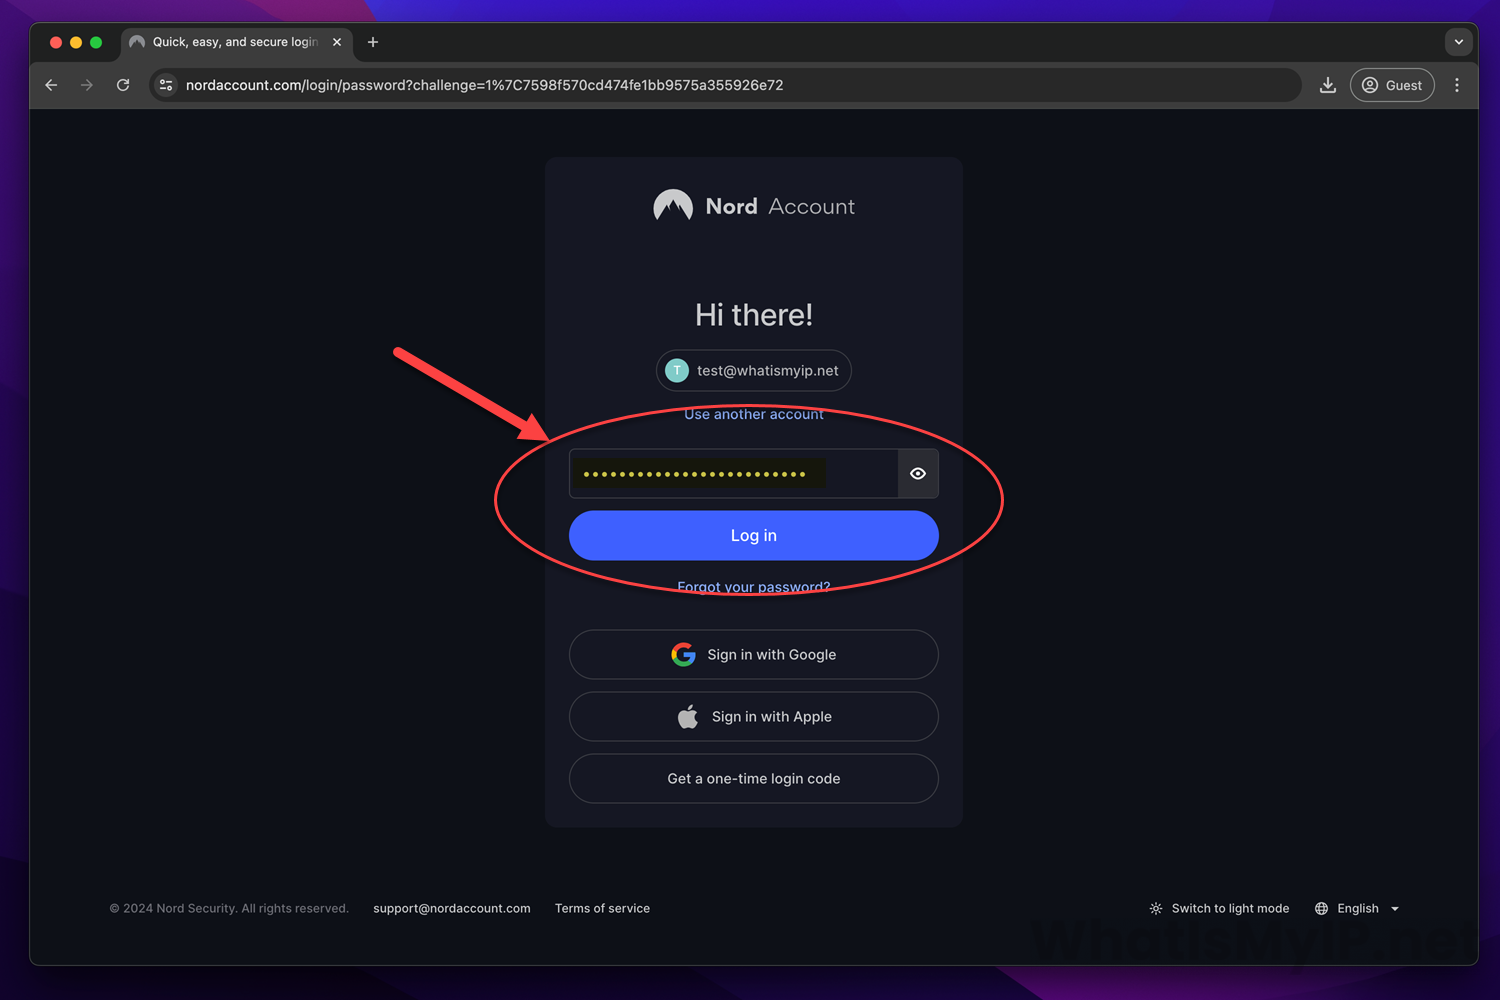
Login to Nord Account
Once you click the log in button, a browser window will pop open on your default browser and open up to the Nord Account login page. Here you will need type in your username/email address and password to continue.

Step 12
Open App
Once you have successfully logged into your Nord account, you will get a popup asking to Open NordVPN or Cancel, click the “Open NordVPN” button to go back to the vpn client app.
Step 13
Running the NordVPN App
You will no be redirected back to the client app and you will see the map with all the vpn server nord has to offer. To connect to a specific vpn server, you can click on the search bar at the top of the left sidebar and type in the Country name of where you would like to connect to a server in. For this example, I chose to connect to a vpn server in Switzerland, Zurich so I started to type in “Swi” and it found the country I was looking for. Just click on the name of the country and the vpn client will automictically connect to the best vpn server in that country for you. After it has connected you will see at the top in green “Connected” and your new ip address from that vpn server. That’s it, you are now connected to a vpn server in Switzerland.
Step 14
Test Your VPN Connection
You can go over to our main page and check your newly connect vpn server ip details for your client. As you can see from my example, my client connected to Switzerland and my ip address is the same as the ip in the vpn client.
Step 1
Google Play Store
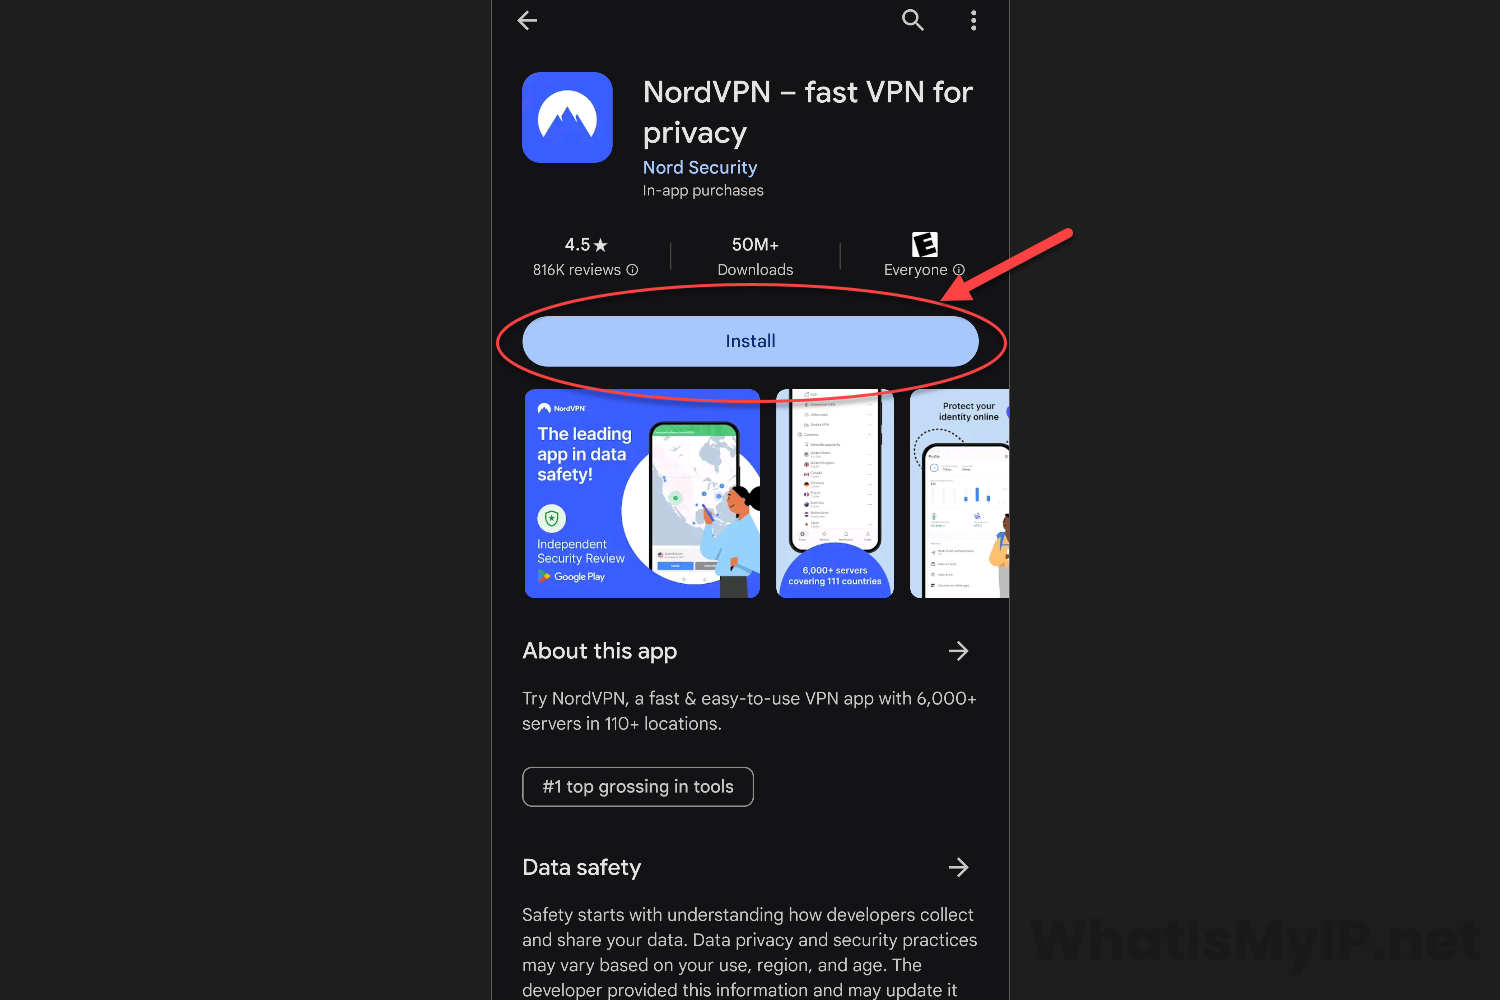
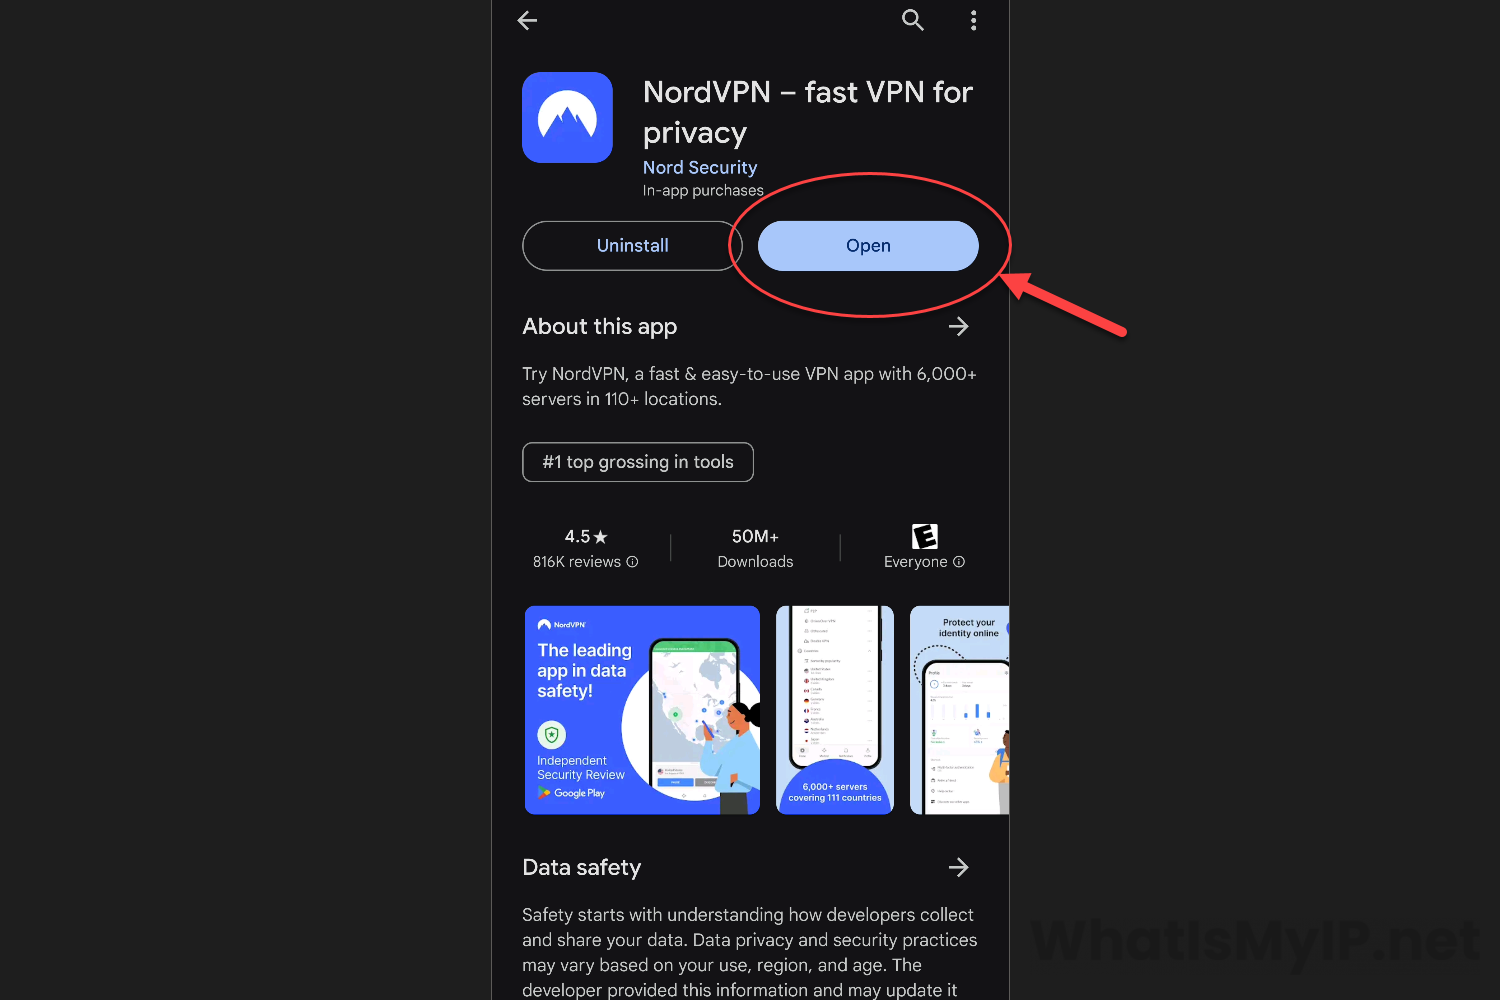
Head over to the Google Play Store app and do a search for NordVPN. Once you find the app, click on the “Install” button to begin installation of the NordVPN Android App.
Step 2
Download Complete
Once the download is complete, you will see a button to “Open” the NordVPN app. Click the open button to run the software.
Step 3
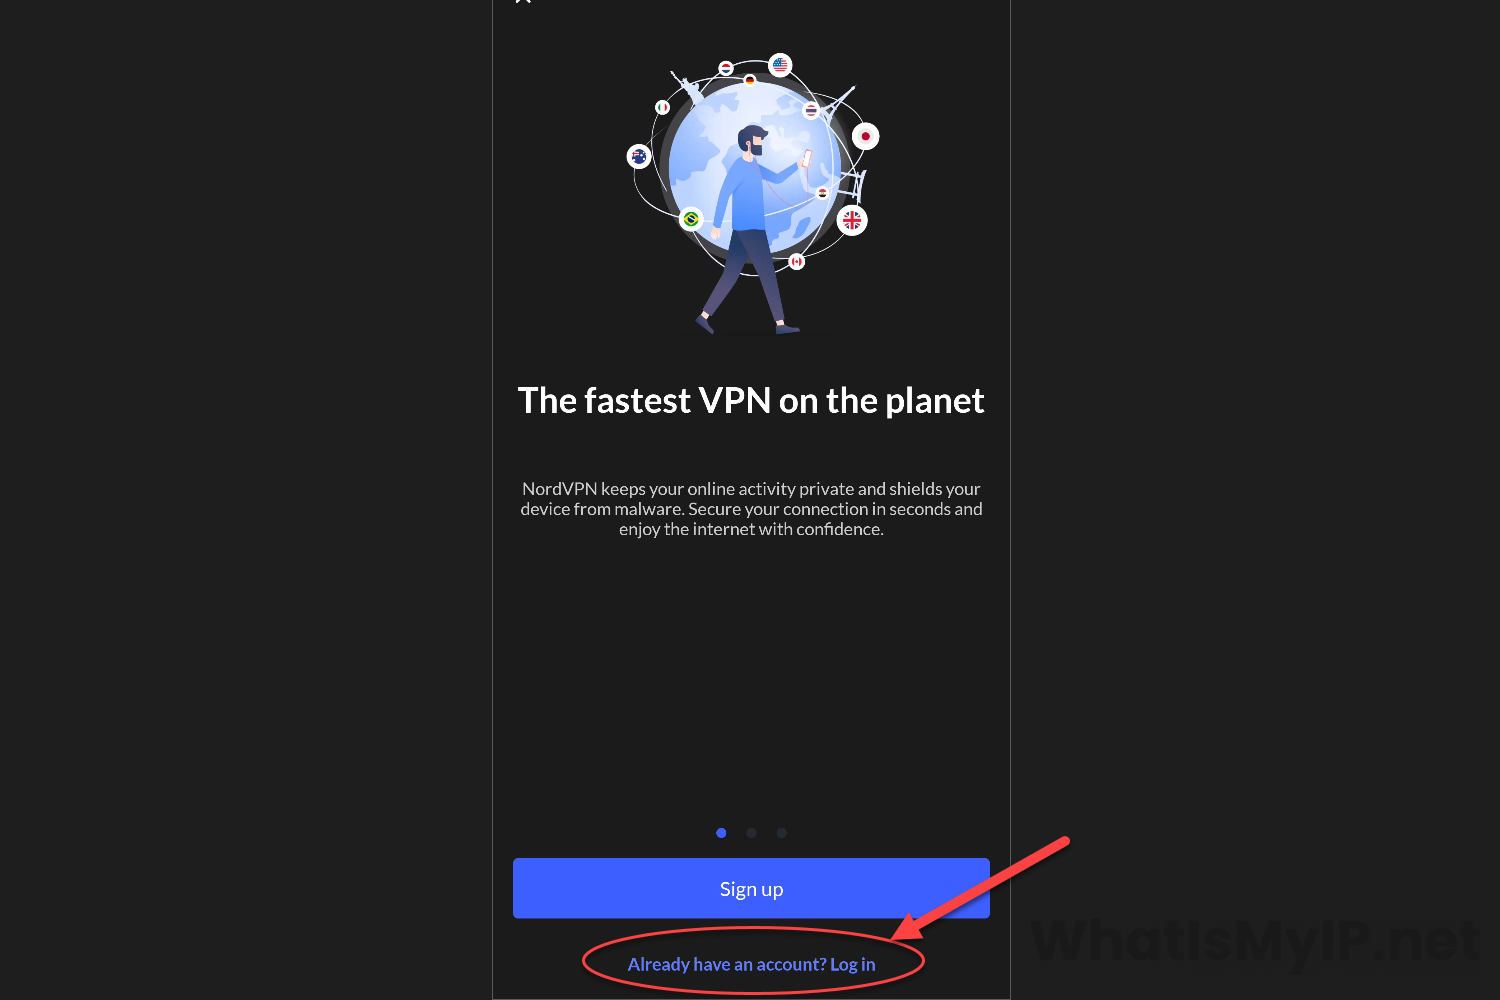
Start NordVPN
On the first screen you will have the ability to either Sign up for a Nord account or to Log in. Click the “Already have an account? Log in” link at the bottom to start the process.
Step 4
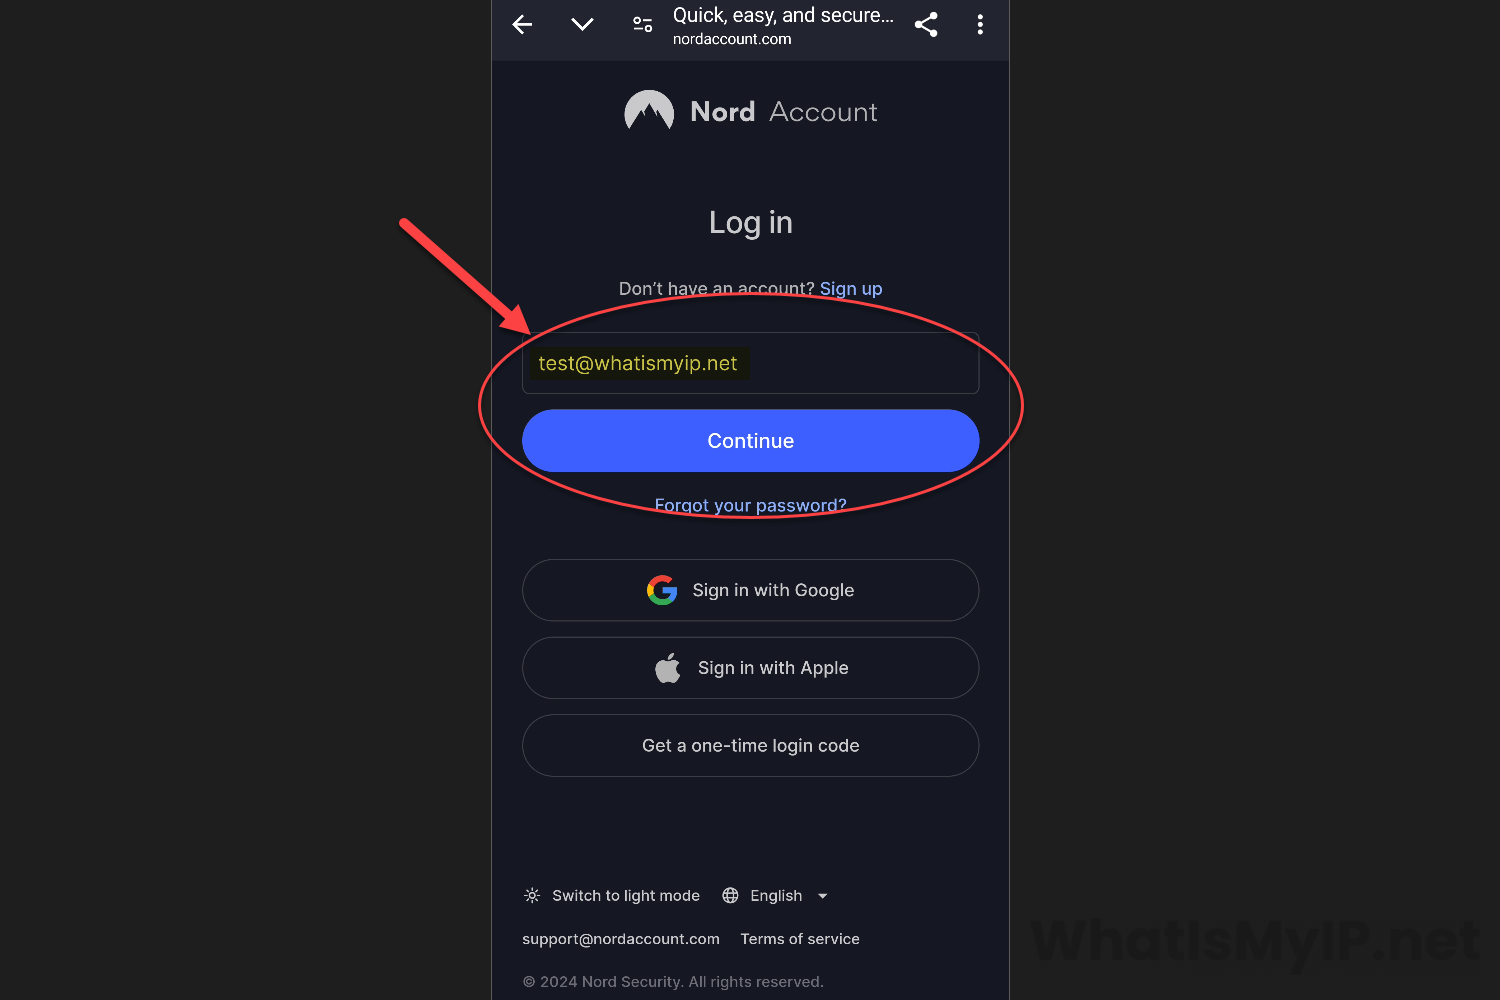
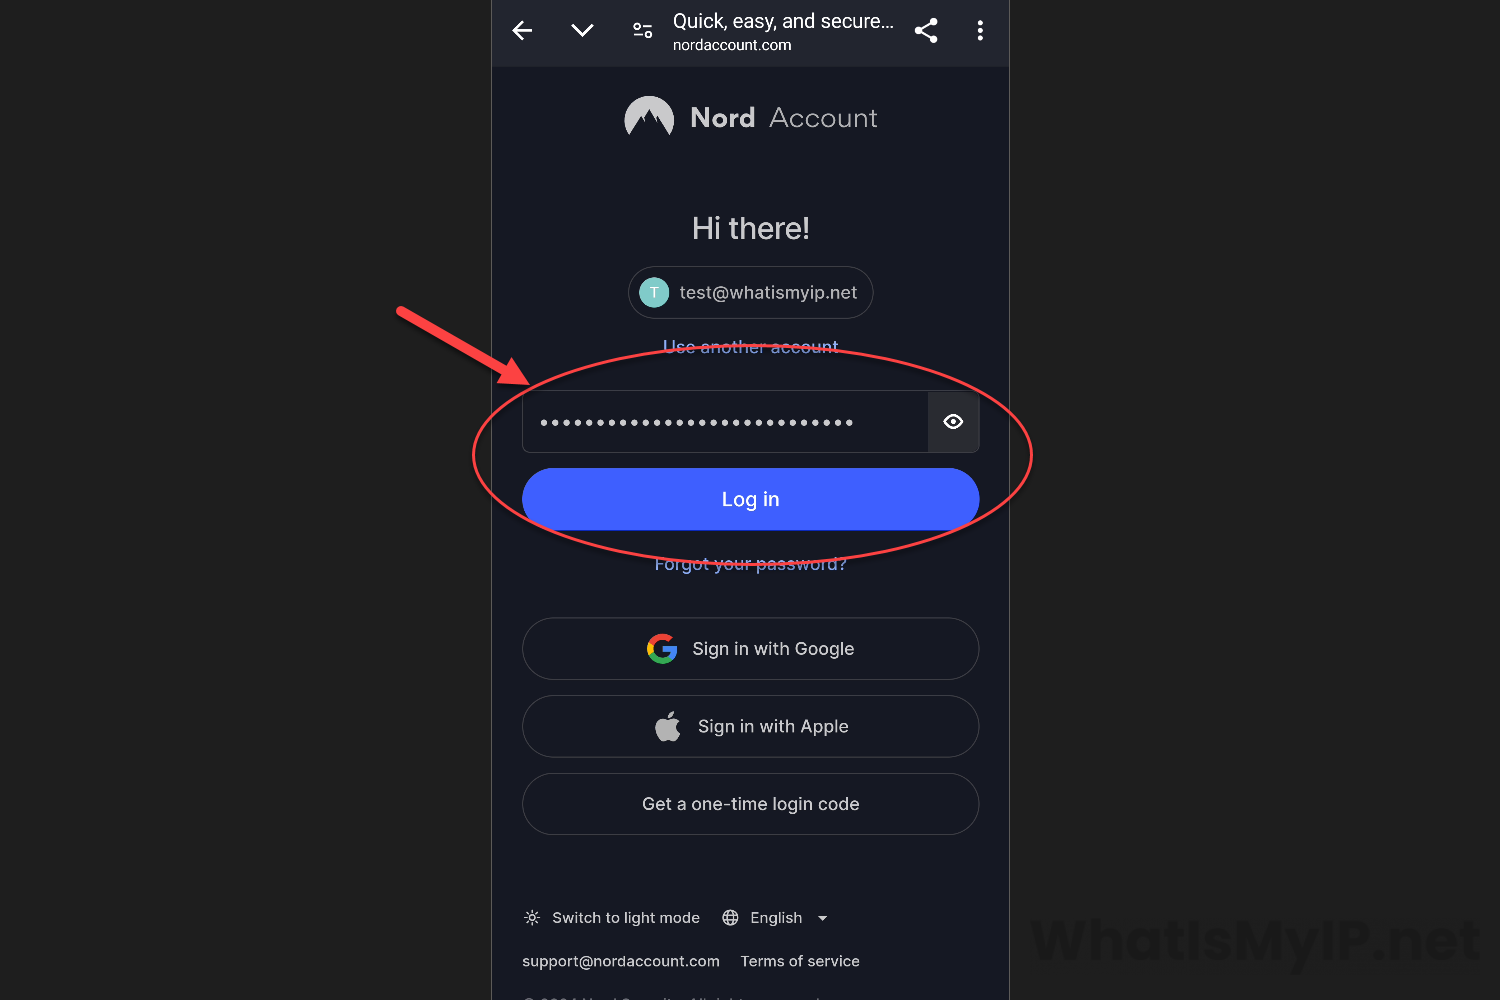
Log in
Once you hit the Log in link, it will redirect you and open up your default browser over to the Nord Account webpage so you can login to your account. Go ahead and input your username/email address and password on the next 2 screens to continue. Hit the “Log in” button once you are done.
Step 5
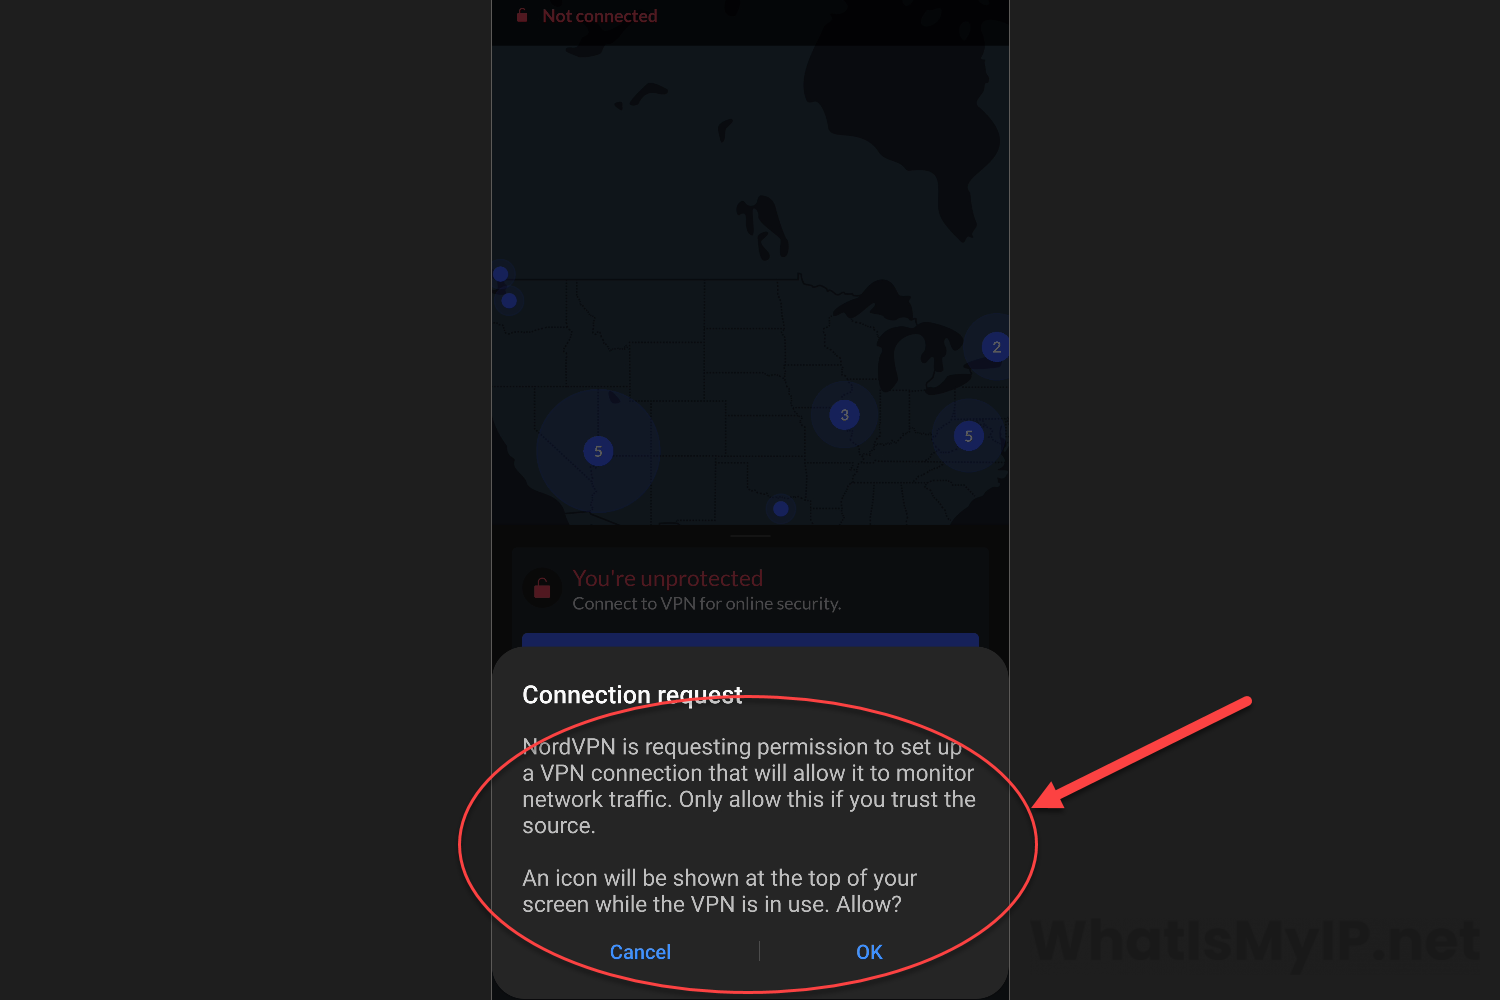
Android Settings
When the NordVPN app starts, it will request permission to setup a VPN connection on your android device so you can use the VPN servers. Click the “OK” link on the bottom to continue.
Step 6
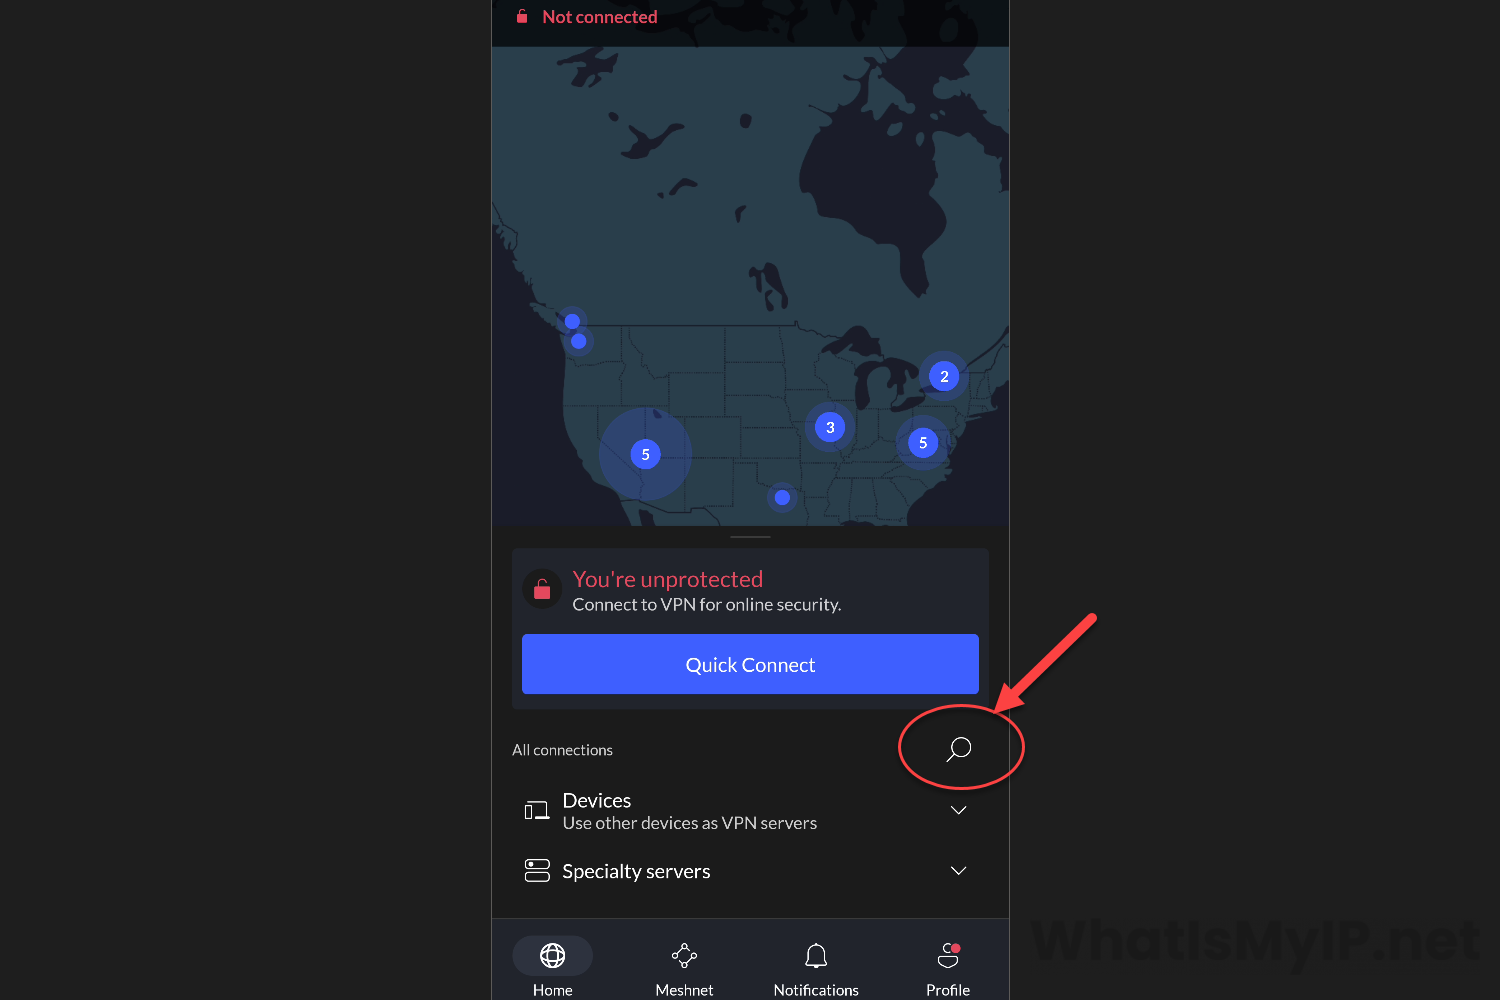
Open NordVPN App
Once the app is open, you will get the main dashboard which will have a map on it for the vpn servers close to you. Here we will connect to a vpn server of your choice. You can either hit the “Quick Connect” button or in our case hit the search icon to look for another vpn server to connect too.
Step 7
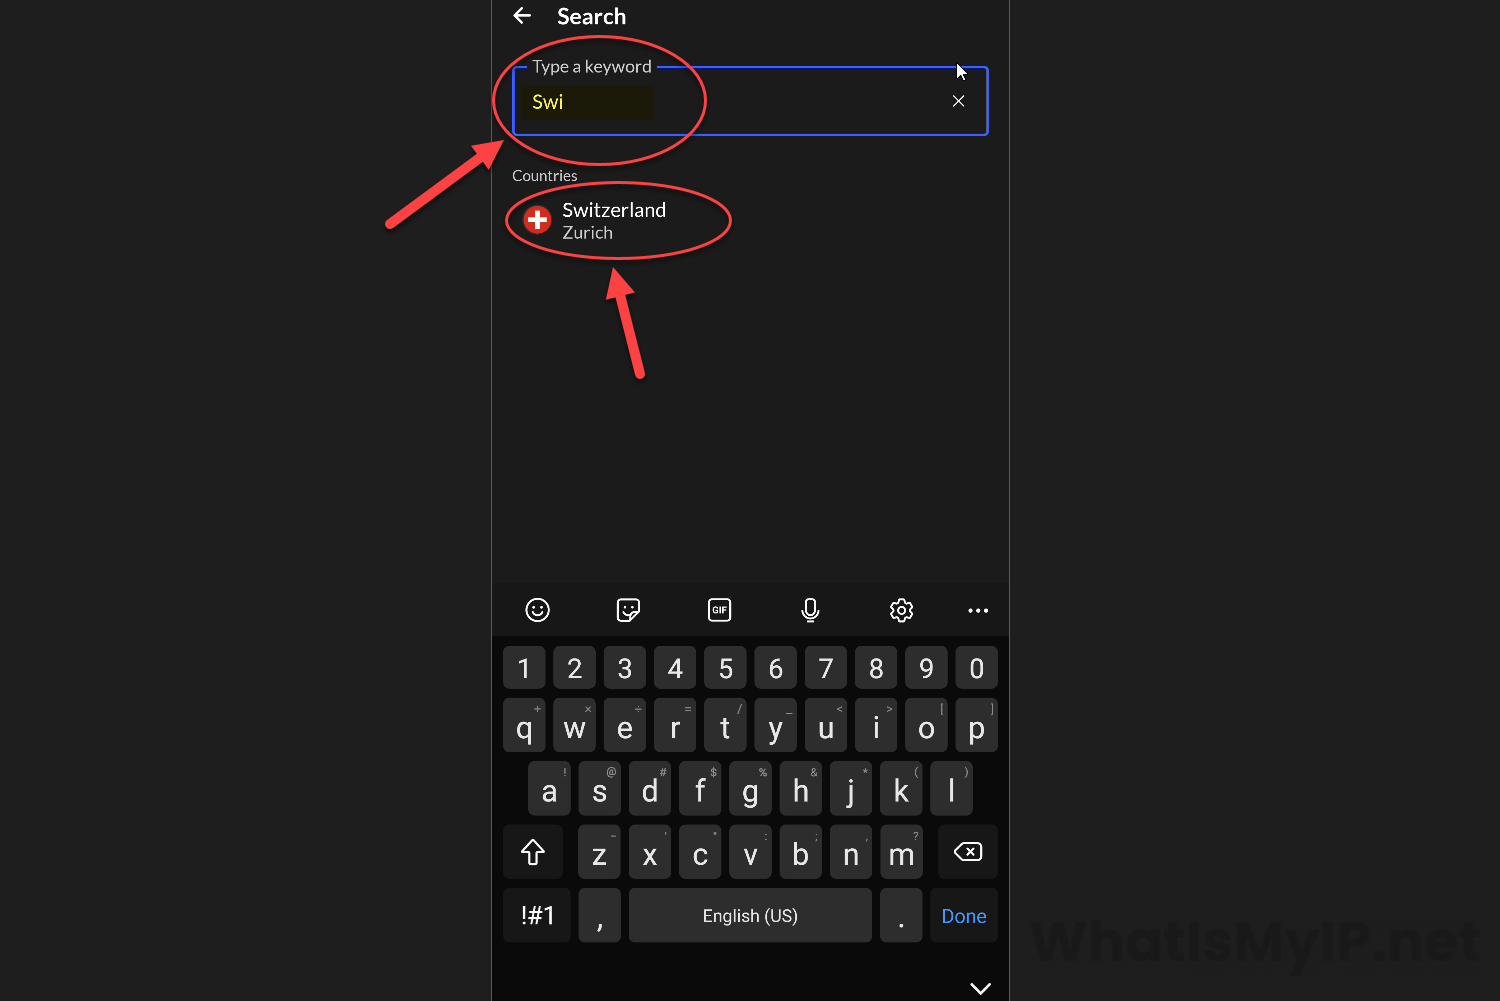
Connect to VPN Server
In the search area, you can type in the name of the Country you would like to connect to. For this example we will be connecting to a vpn server in Switzerland. Just start type the country name and nordvpn will auto find the country. To connect to the vpn server, just click the name of the country and off you go.
Step 8
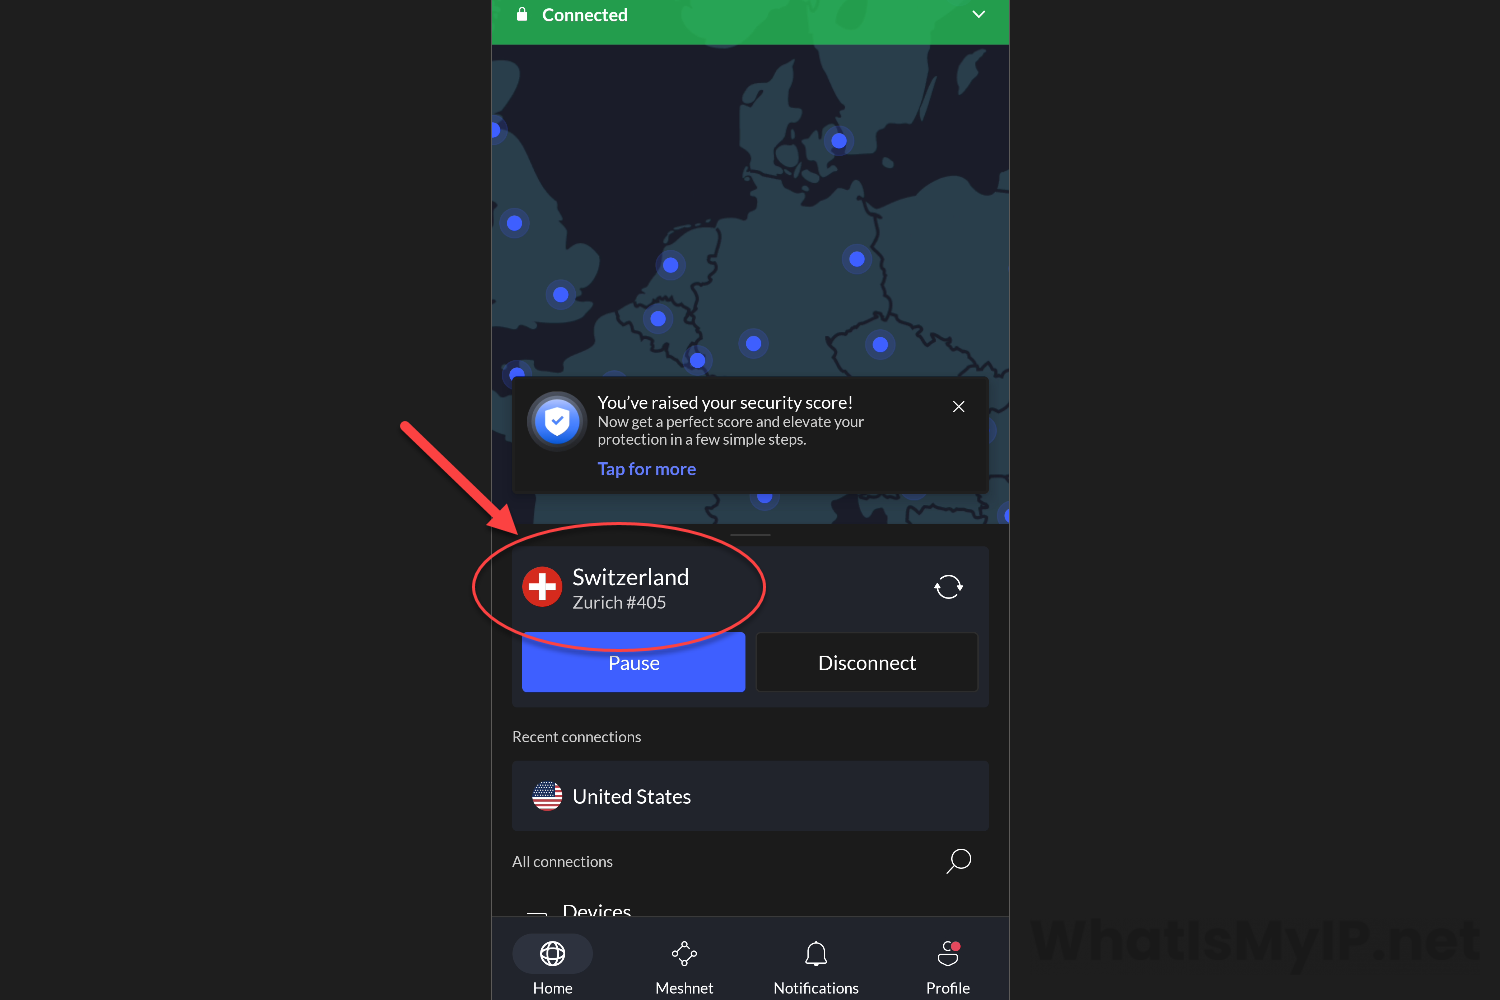
Connected to VPN
Once you connect to a vpn server of your choice, you will be redirected back to the main dashboard and at the top in Green, it will say “Connected“. It will also tell you which vpn server you are connected to, in our case it’s server #405.
Step 9
Test Your VPN Connection
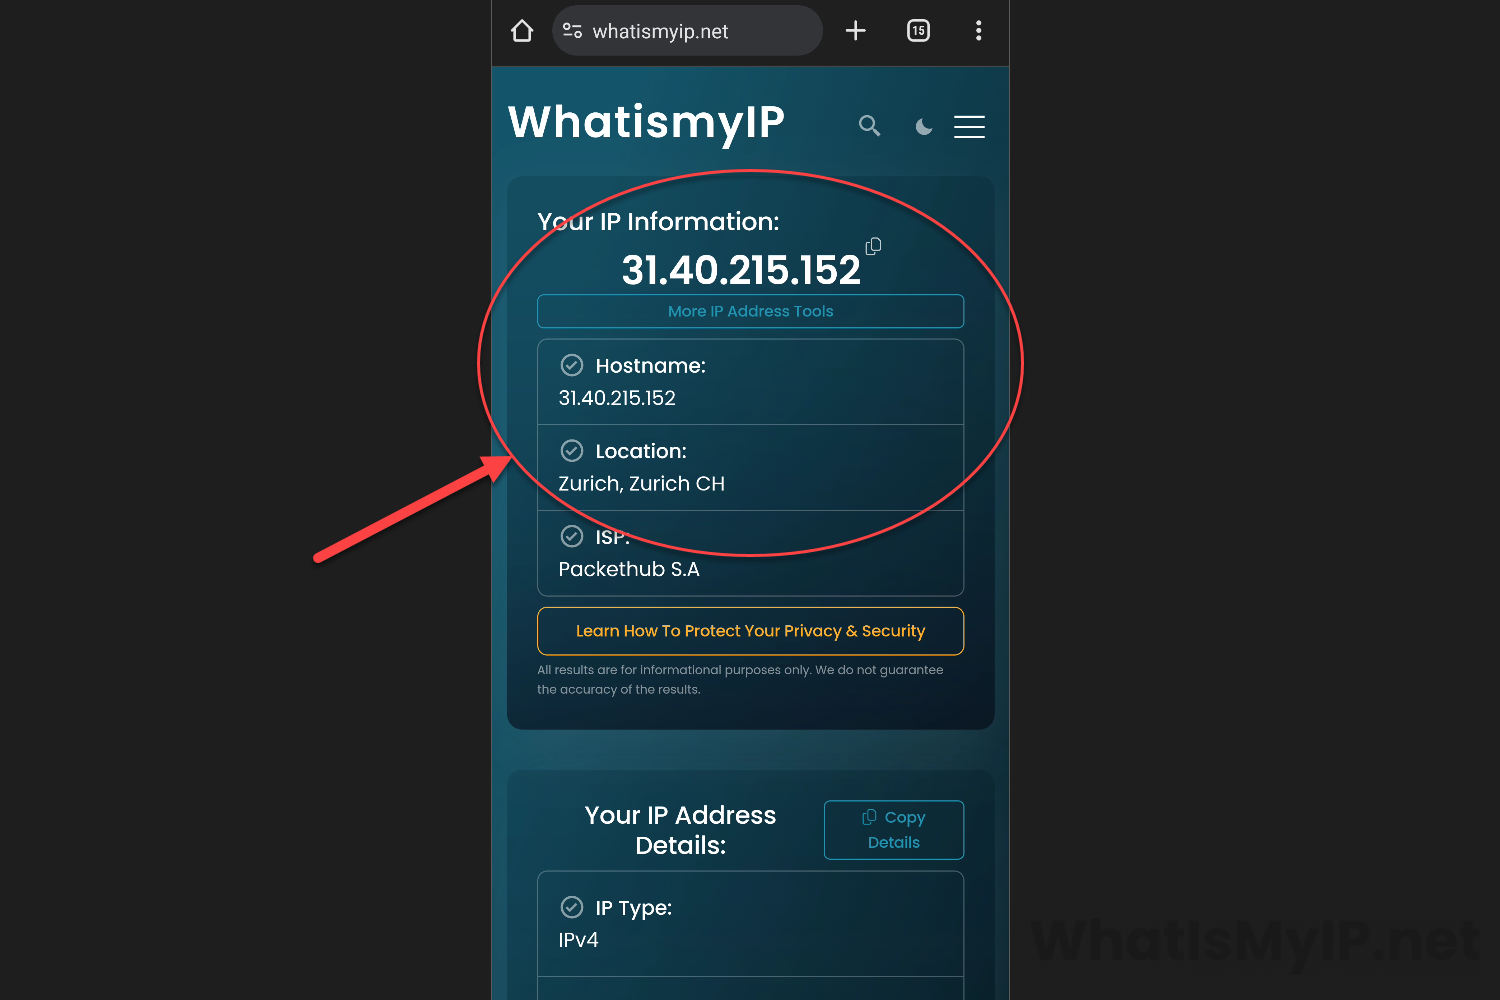
To test and make sure your device it connected to a vpn server and routing your device traffic through that server, head over to our main website where you can check your ip address. As you can see, we are getting an ip address of the vpn server connected through Zurich Switzerland.
Step 1
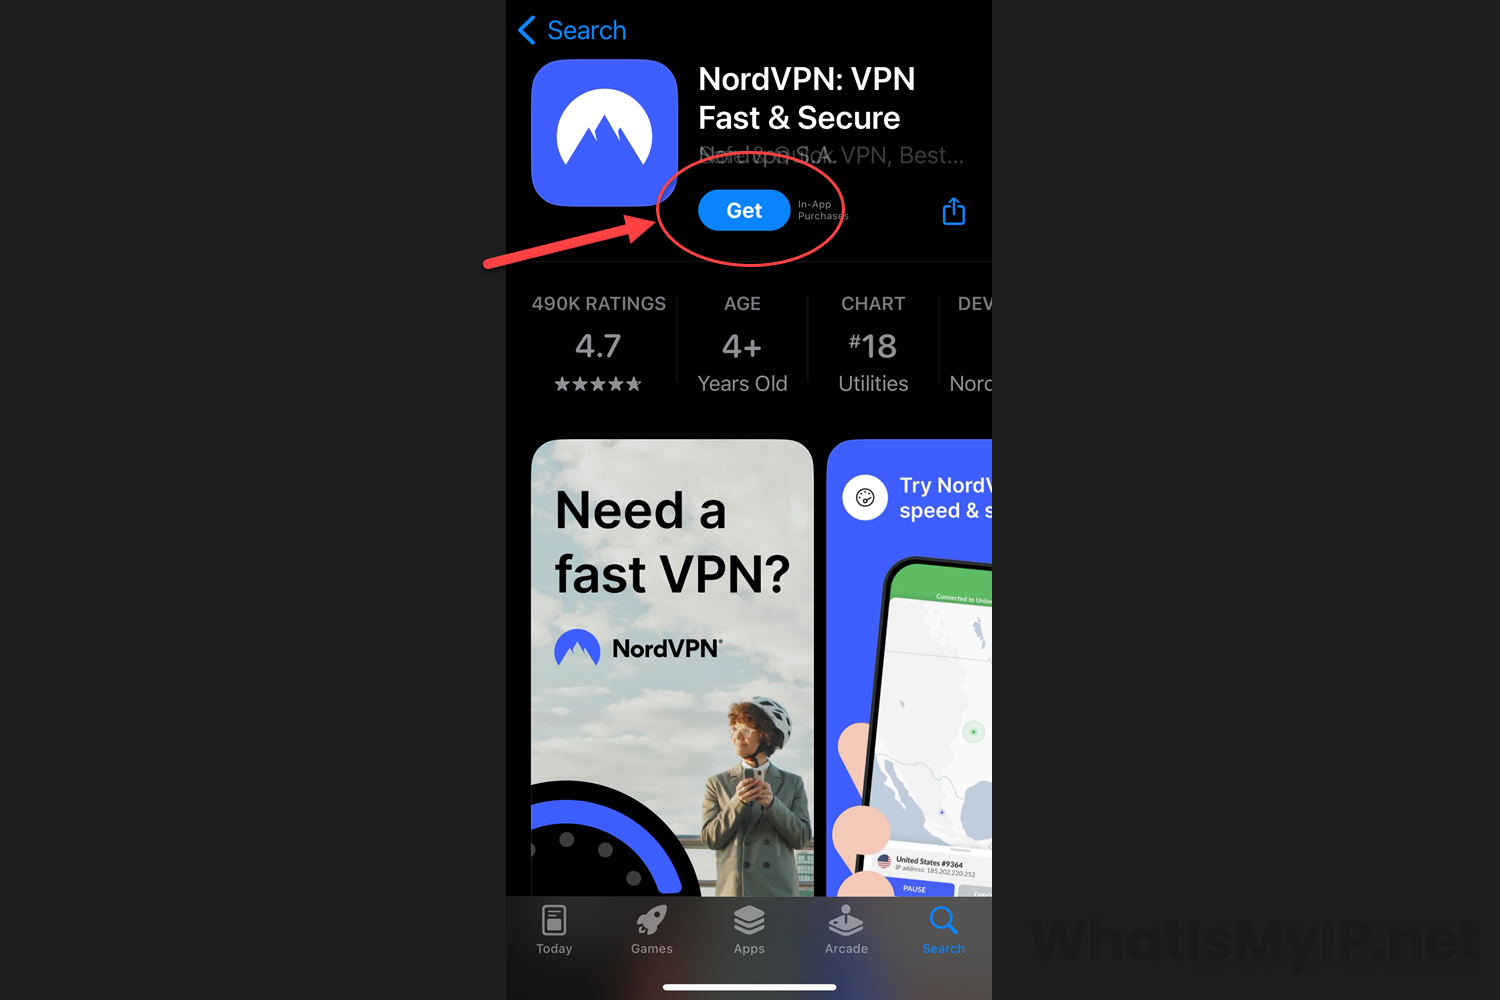
Open Apple App Store
Open up the app store on your ios device and do a search for NordVPN. Go ahead and hit the “Get” button to download the app and get started.
Step 2
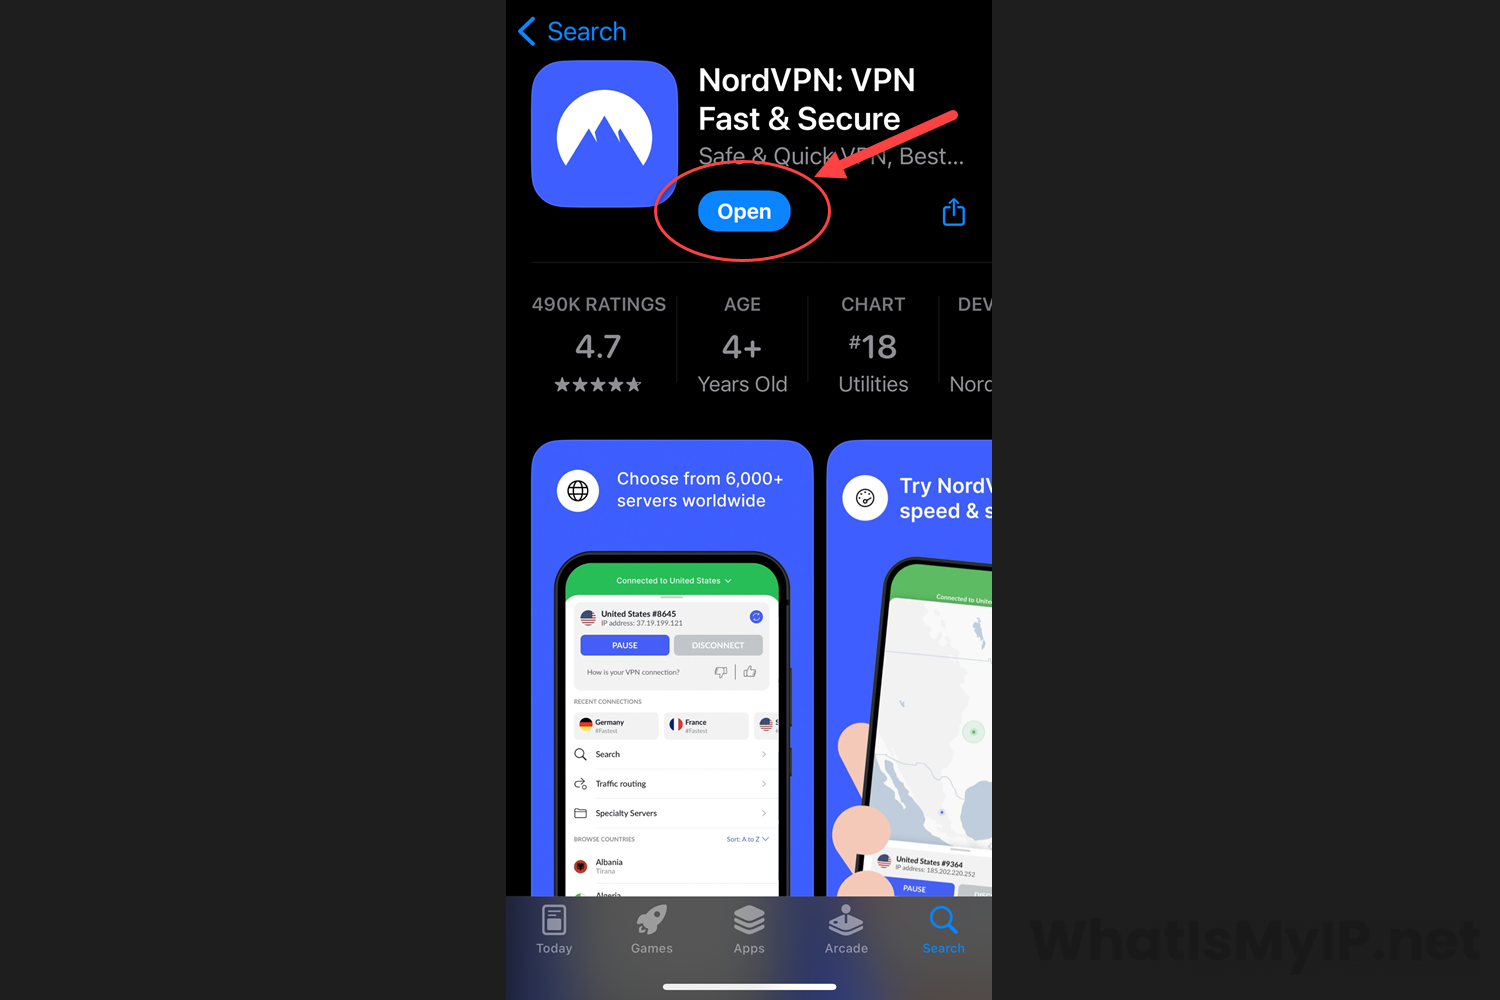
Download Complete
Once the download is complete, click the “Open” button to get started with rest of the installation process.
Step 3
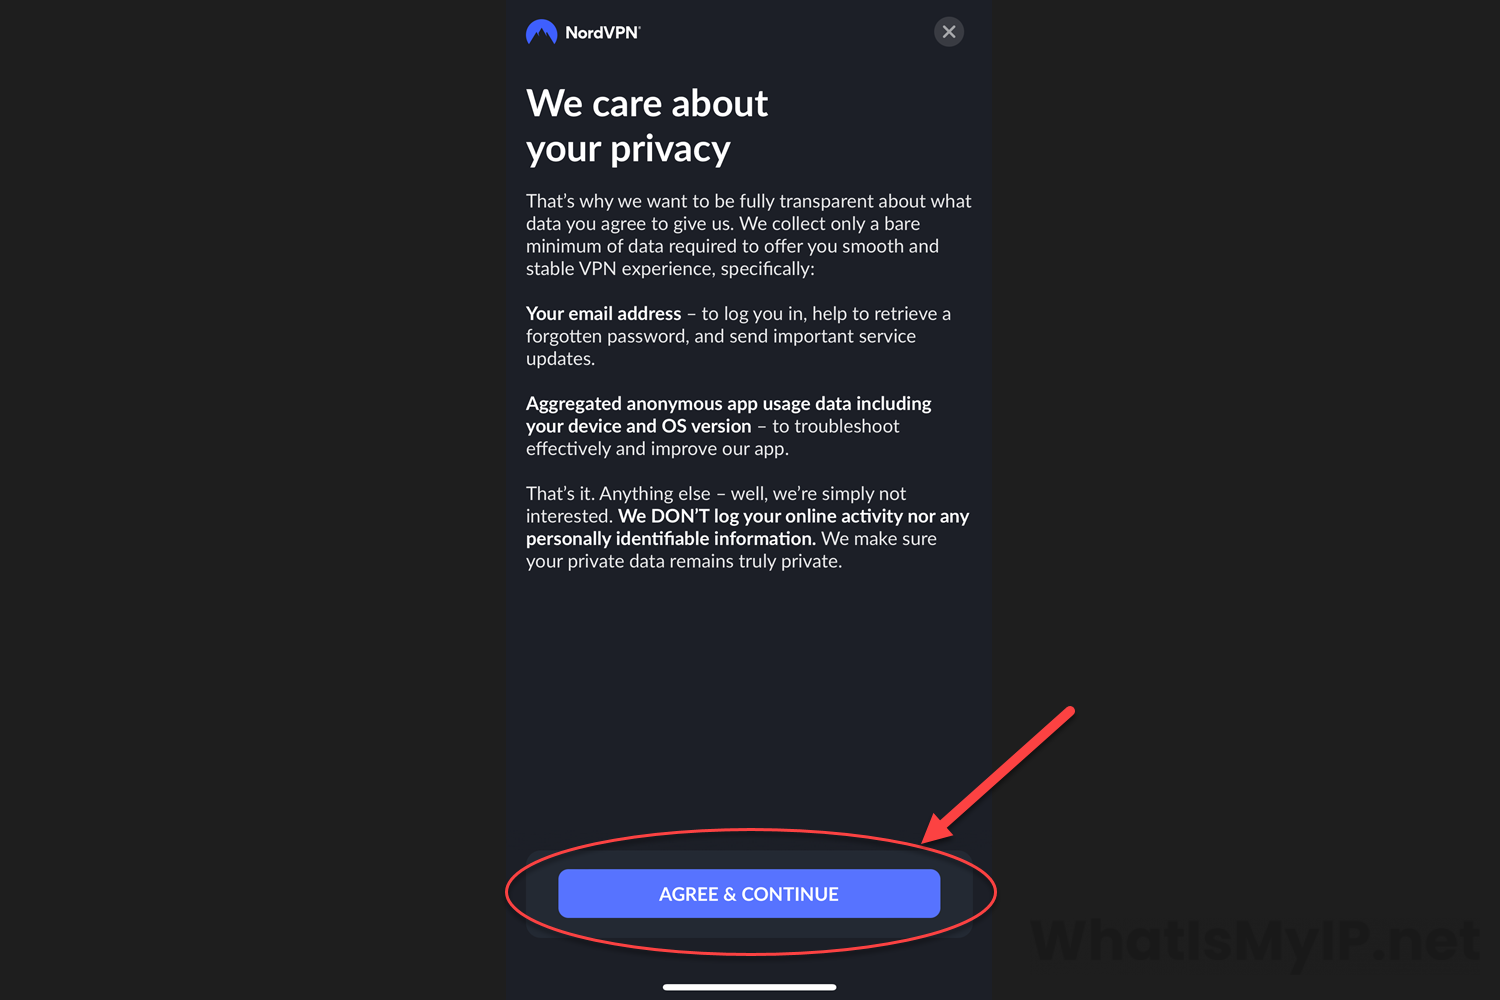
NordVPN Privacy
Before you can login and use the NordVPN Client, you will need to agree to the privacy setting about what Nord collects from you. These can be changed later on in the setting menu, but they just collect what they need for your account to work. Click the “Agree & Continue” to continue.
Step 4
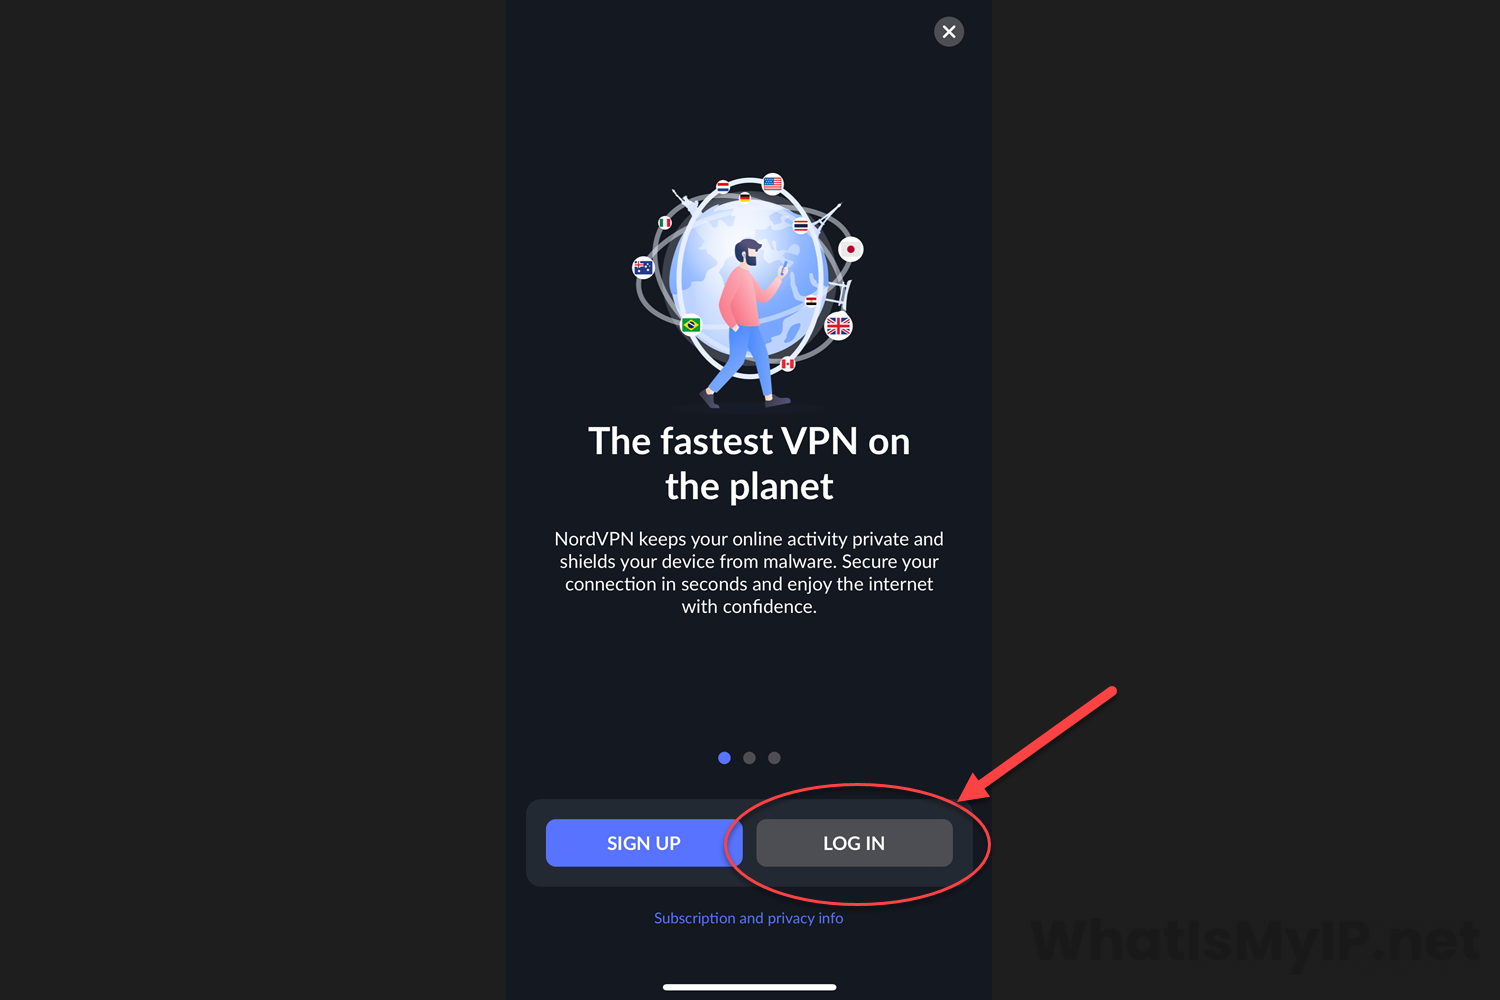
Login to NordVPN
On this screen you will be prompted to either Signup or Login to your account. Click the “LOG IN” button to get started.
Step 5
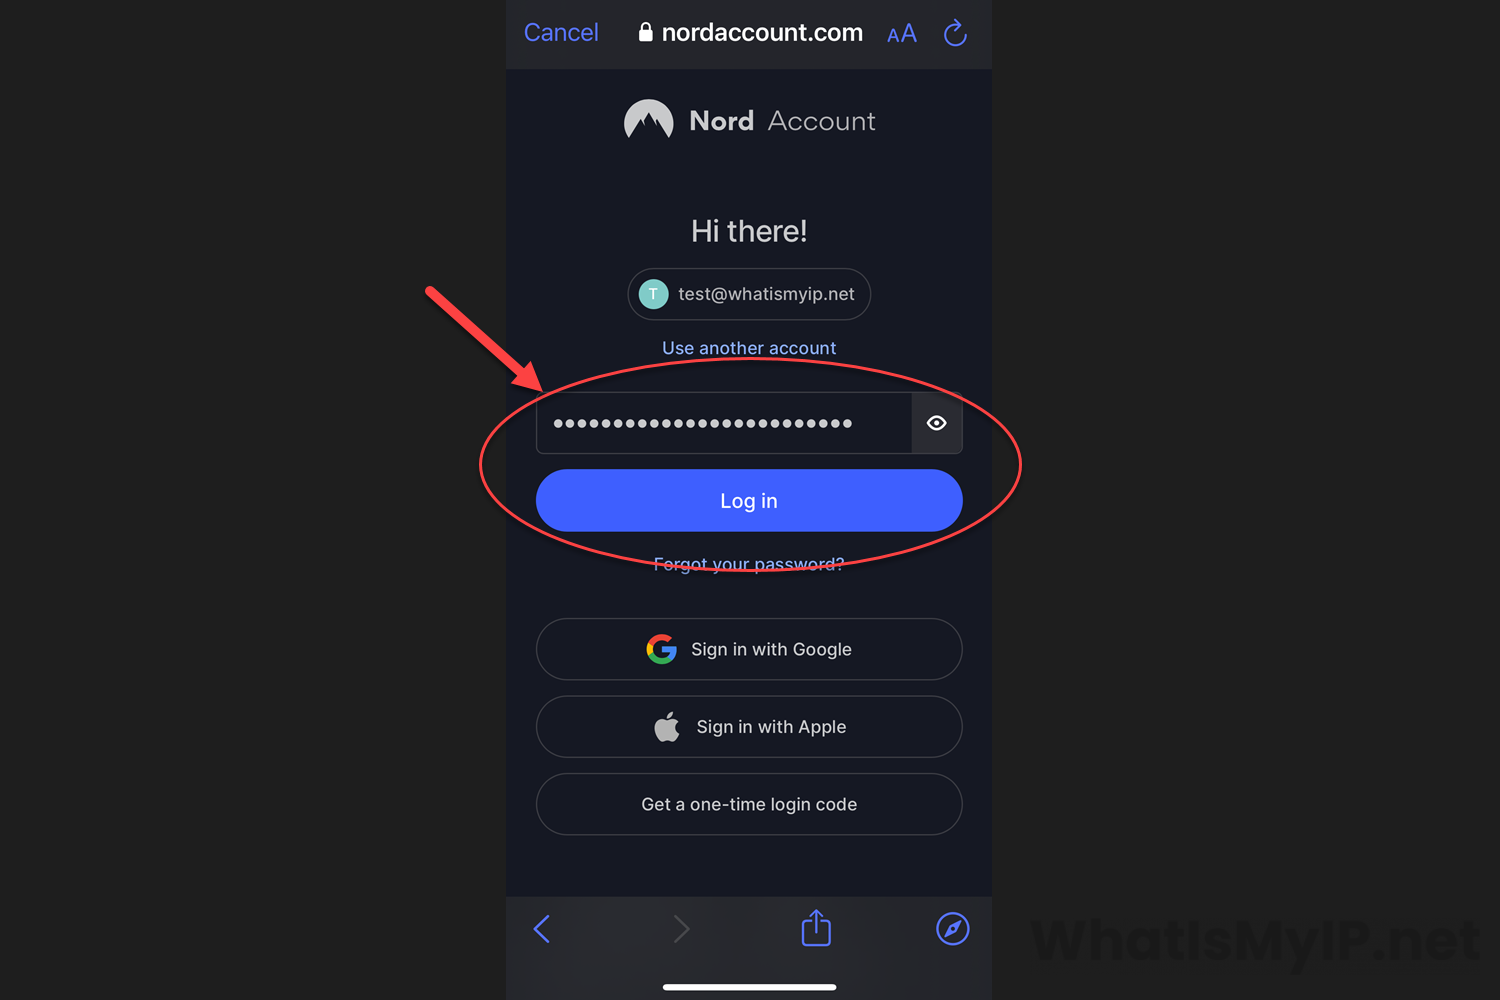
Logging in to Nord Account
Your default browser will pop open and direct you to the Nord Account login page. Here you will enter your username/email address and password to continue with the log in process.

Step 6
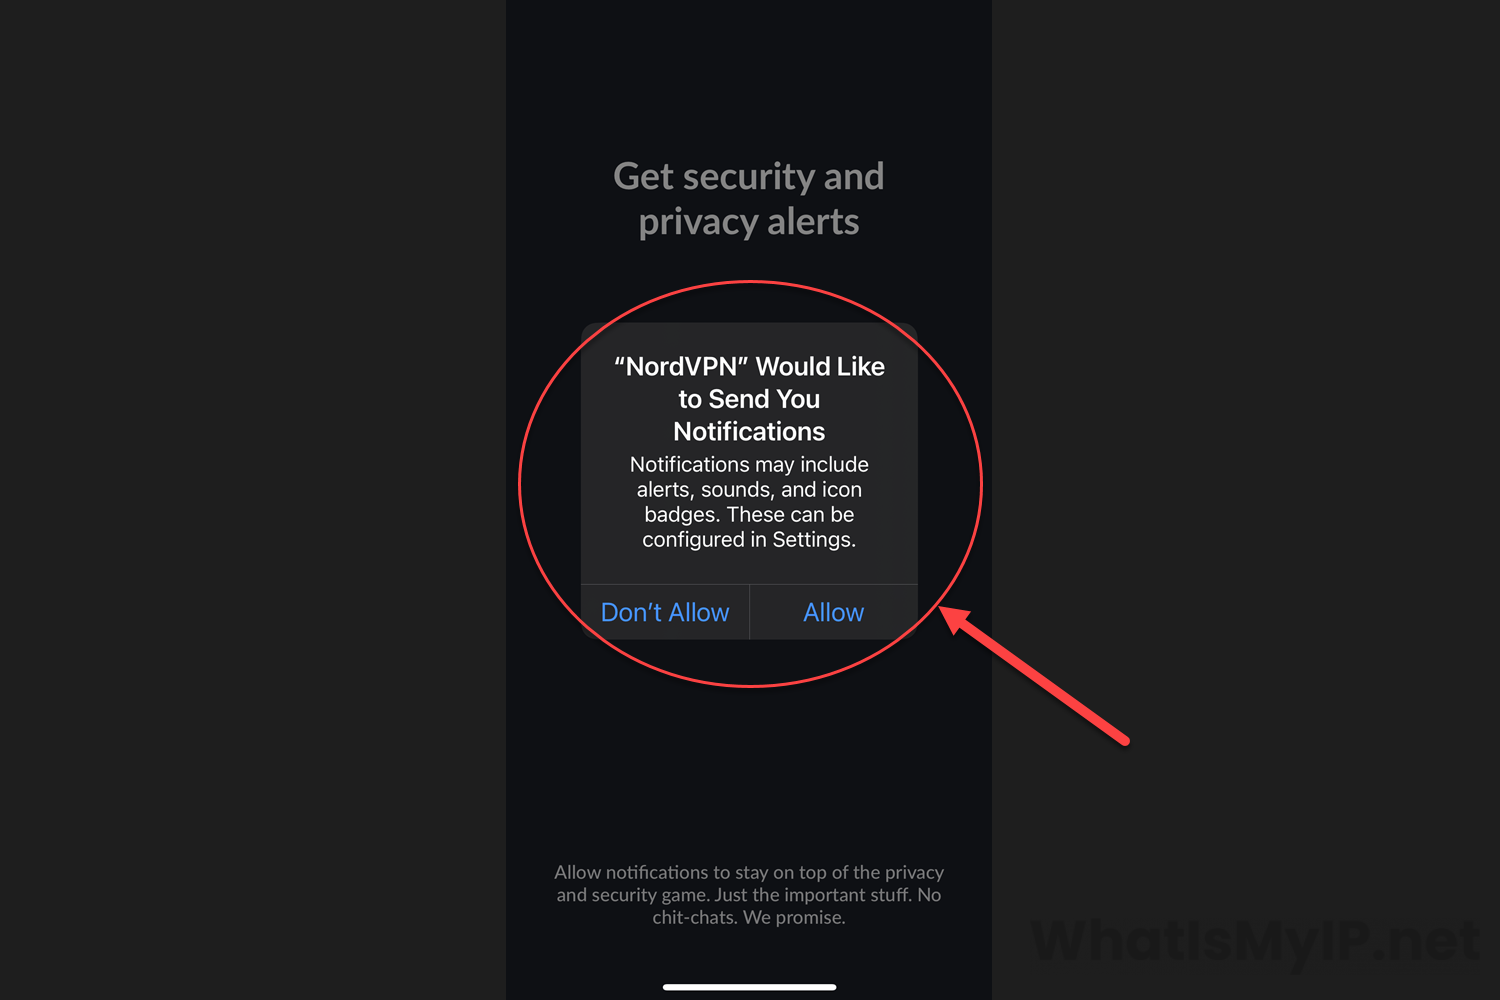
Notifications Setting
Once you login, you will be redirected back to the NordVPN iOS App and you will get a popup asking you to allow or not on NordVPN sending you notifications on the ios device. You can click the “Allow” link here if you like to continue.
Step 7
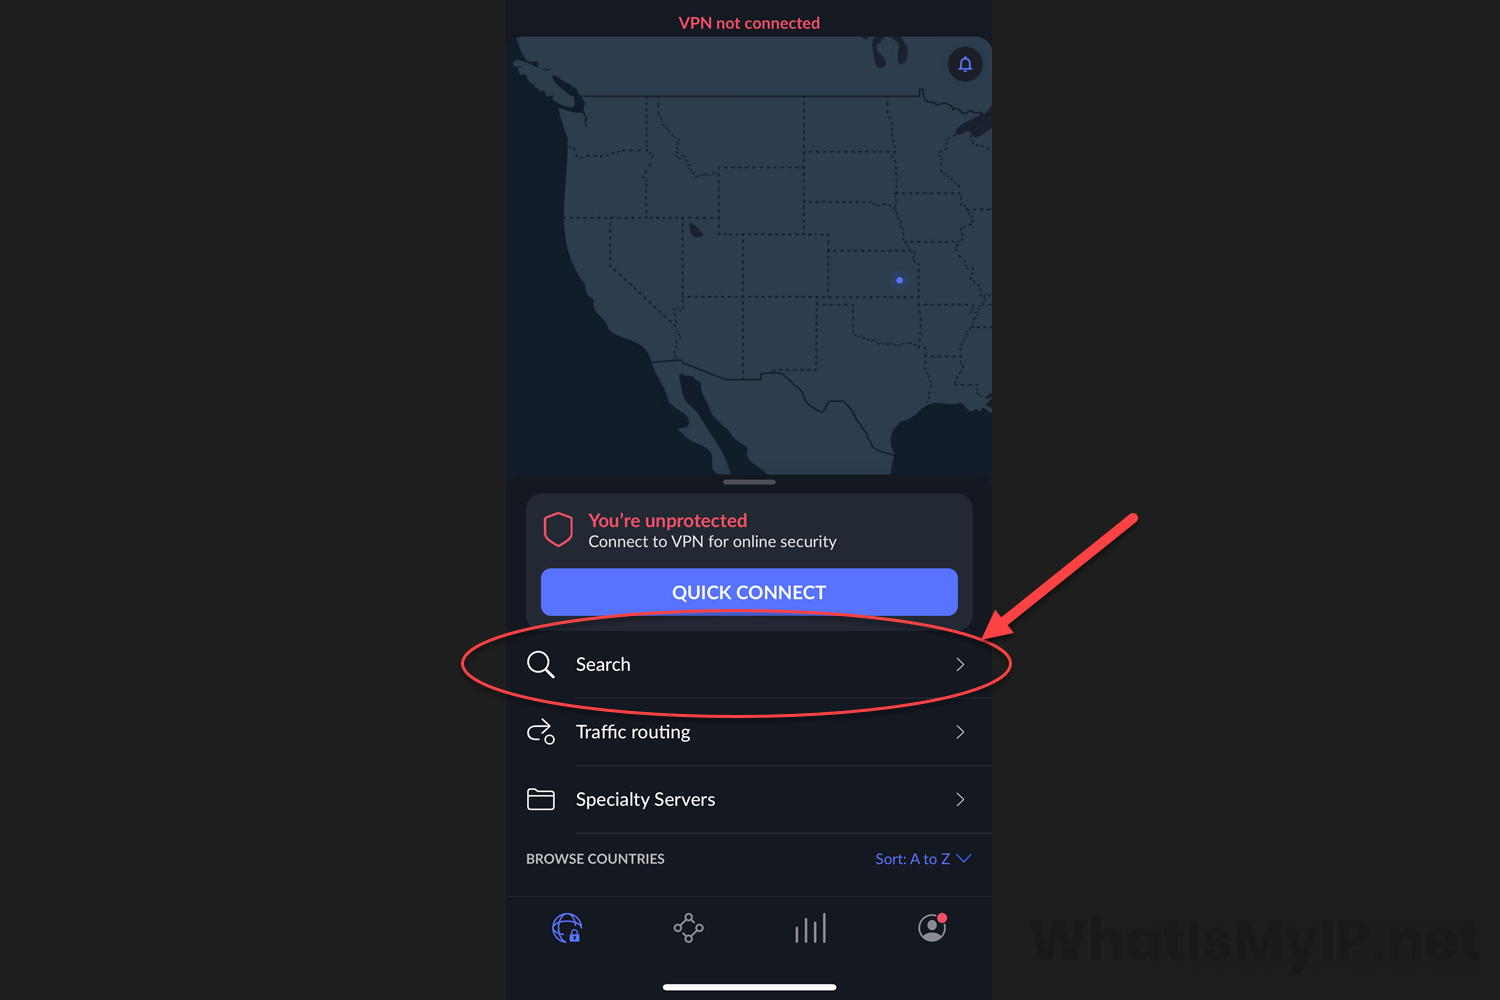
NordVPN iOS App
Once you are completely logged in, you will see the main dashboard of the app which will have a map on it along with some other links at the bottom. Here you can do a “Quick Connect” if you like to quickly connect to a vpn server close by for you or in our case click the Search link at the bottom to select a vpn server of your choice to connect too.
Step 8
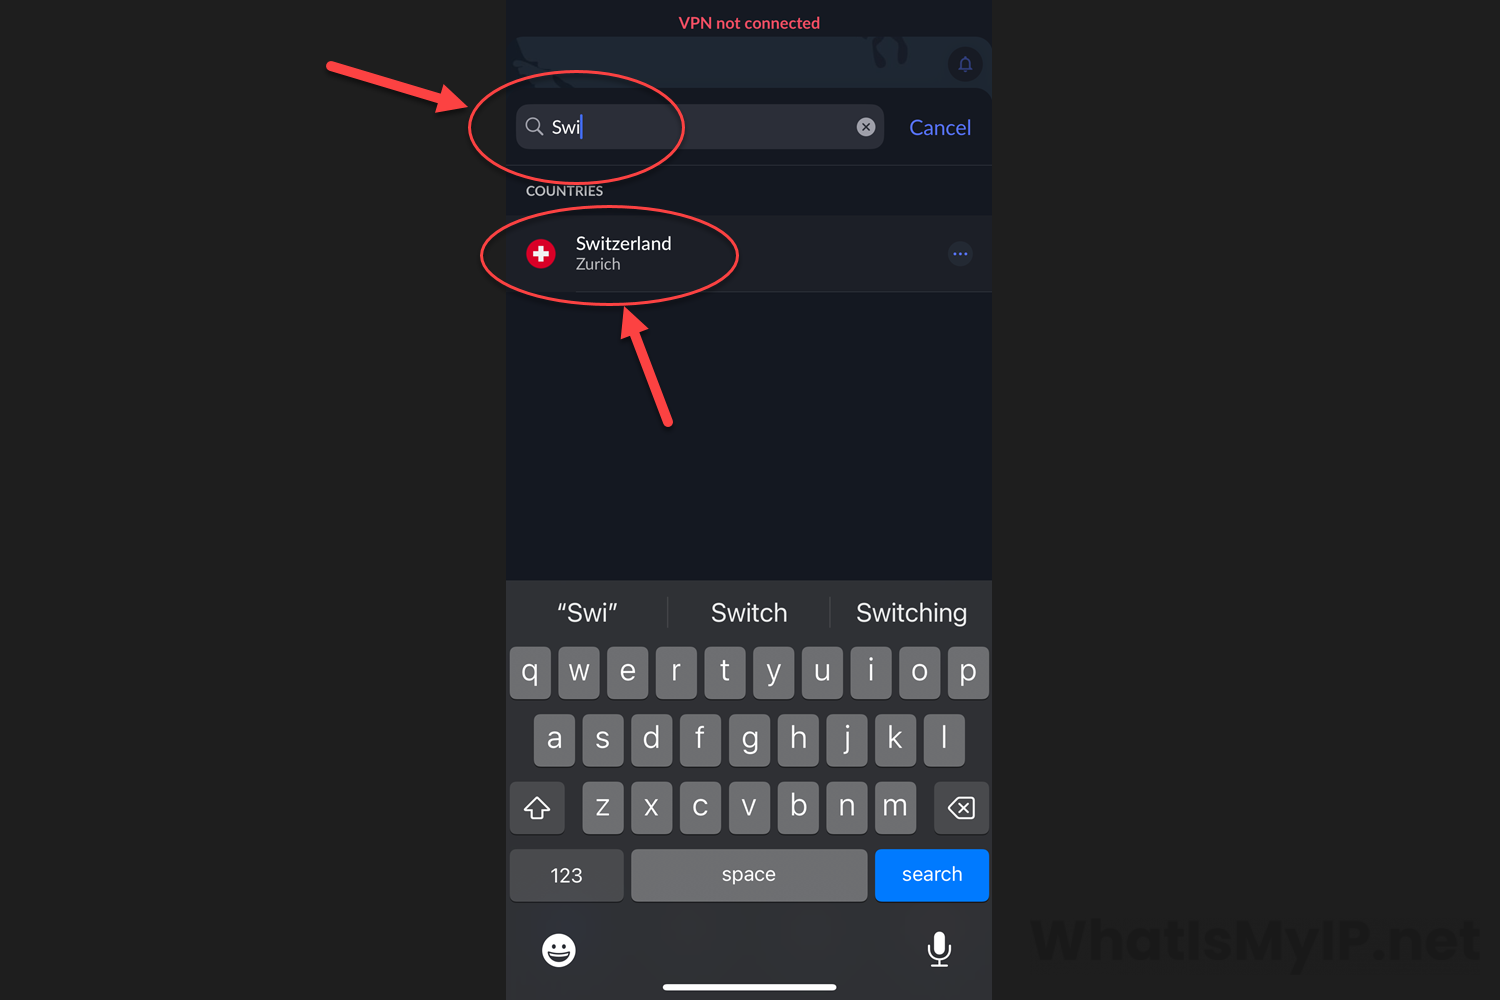
Connecting to a VPN Server
Here you can search for the server you would like to connect to by simply typing in the name of the country you would like to connect through. In the example we are connecting through Switzerland so start by type in “Swi” and you will see the country name come up at the bottom. Click on the name of the country and it will automatically select a vpn server from that country and connect you through it.
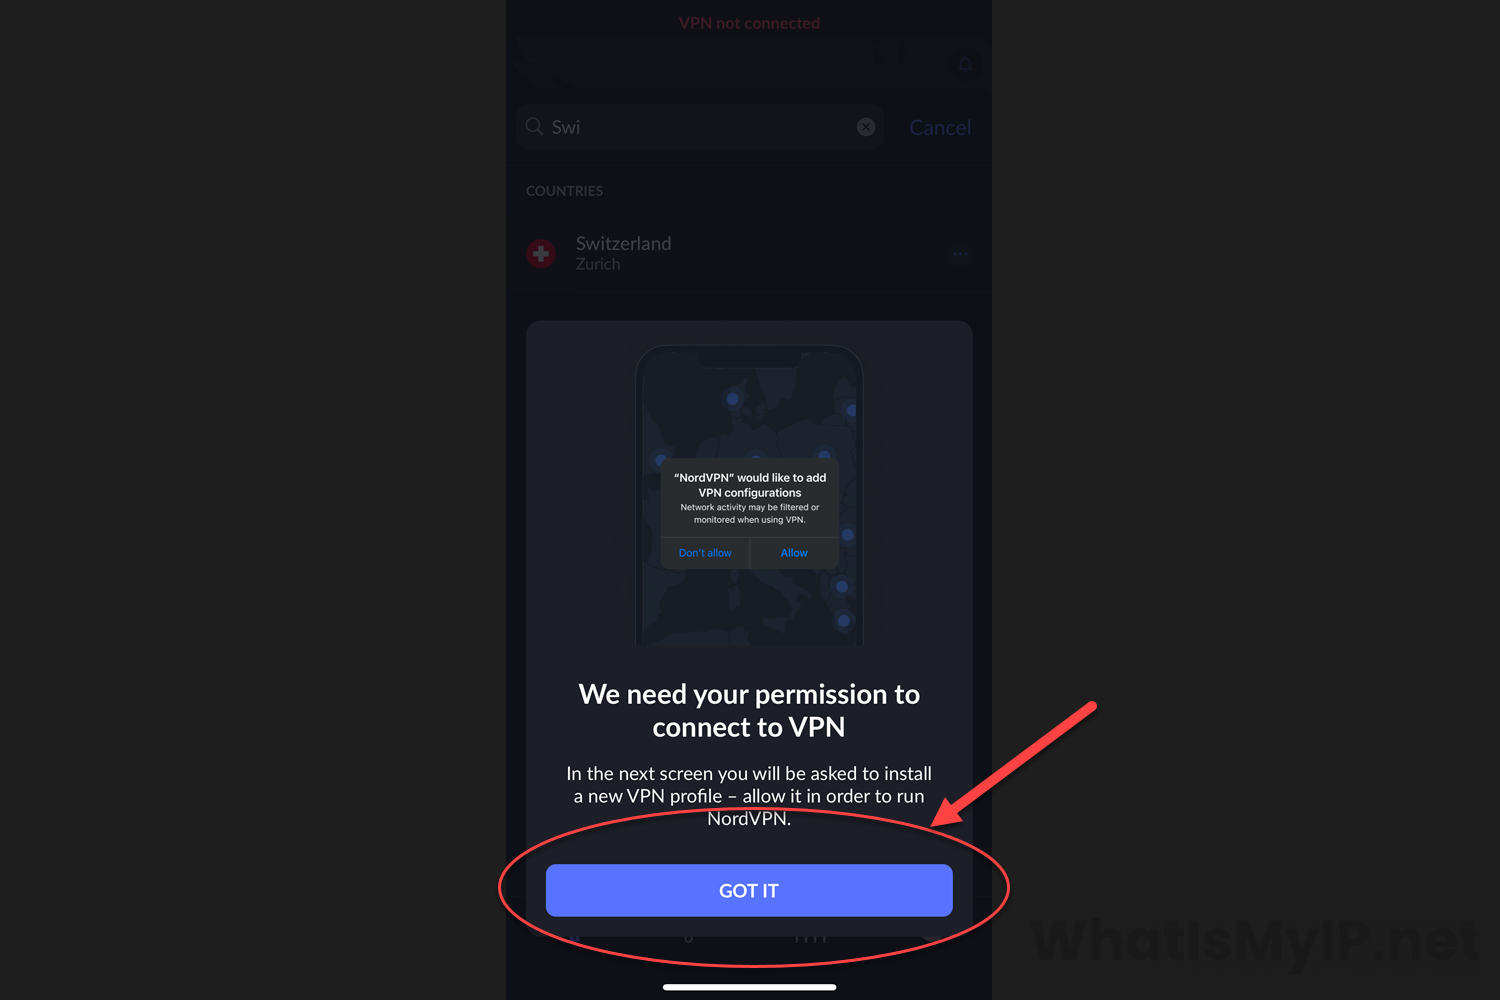
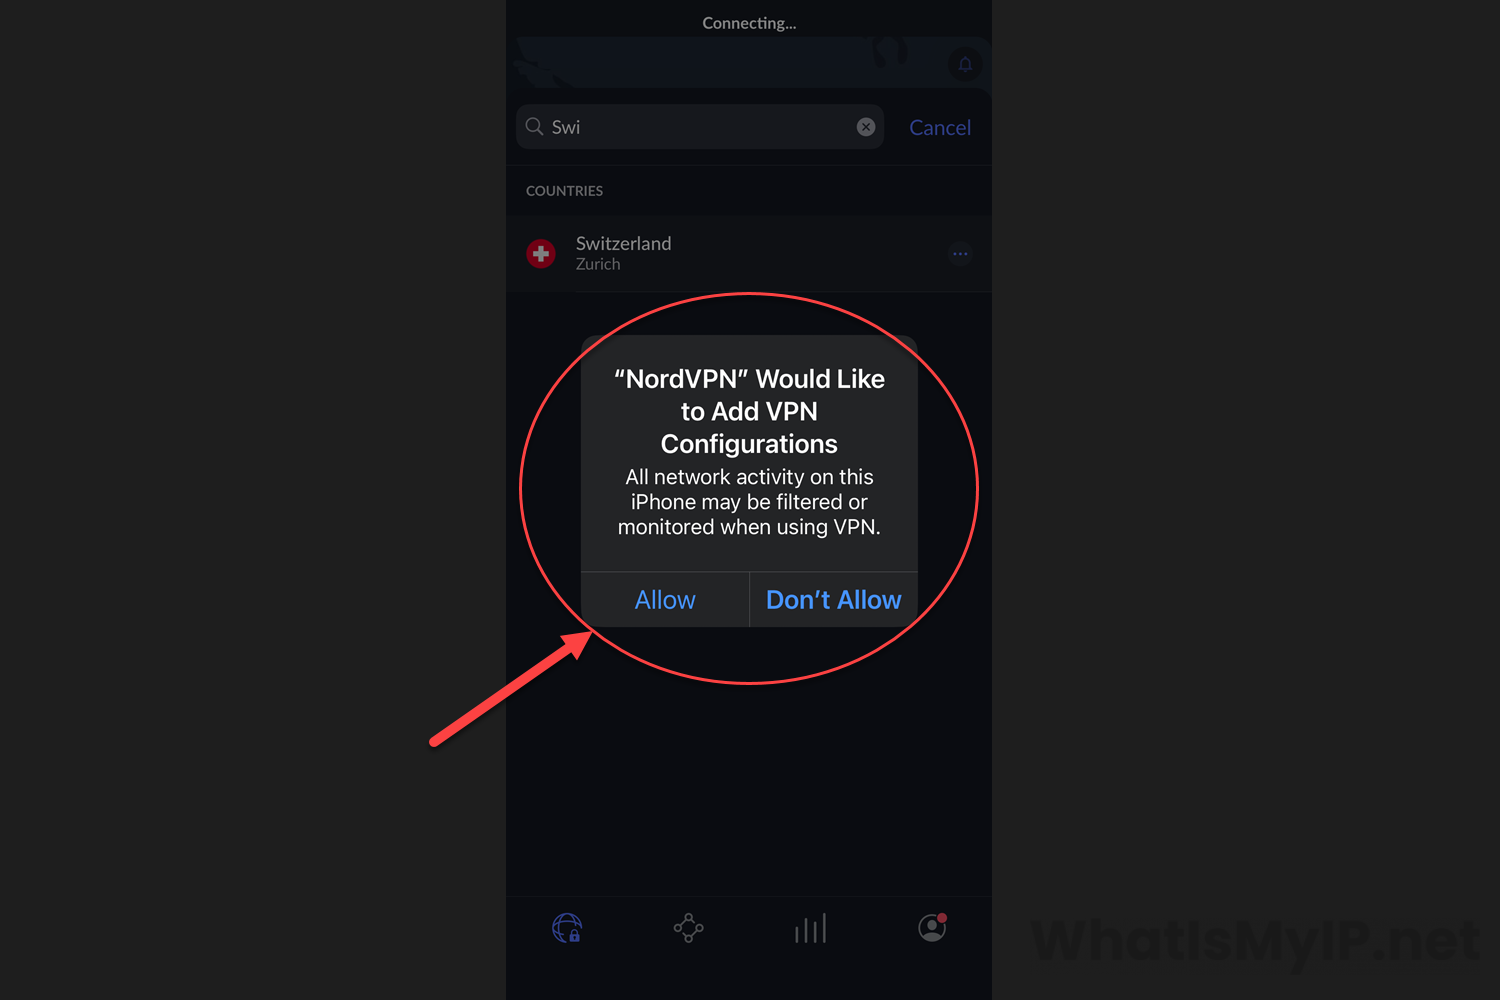
Step 9
VPN Permission Settings for iOS
On the first time you connect to a vpn server on your iOS device, you will need to allow NordVPN to setup a von profile on your device. This just allows you iOS device to connect through the nord vpn servers. On the first screen just click the “GOT IT” button. On the next popup, you will need to click on the “Allow” link to allow NordVPN client to set up the vpn profile on your iOS device.
Step 10
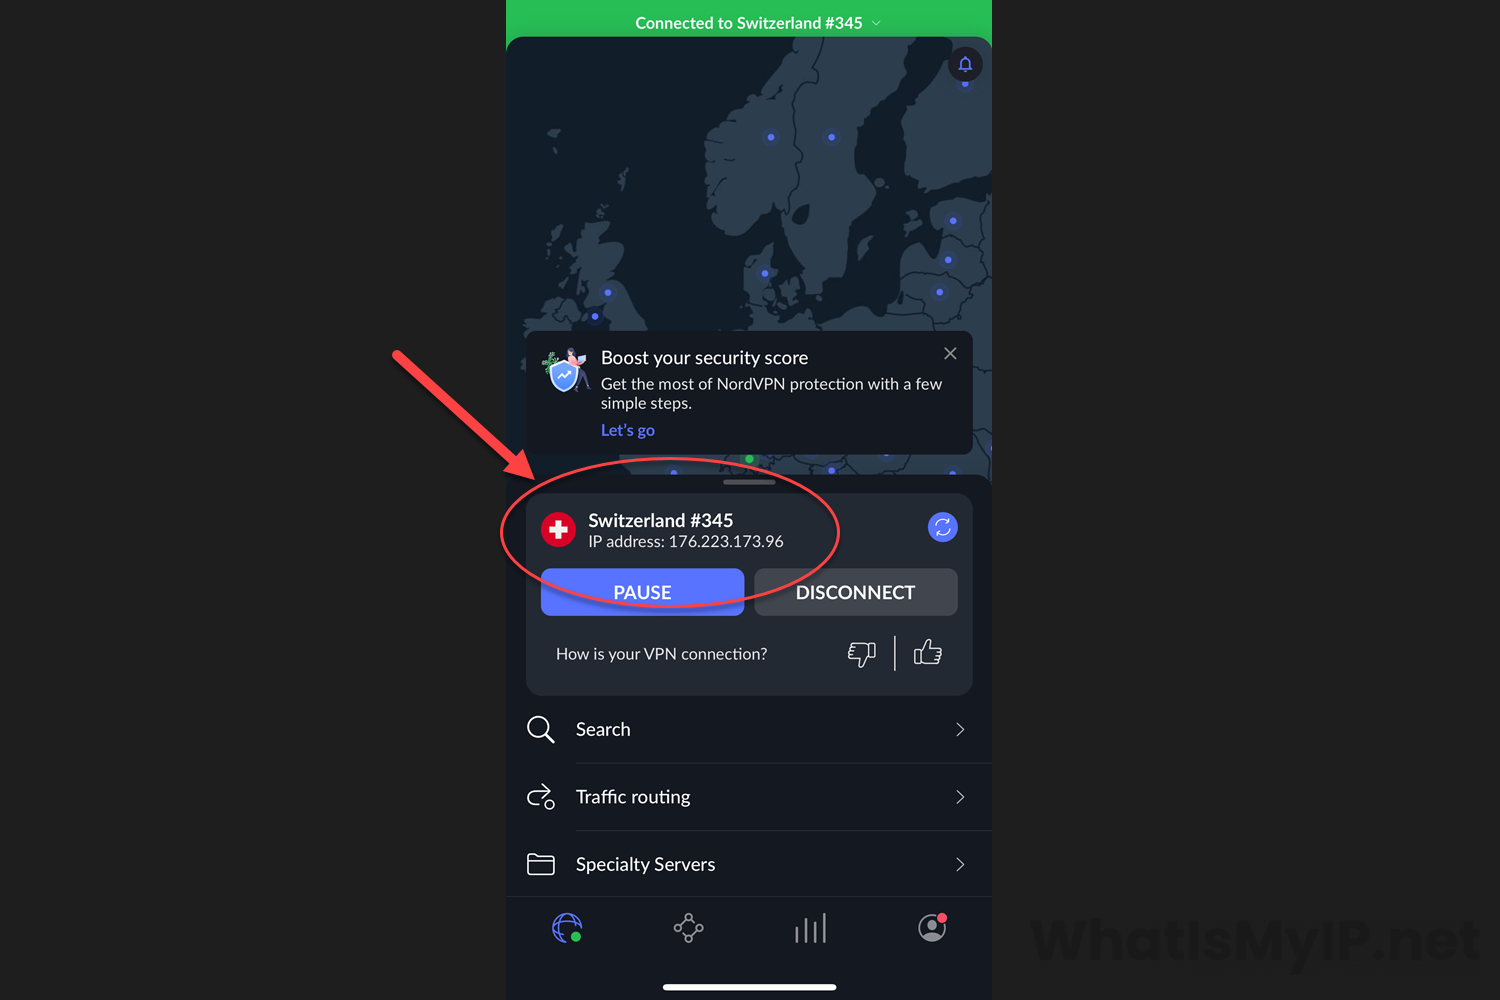
Connected to VPN Server
Once you connect to the vpn server you will see a green bar at the top of the screen and it will say “Connected to Country ServerID“. In the middle of the app you will see the country where the vpn server is located in and you are connected to. In our case, it a vpn server in Switzerland Zurich and it will show the ip address you were assigned to by that vpn server.
Step 11
Test VPN Connection
If you would like to test the vpn server connection details, head over to our main website and check your ip address details there. As you can see by our example my ip address details show location Zurich.
Here we will guide you through the steps for downloading and installing NordVPN on your various browsers. While the process is similar across most, each has its own specific configuration options that you can customize.
Step 1
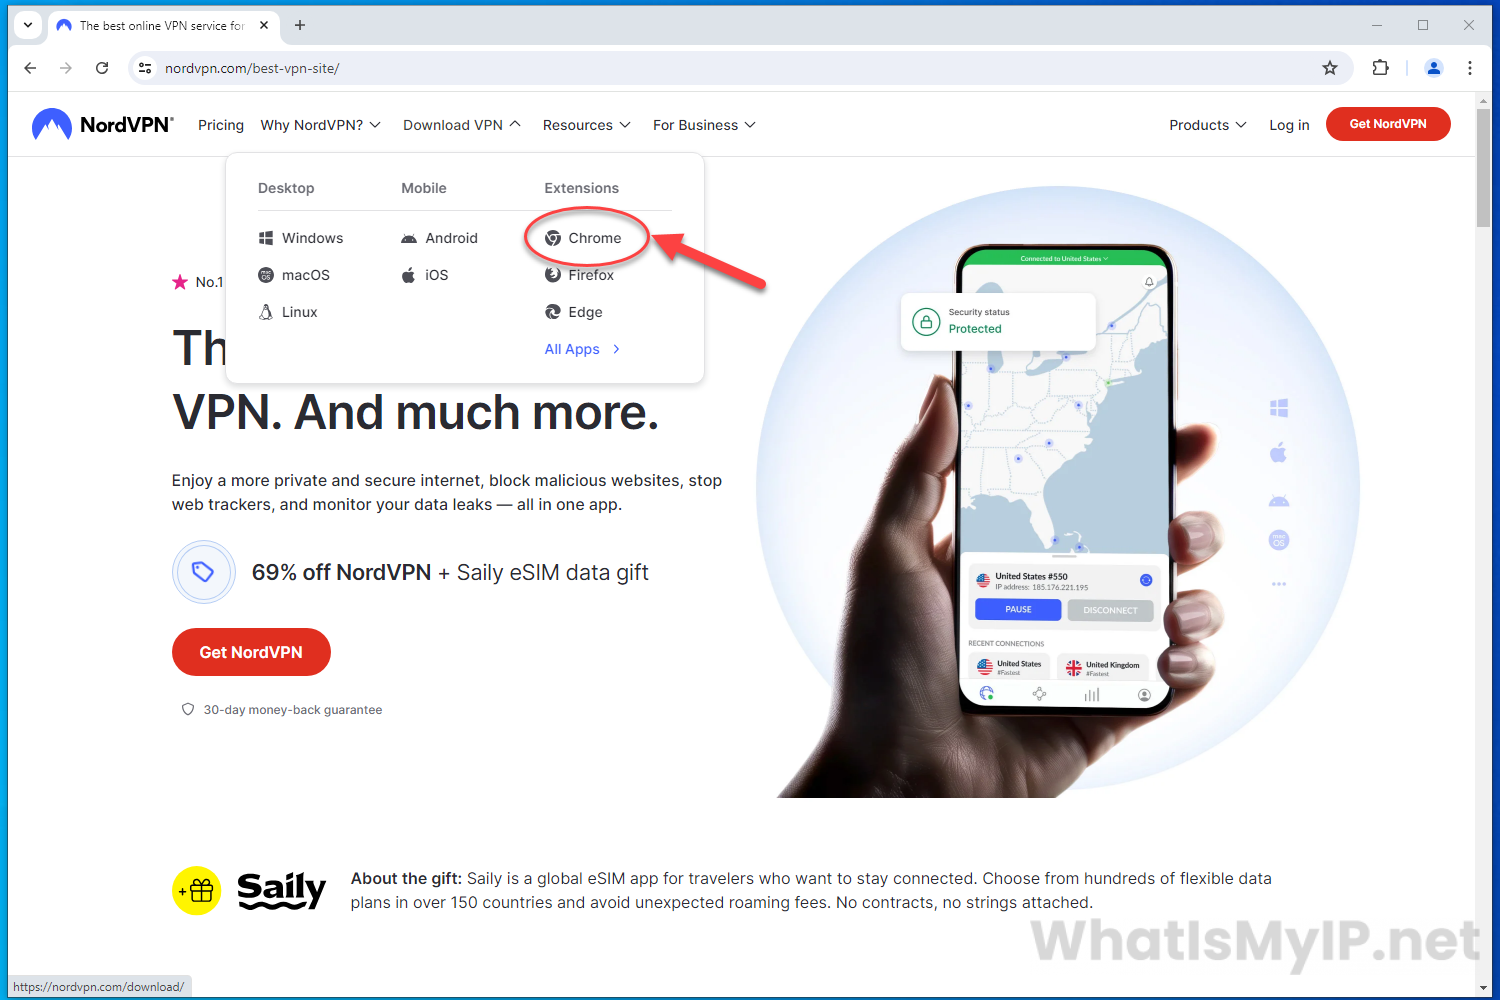
Download Chrome Extension
Head over to the NordVPN page and hover over the “Download VPN” link at the top and click on the link “Chrome” under the Extensions menu.
Step 2
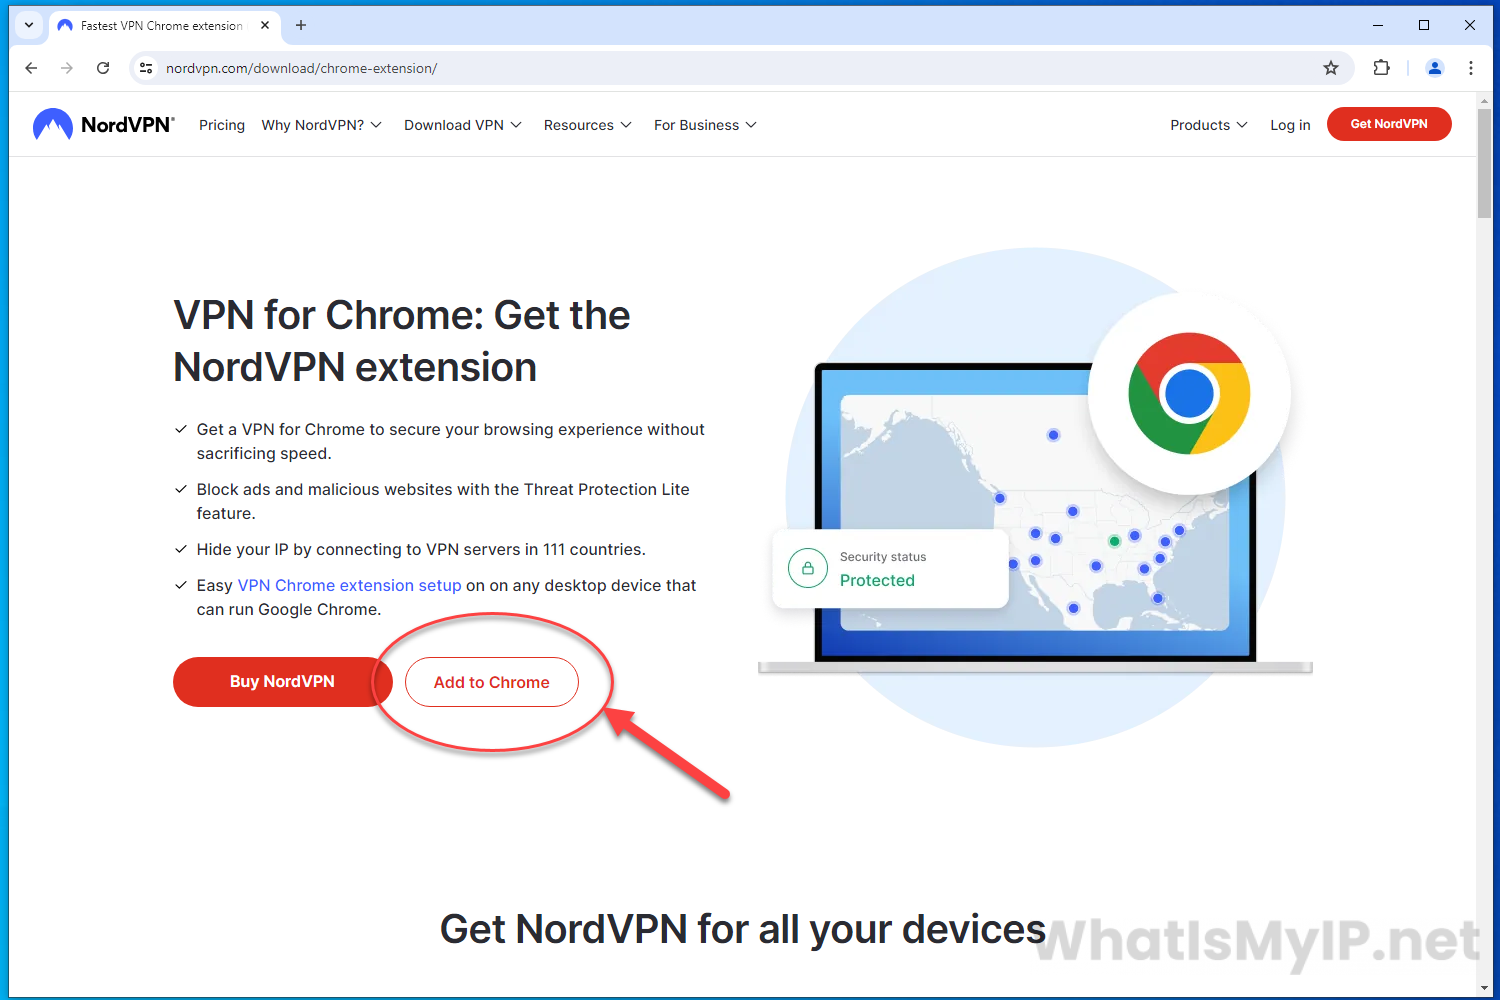
Download NordVPN for Chrome
Click the “Add to Chrome” button to get started with adding the NordVPN Chrome Extension.
Step 3
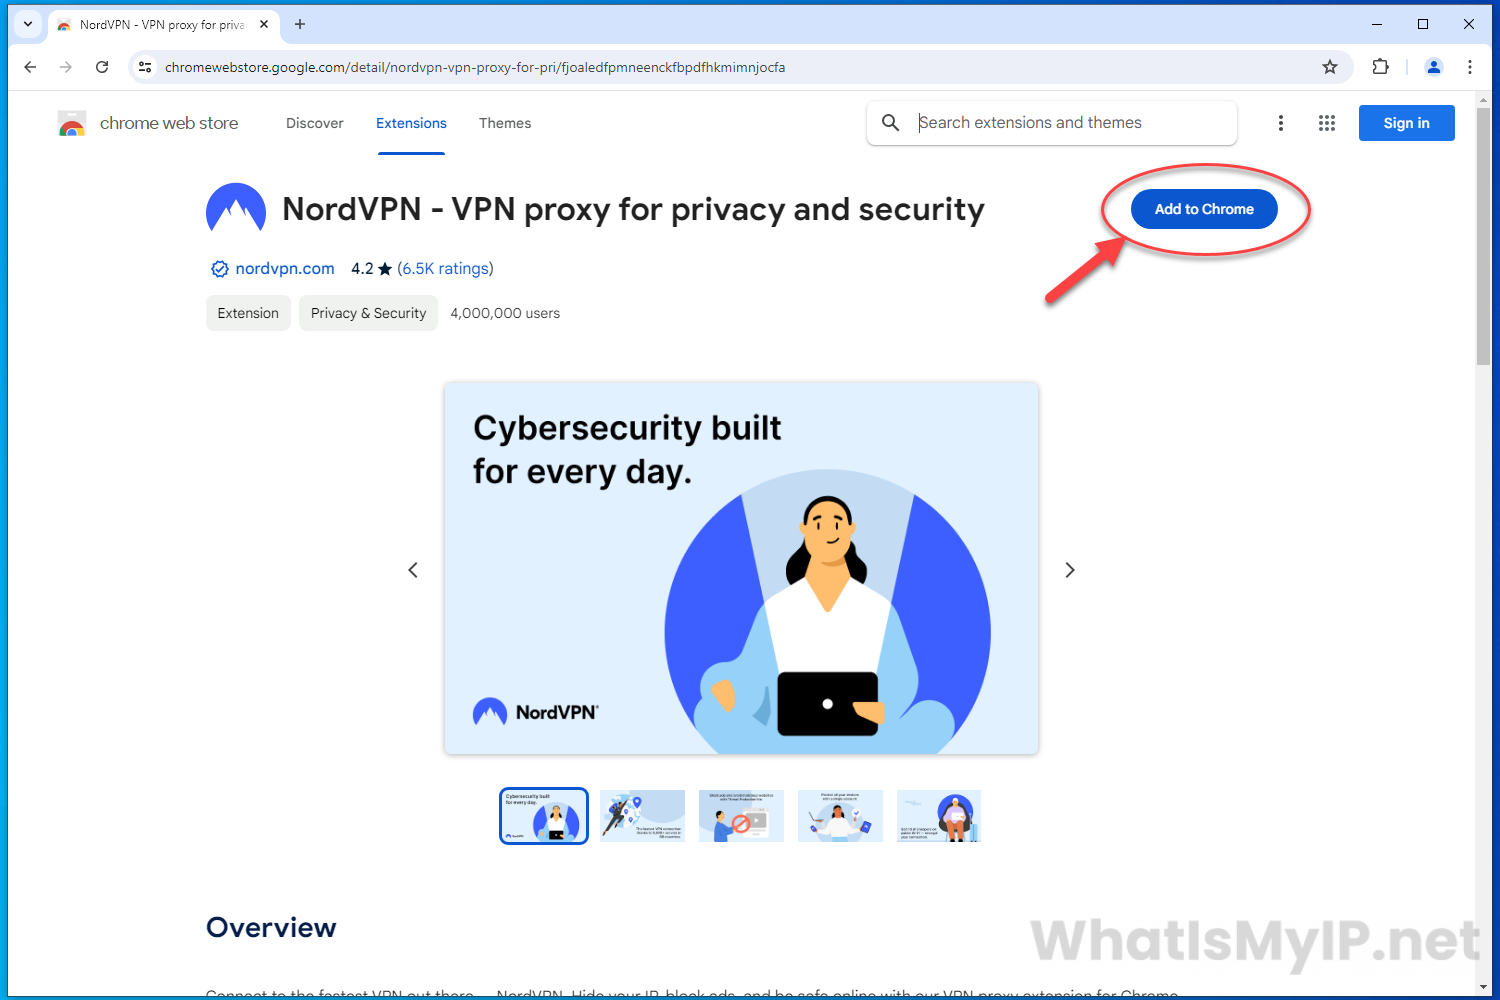
Add to Chrome
You will be redirected to the Chrome Web Store to download and install the extension for NordVPN. At the top right, click the blue button that says “Add to Chrome” to get started.
Step 4
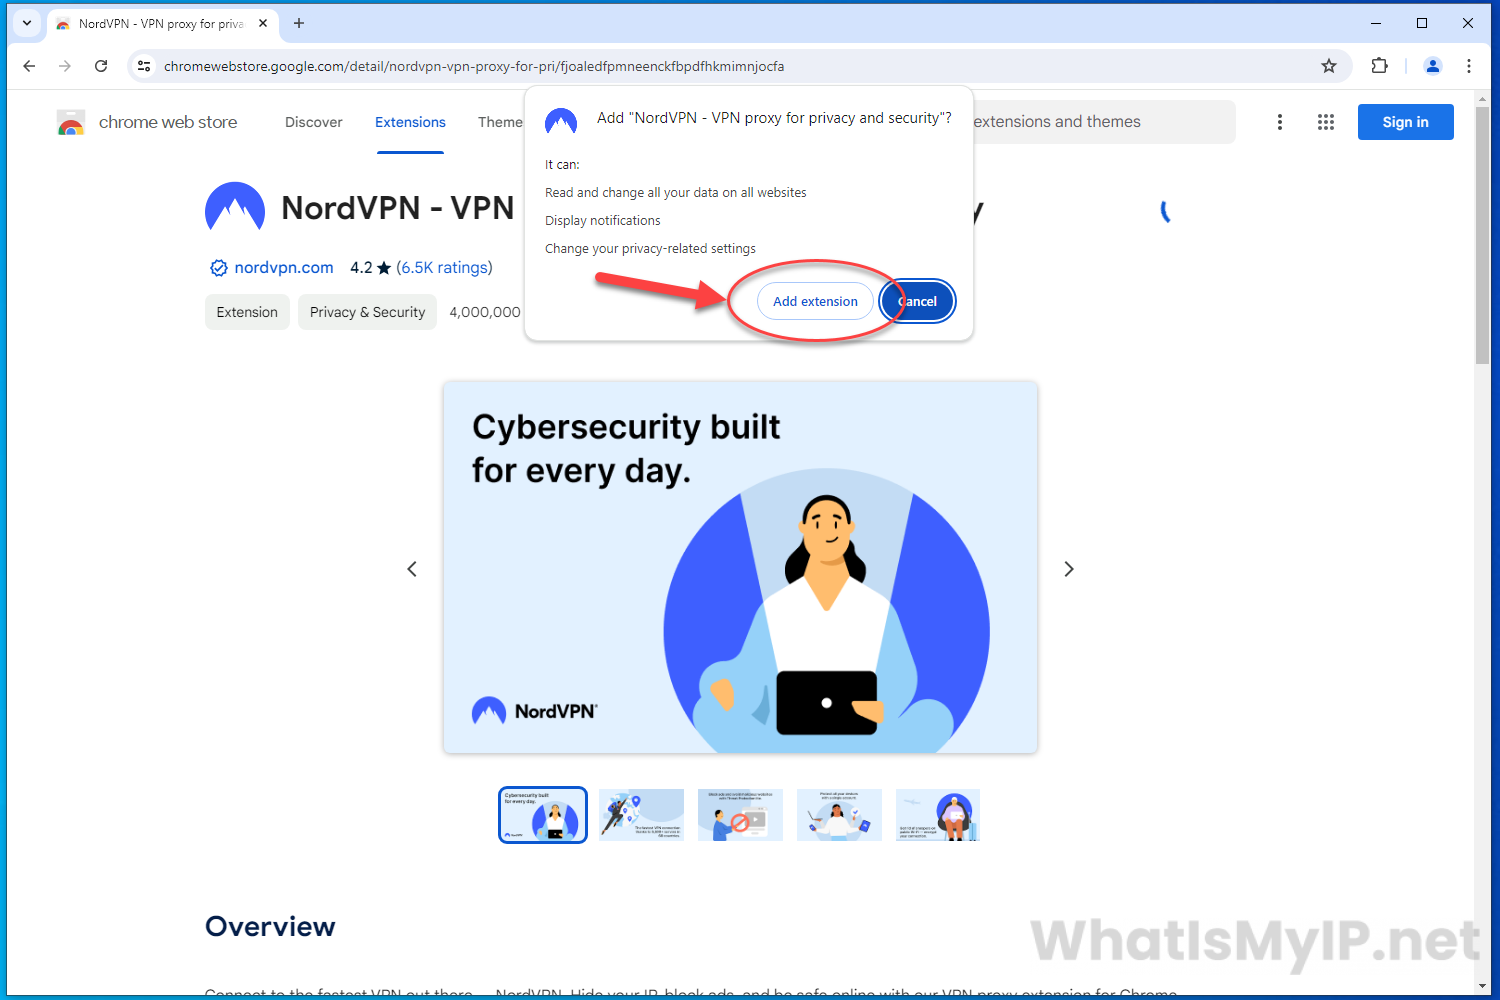
Confirm Extension
You will received a popup box from chrome asking if you would like to add the NordVPN Extension. Click the “Add extension” button in the popup.
Step 5
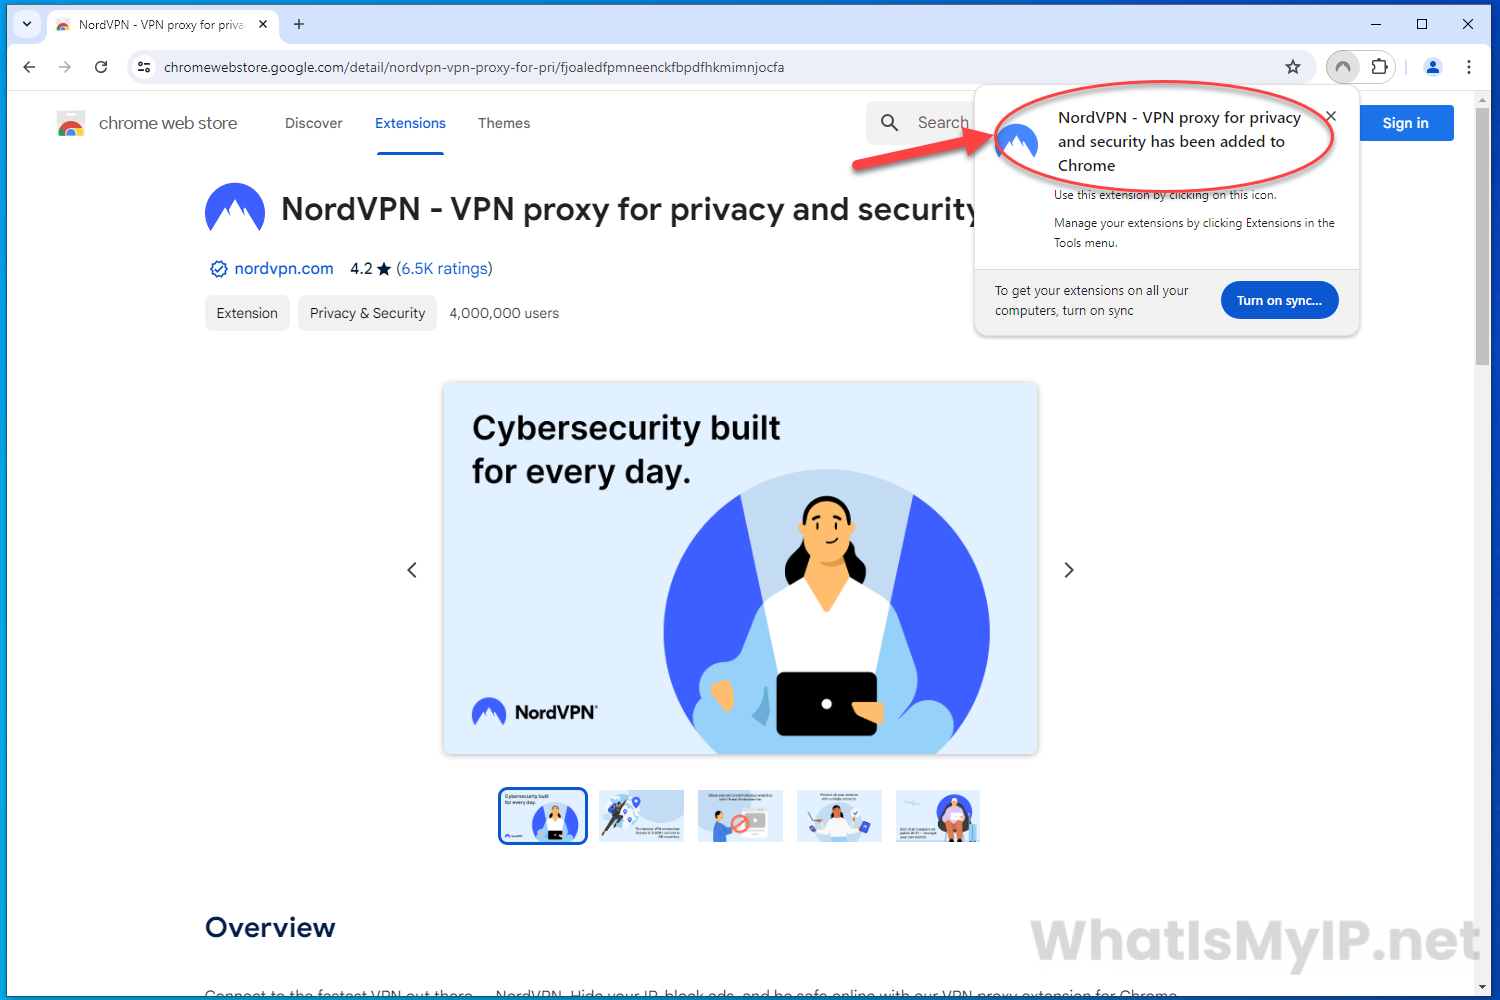
Extension Install Complete
Once the extension has been successfully installed and added into Chrome, you will get a popup box saying so.
Step 6
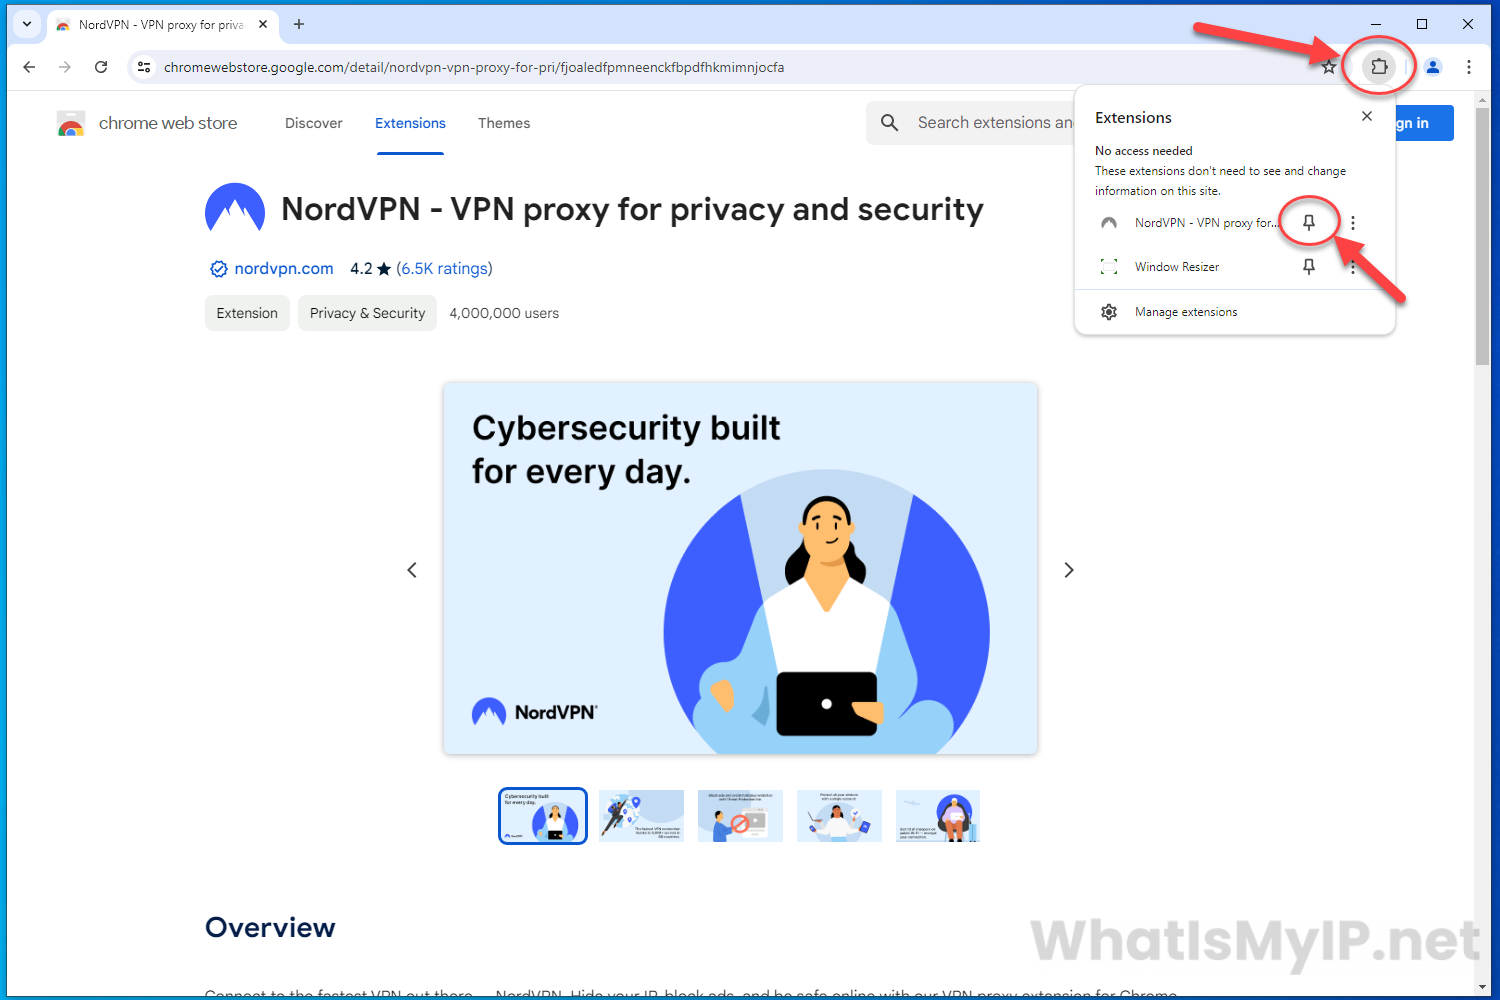
Pin Extension for Use
Now lets pin the extension to the toolbar for easy access. On the upper right corner, click on the little puzzle piece icon which will open up a menu showing you all the extensions you have installed. You will see NordVPN on that list and a little pin icon next to it. Click the pin icon to pin the extension into your toolbar.
Step 7
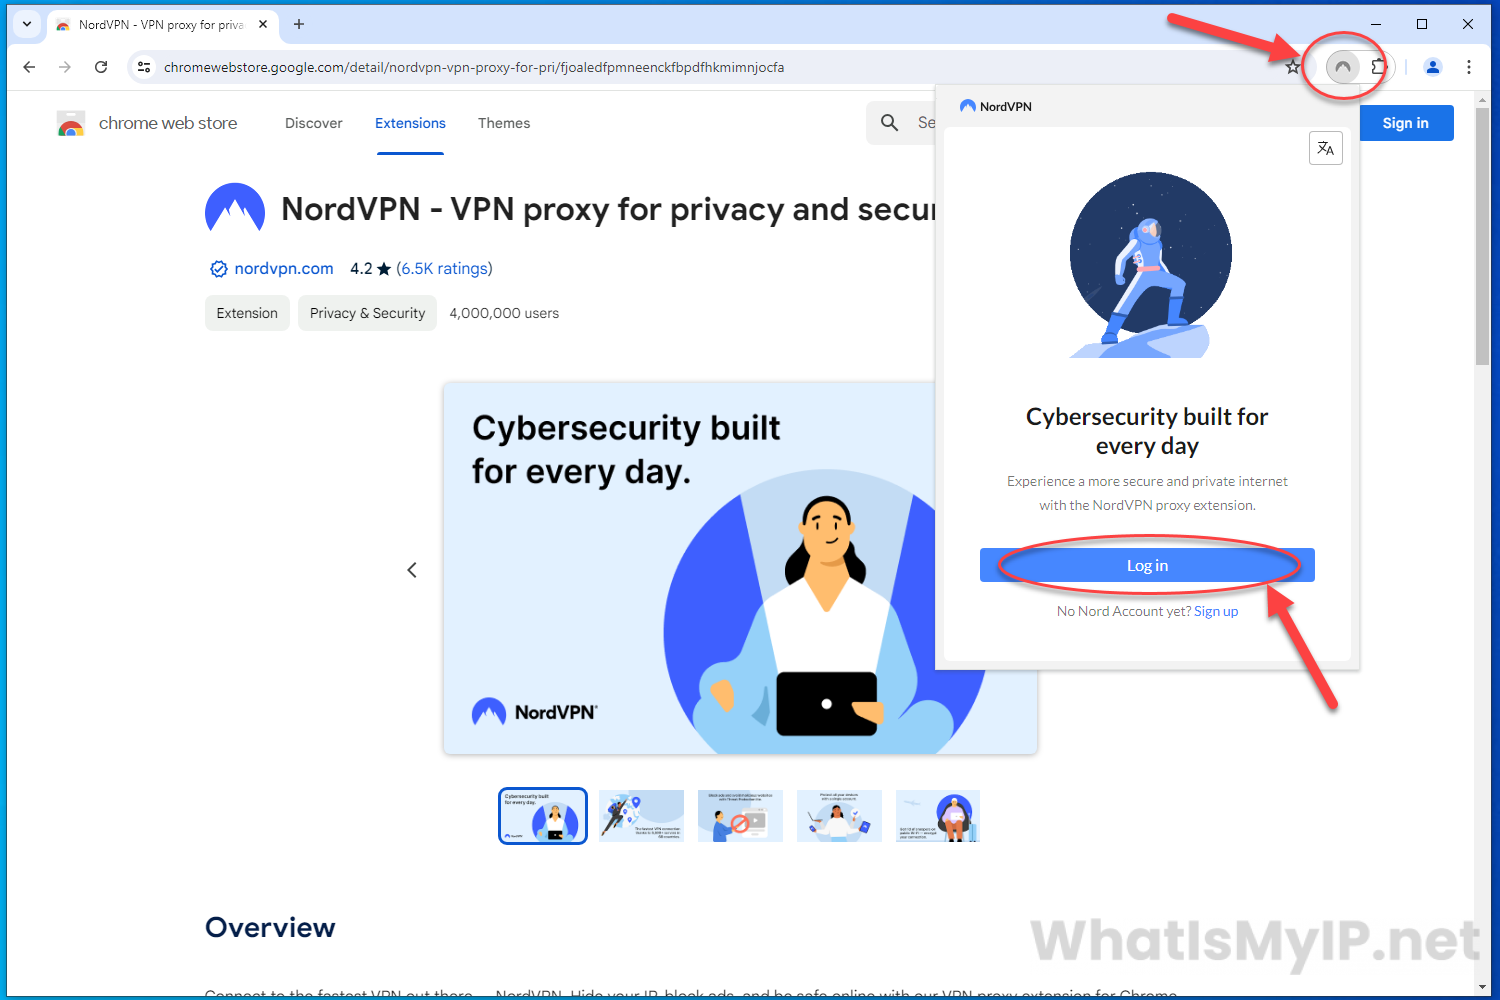
Extension Setup
Now that we have the extension installed and pin, go ahead and click the little mountain icon for NordVPN to open up the app. You will see a box popup asking you to Login or Signup for a account. Since we already have an account, lets click on the “Log in” button to continue with the login process.
Step 8
Login to Nord Account
You will be directed over to the login page for Nord Account. Here we will fill in our username/email address and password to login to our NordVPN account. Once you have those typed in, go ahead and click on the “Log in” button to continue.
Step 9
Setup Complete
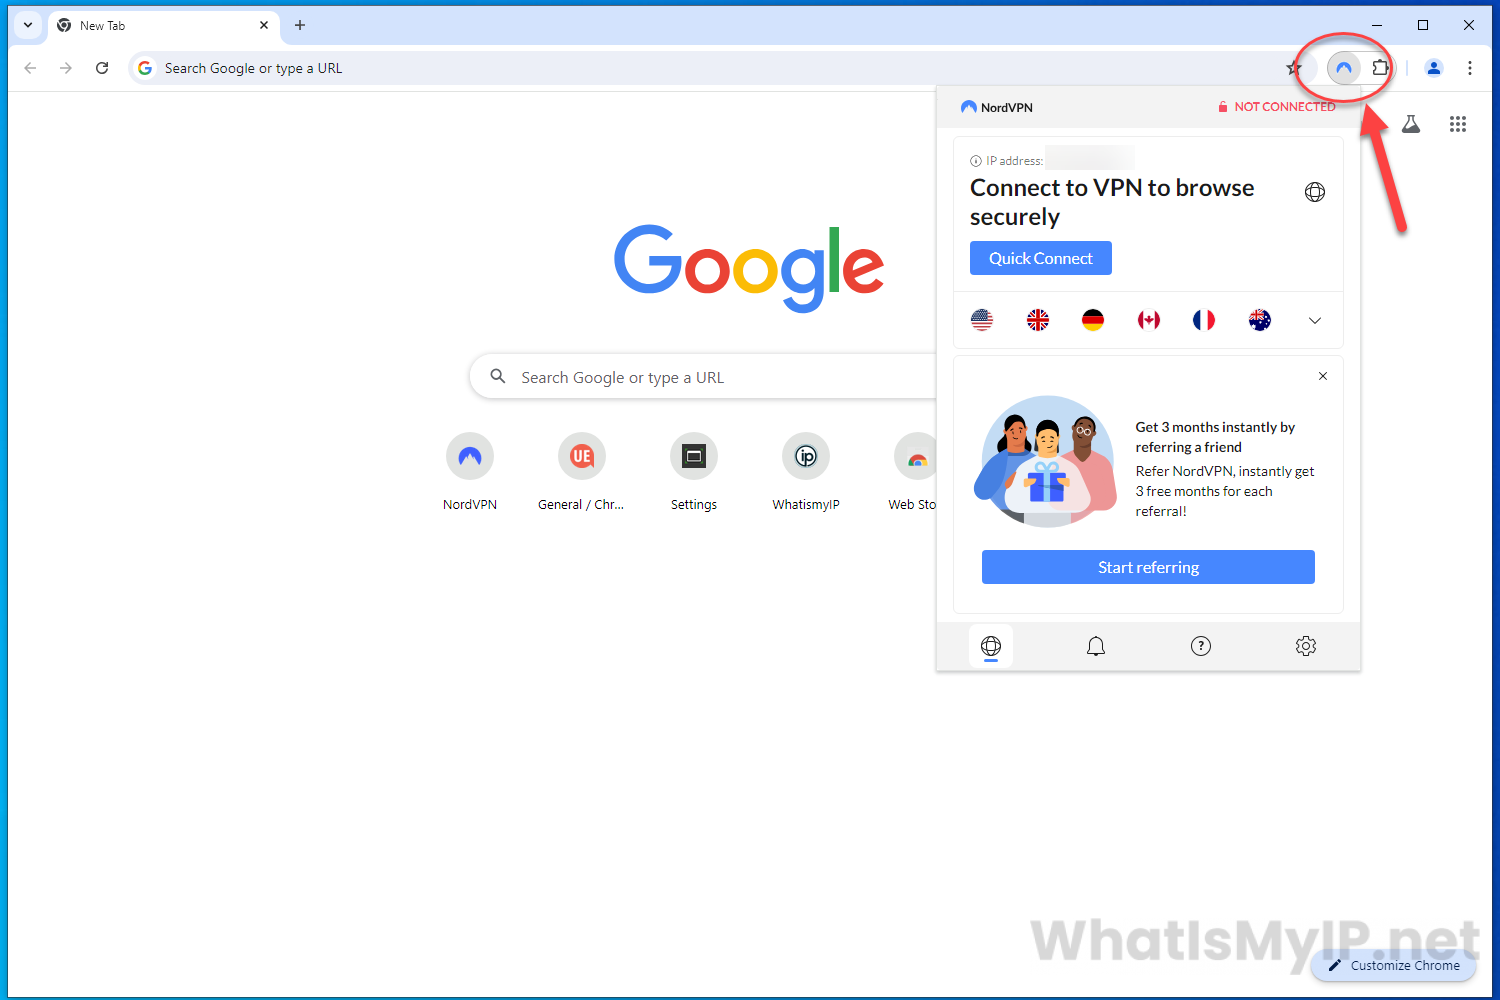
Now once you have logged into your Nord account, by clicking on the NordVPN icon on the toolbar, you will see the options to connect to a vpn server of your choice. You will also see you current ip address at the top and below that a button for quickly connecting to a close vpn server automatically.
Step 10
Connect to VPN Server
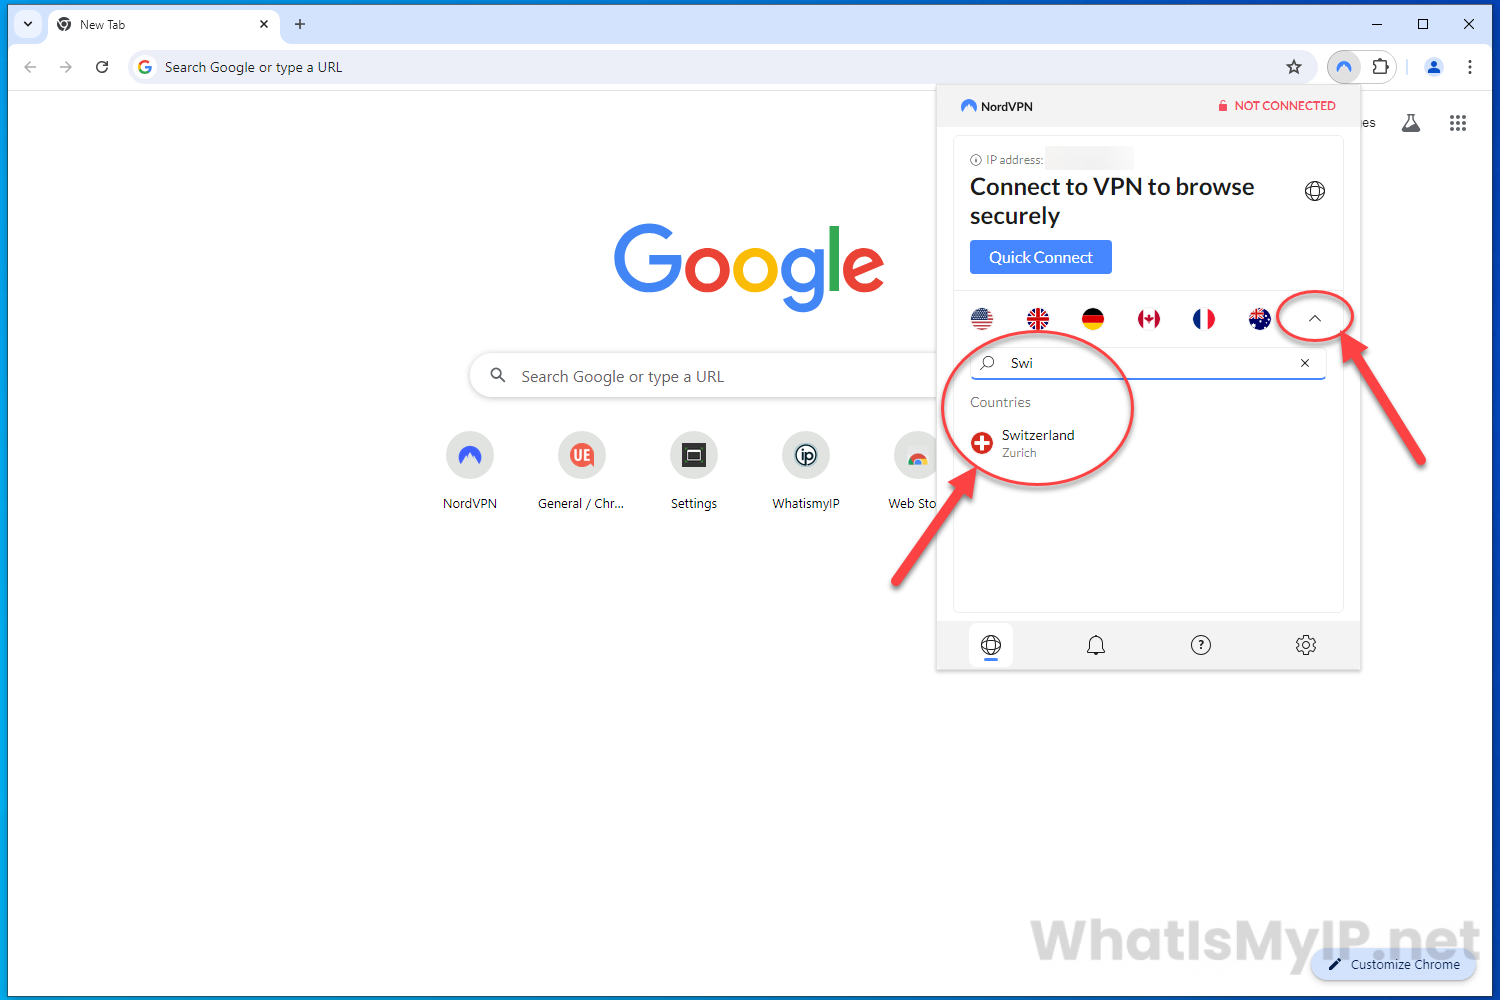
We will for this example connect to a different vpn server of our choice. Click the little up chevron arrow and you will get a search bar where you can type the name of the country you would like to connect through with your vpn. We will be connecting through Switzerland for this so start by typing the name “Swi” and you will see on the bottom list the countries that will come up. Click the country name to connect to the best vpn server NordVPN has in that country.
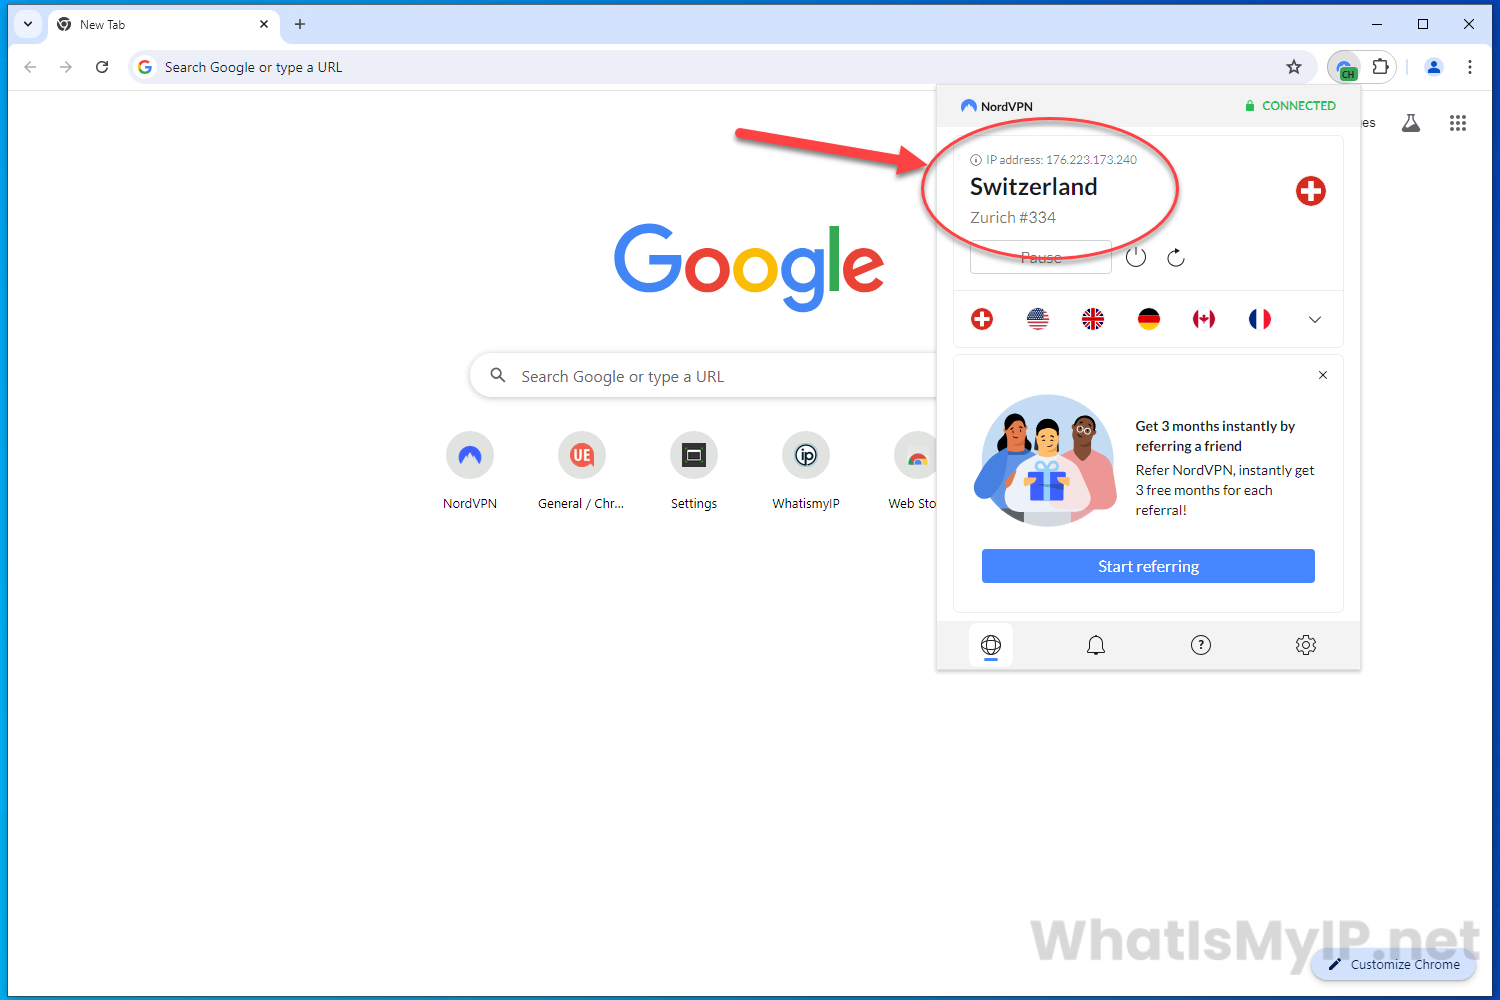
Step 11
Connected VPN
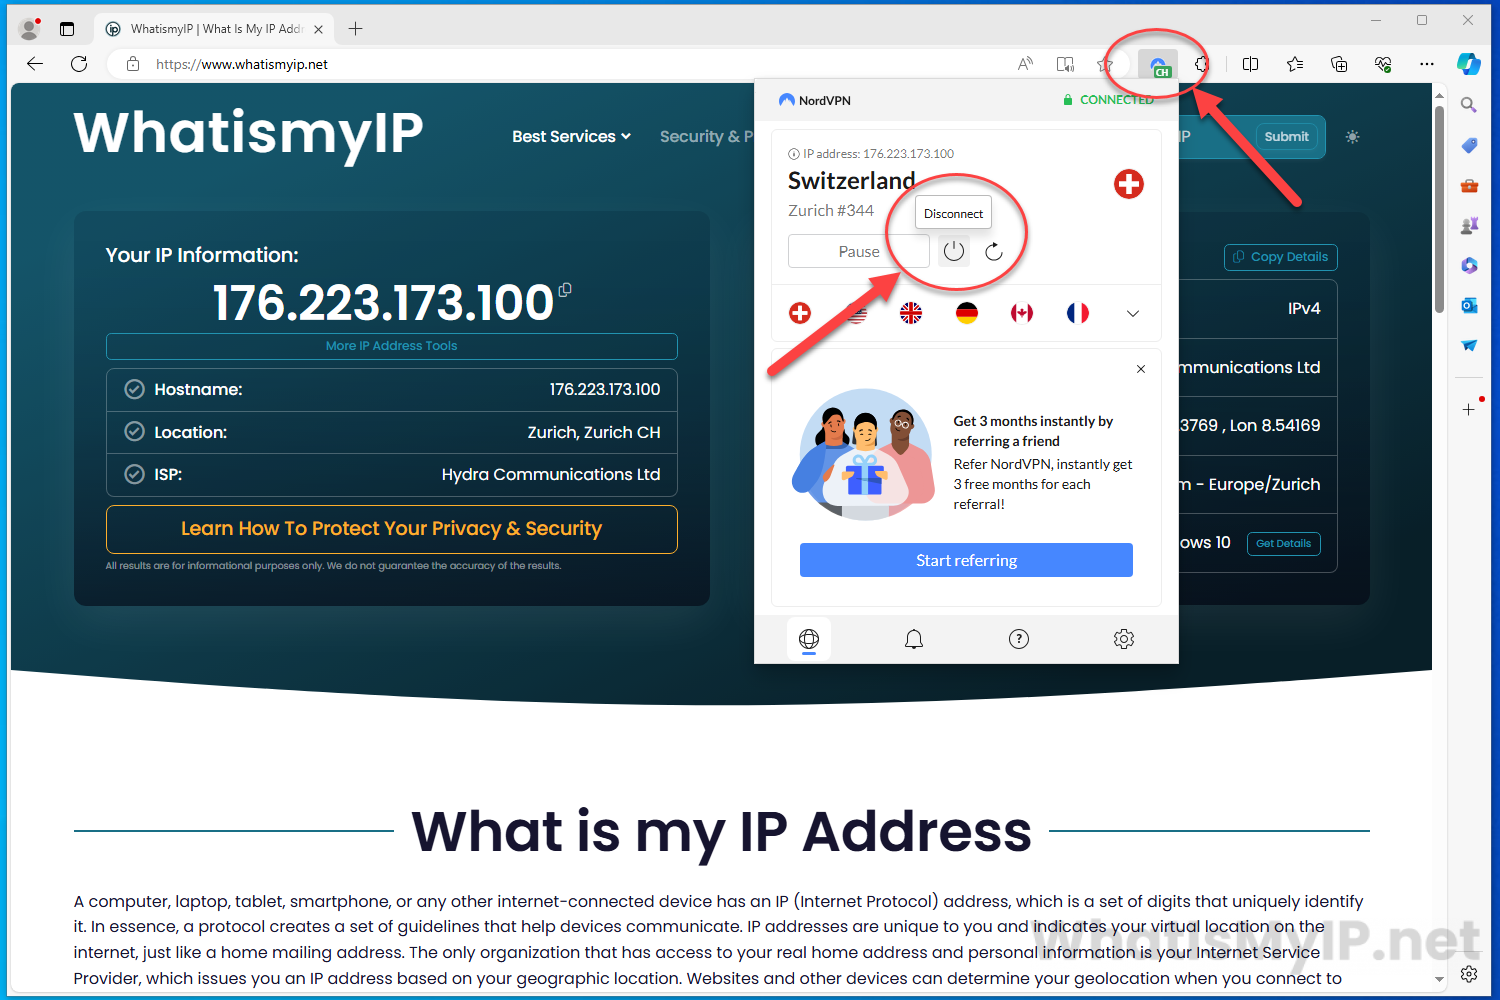
Now since you are connected, clicking on the NordVPN icon on your chrome toolbar (which should be green now with the country letters your are connected too) it will open a NordVPN extension app and you will see the wording at top in green saying “Connected” and it will give you your ip address and the country and VPN Server you are connected too.
Step 12
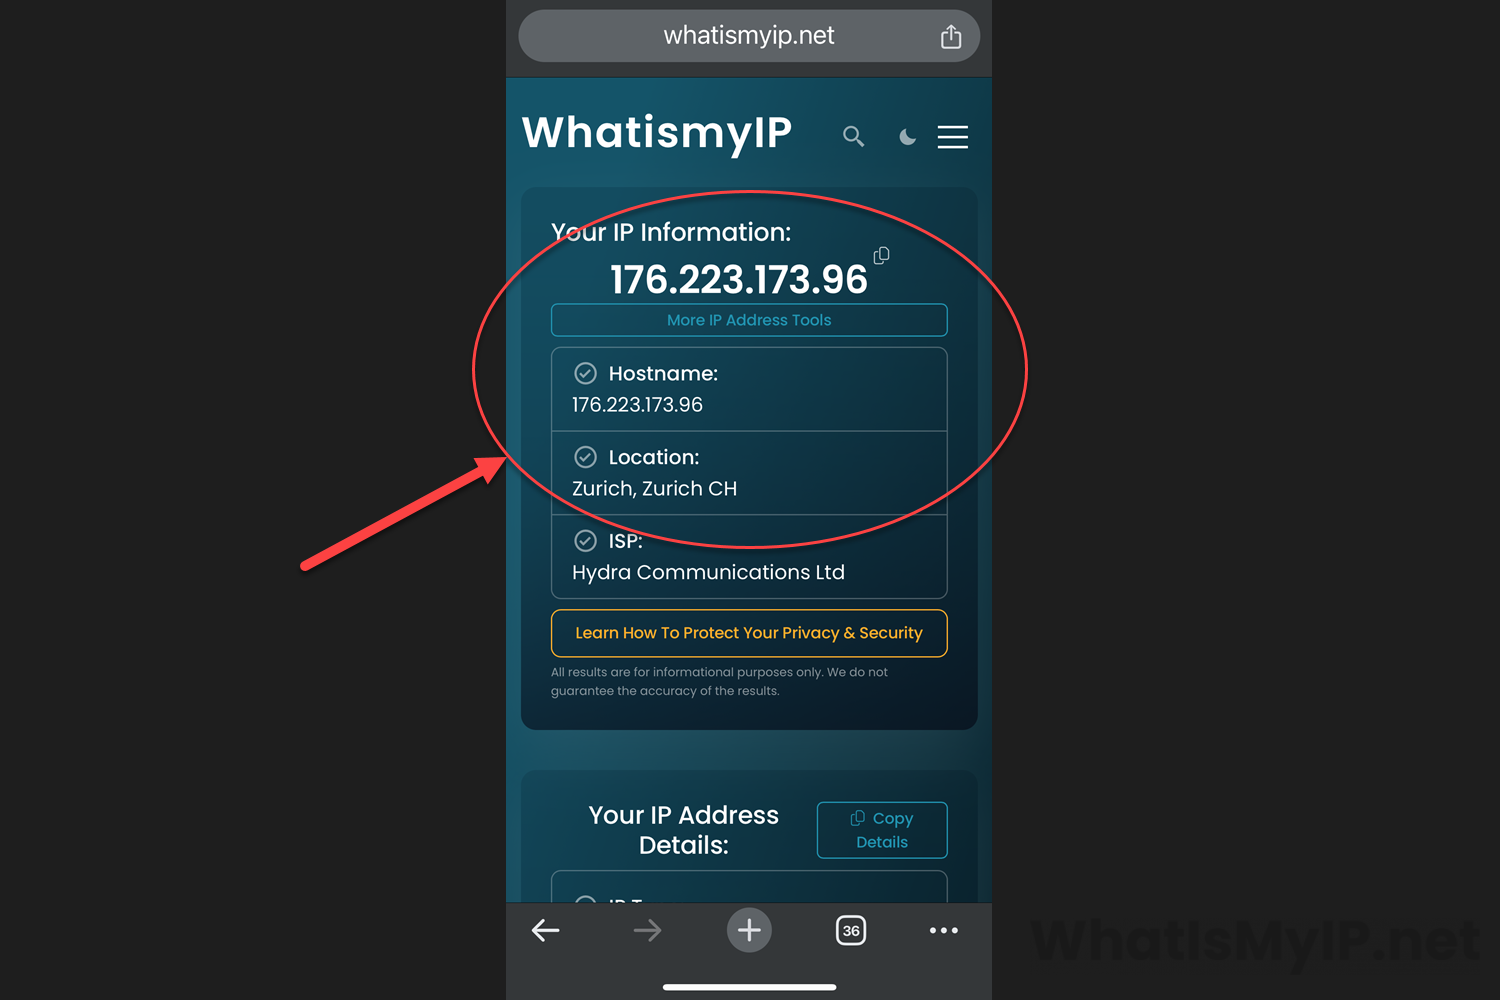
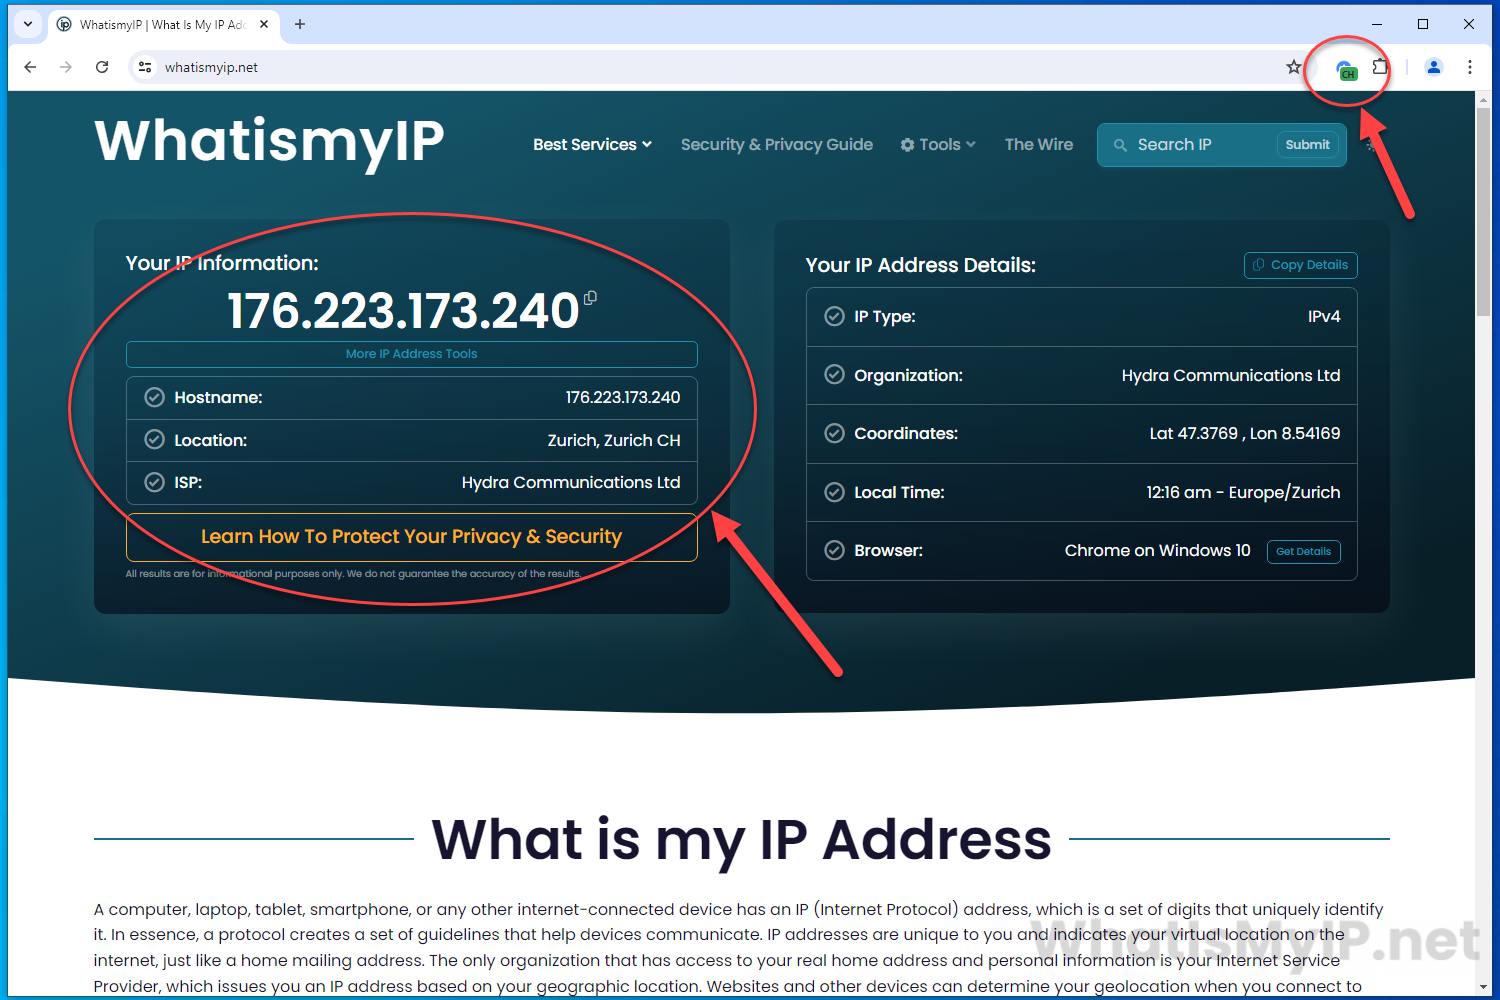
Check Your VPN Connection
To check you vpn server details, head over to our main website WhatismyIP.net and check your ip address details. Here you can see that our ip address details are the same as in the NordVPN Extension app and shows what vpn server we are connected through.
Step 13
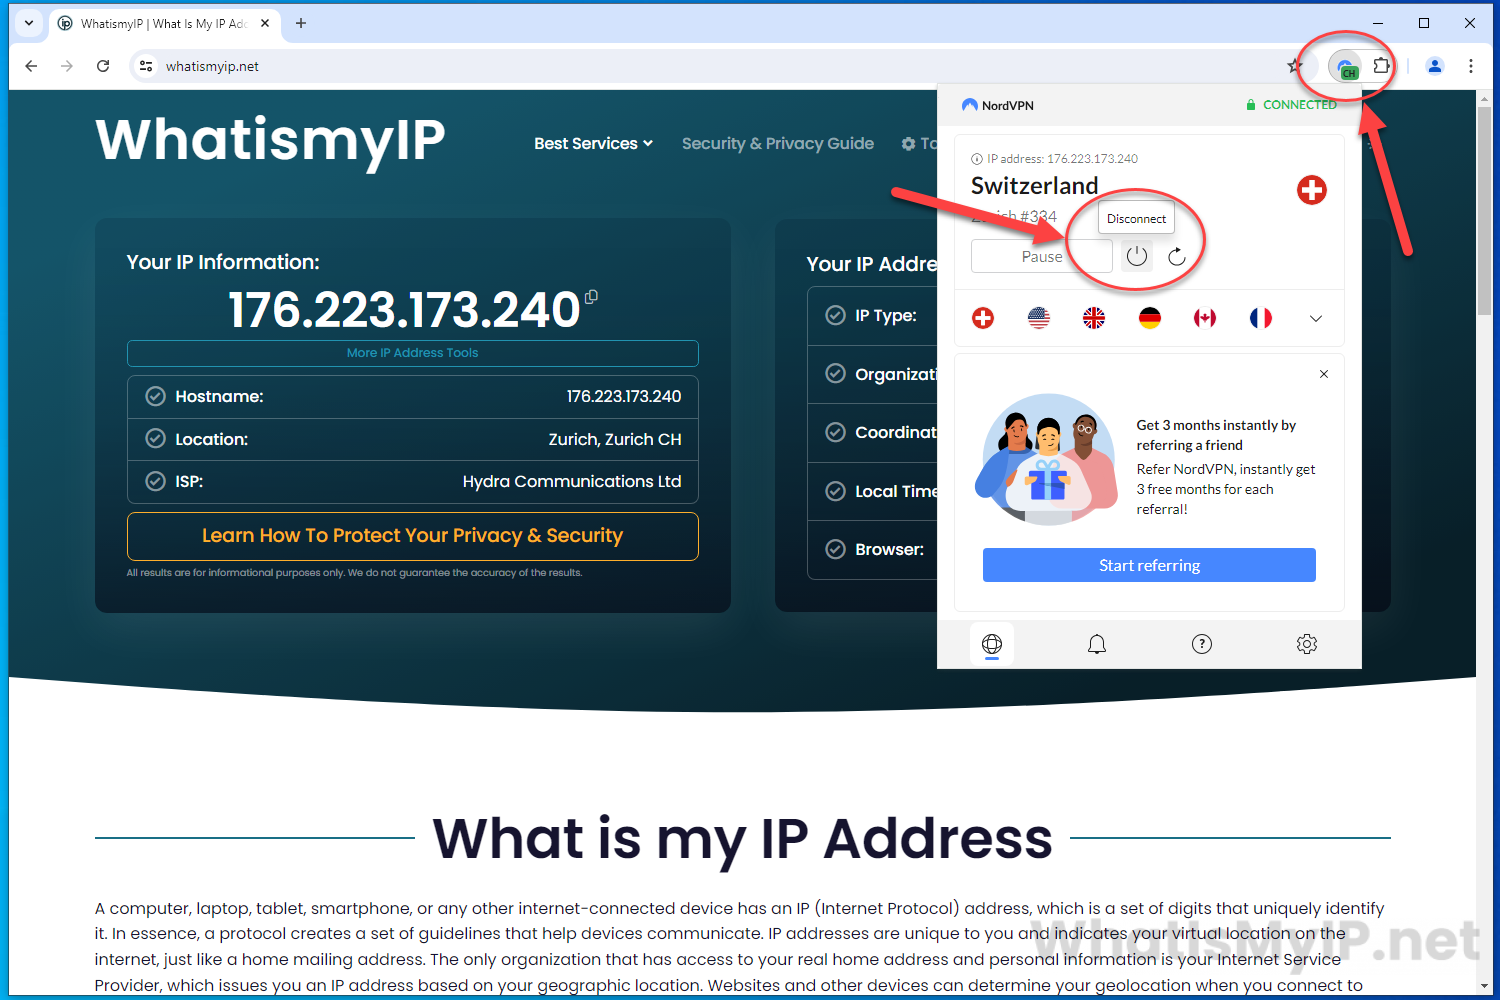
Disconnect from VPN Server
To disconnect from the NordVPN server, just click on the green NordVPN icon on the chrome toolbar and you will see a Power icon under the vpn server details you are connected too. Click the power icon and it will disconnect you from the vpn server. That’s it!
Step 1
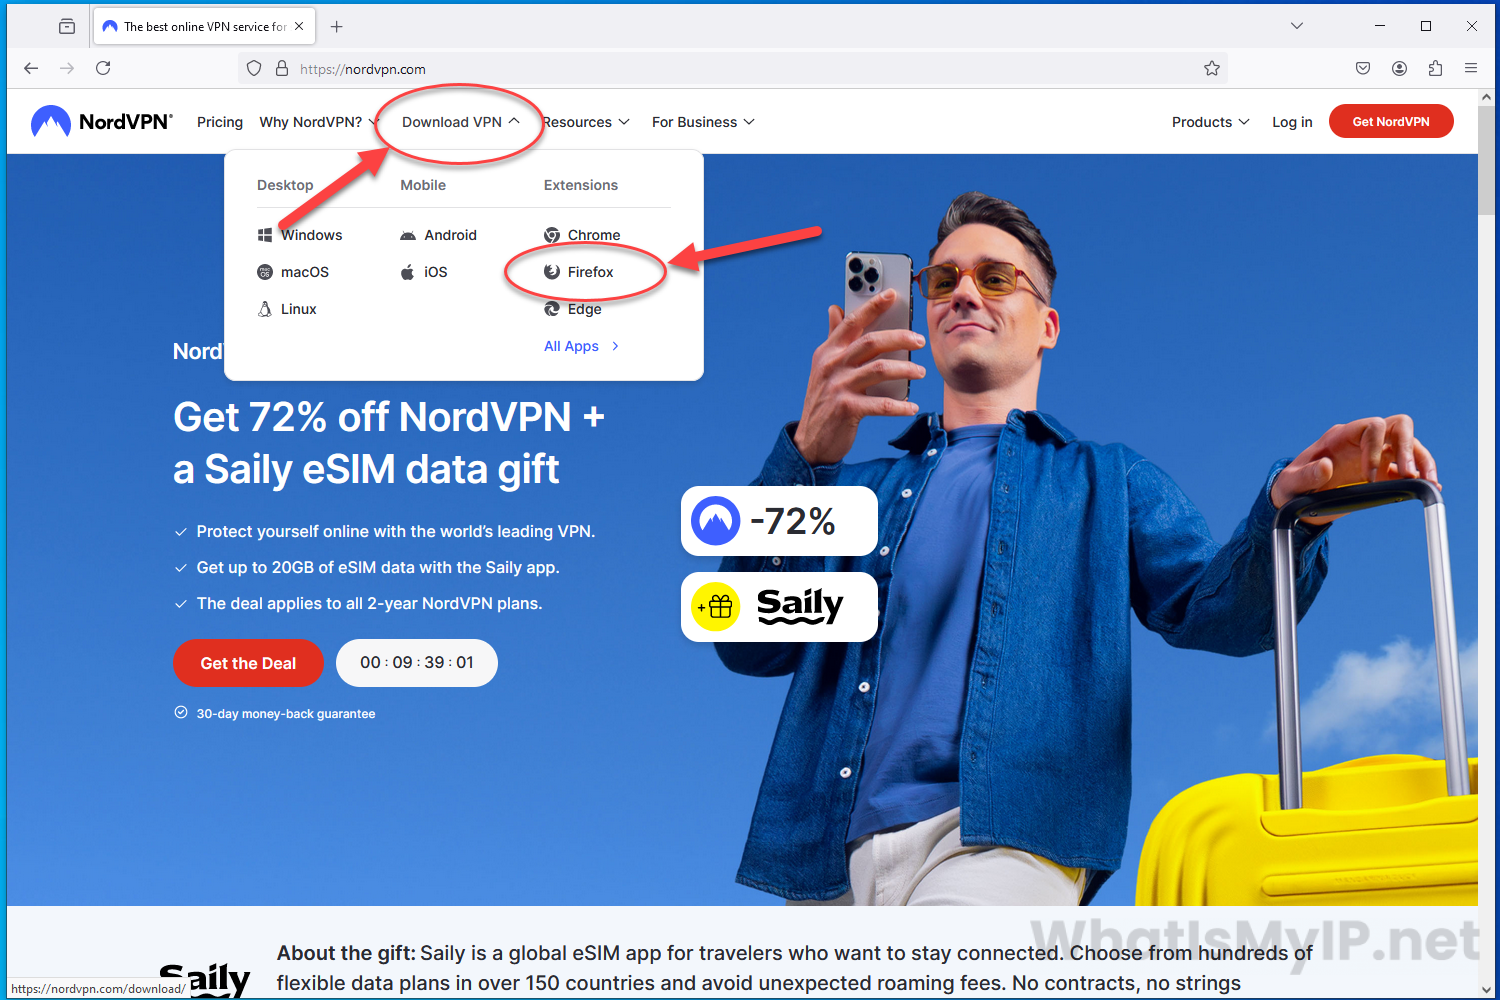
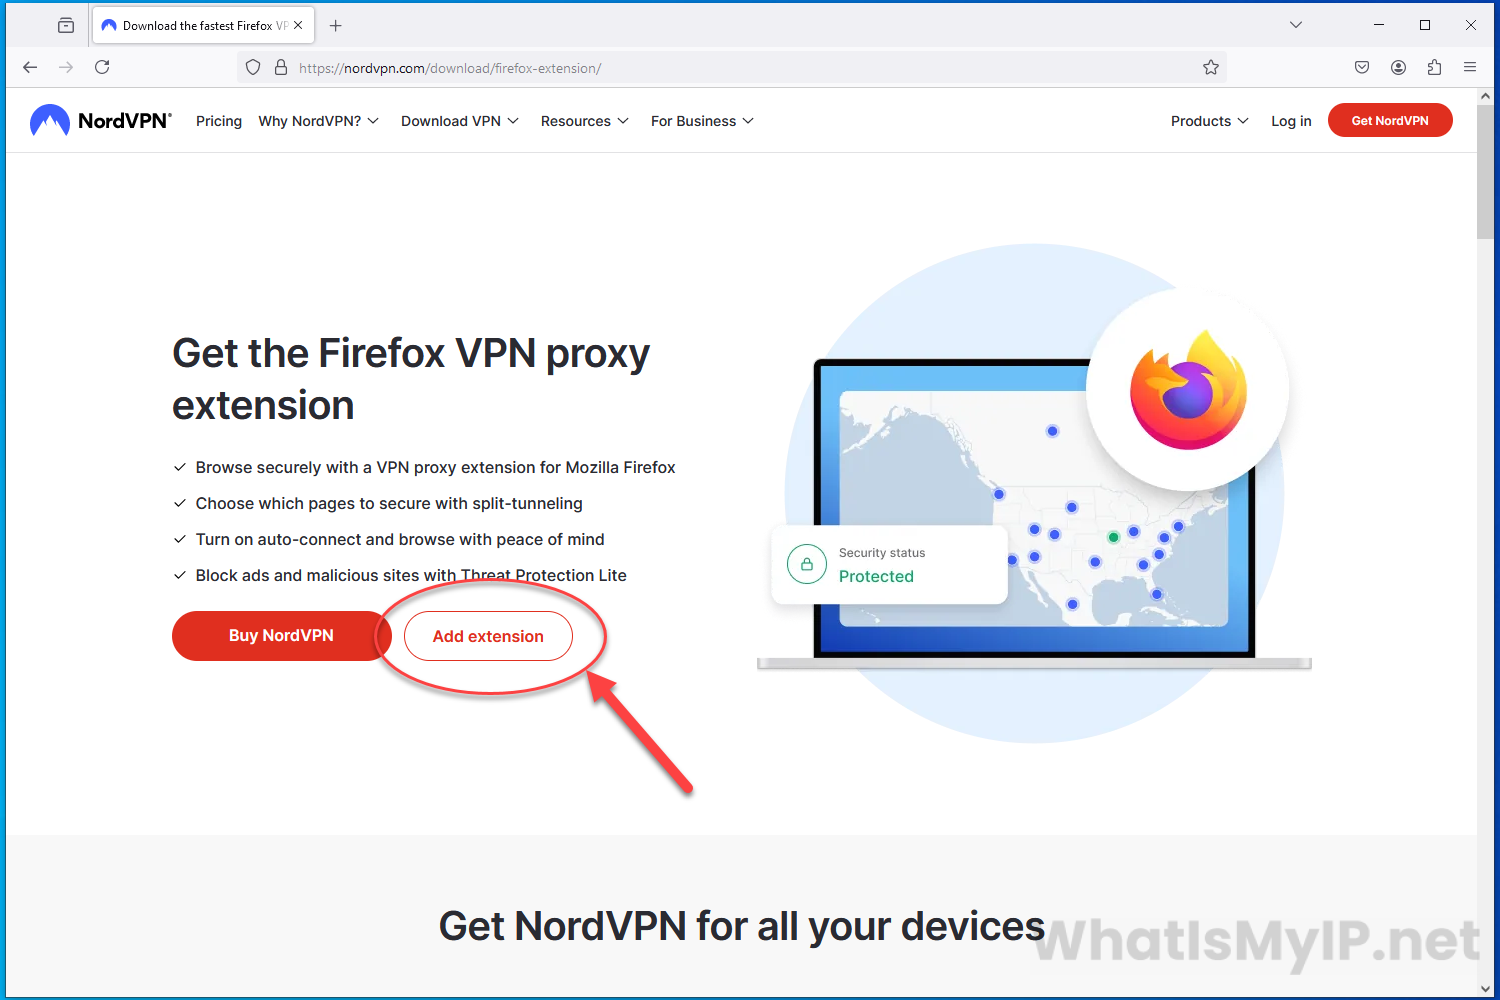
Download Firefox Extension
Go over to the NordVPN site and at the top, hover over “Download VPN” and click on the link that says “Firefox” under the Extensions section.
Step 2
Download NordVPN for Firefox
Here you will see a button called “Add extension“, click on that to get started installing the NordVPN Firefox Extension.
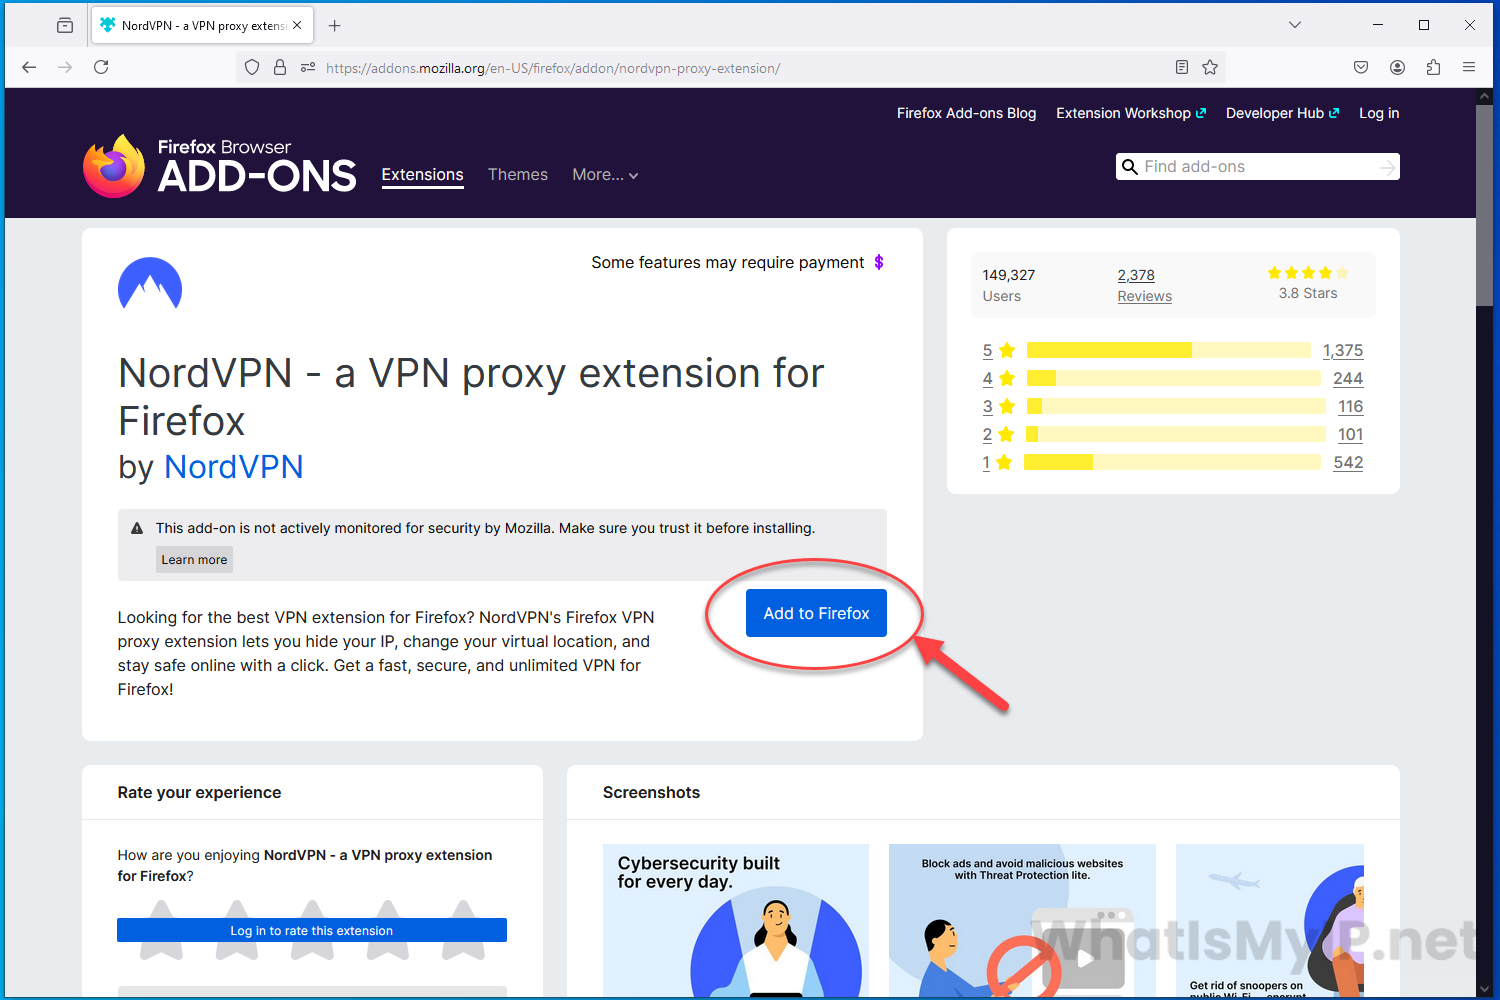
Step 3
Add to Firefox
Your browser will redirect to the extension page for NordVPN on Firefox’s Add-Ons page. Click the blue button “Add to Firefox” to install the NordVPN Extension for Firefox.
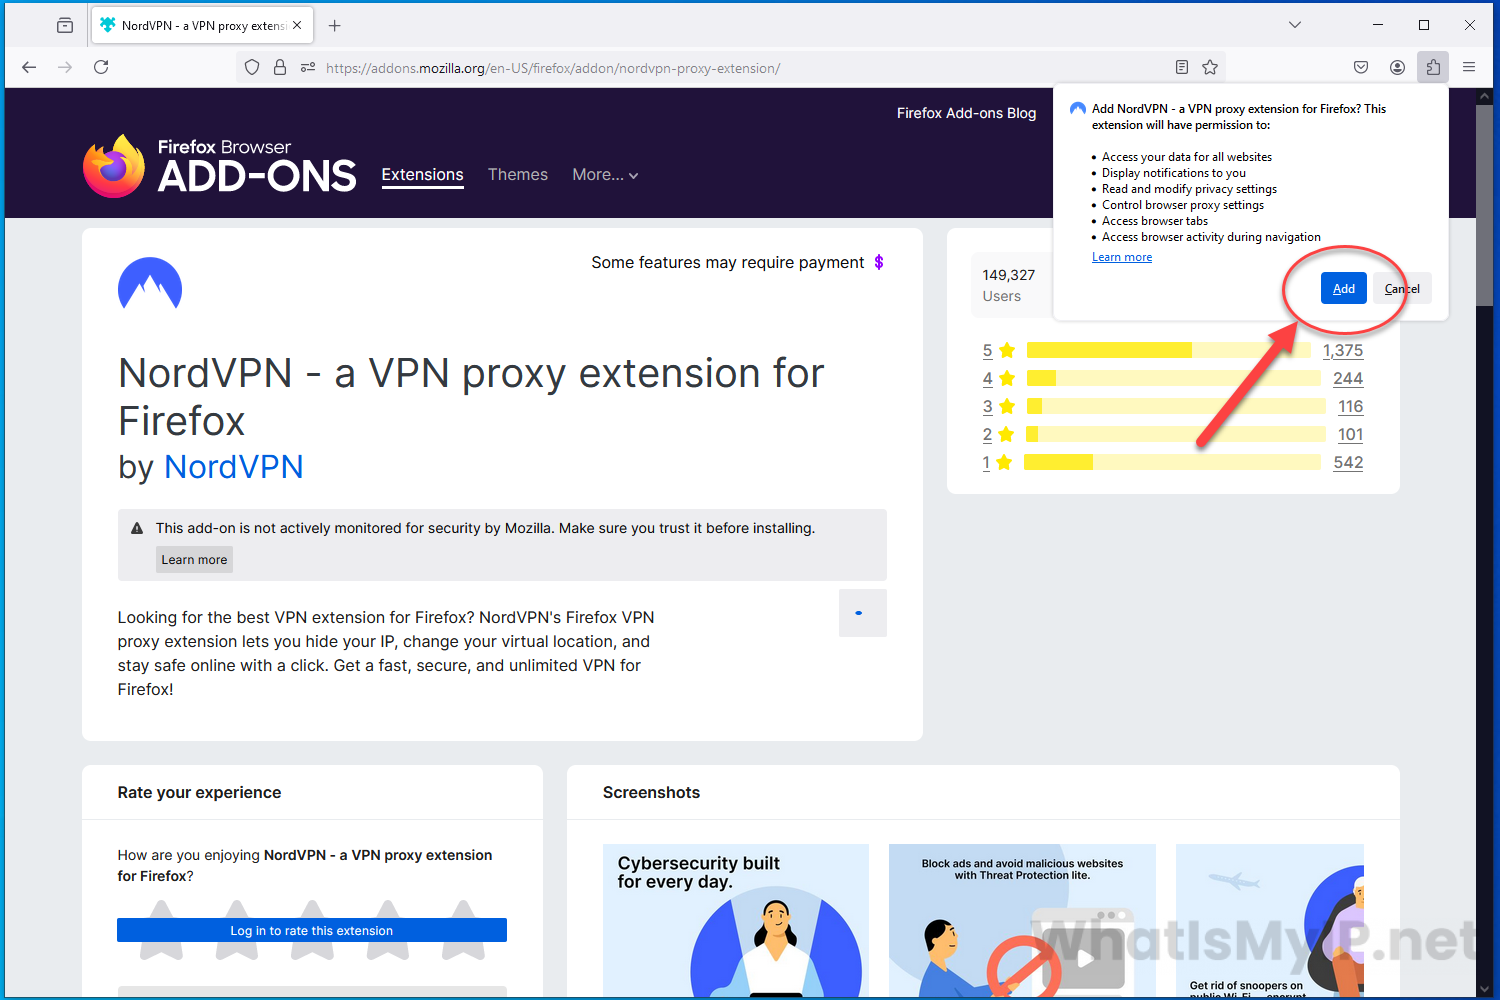
Step 4
Confirm Extension
You will receive a popup from Firefox about the extension on the upper right corner and you will need to hit the “Add” button to continue.
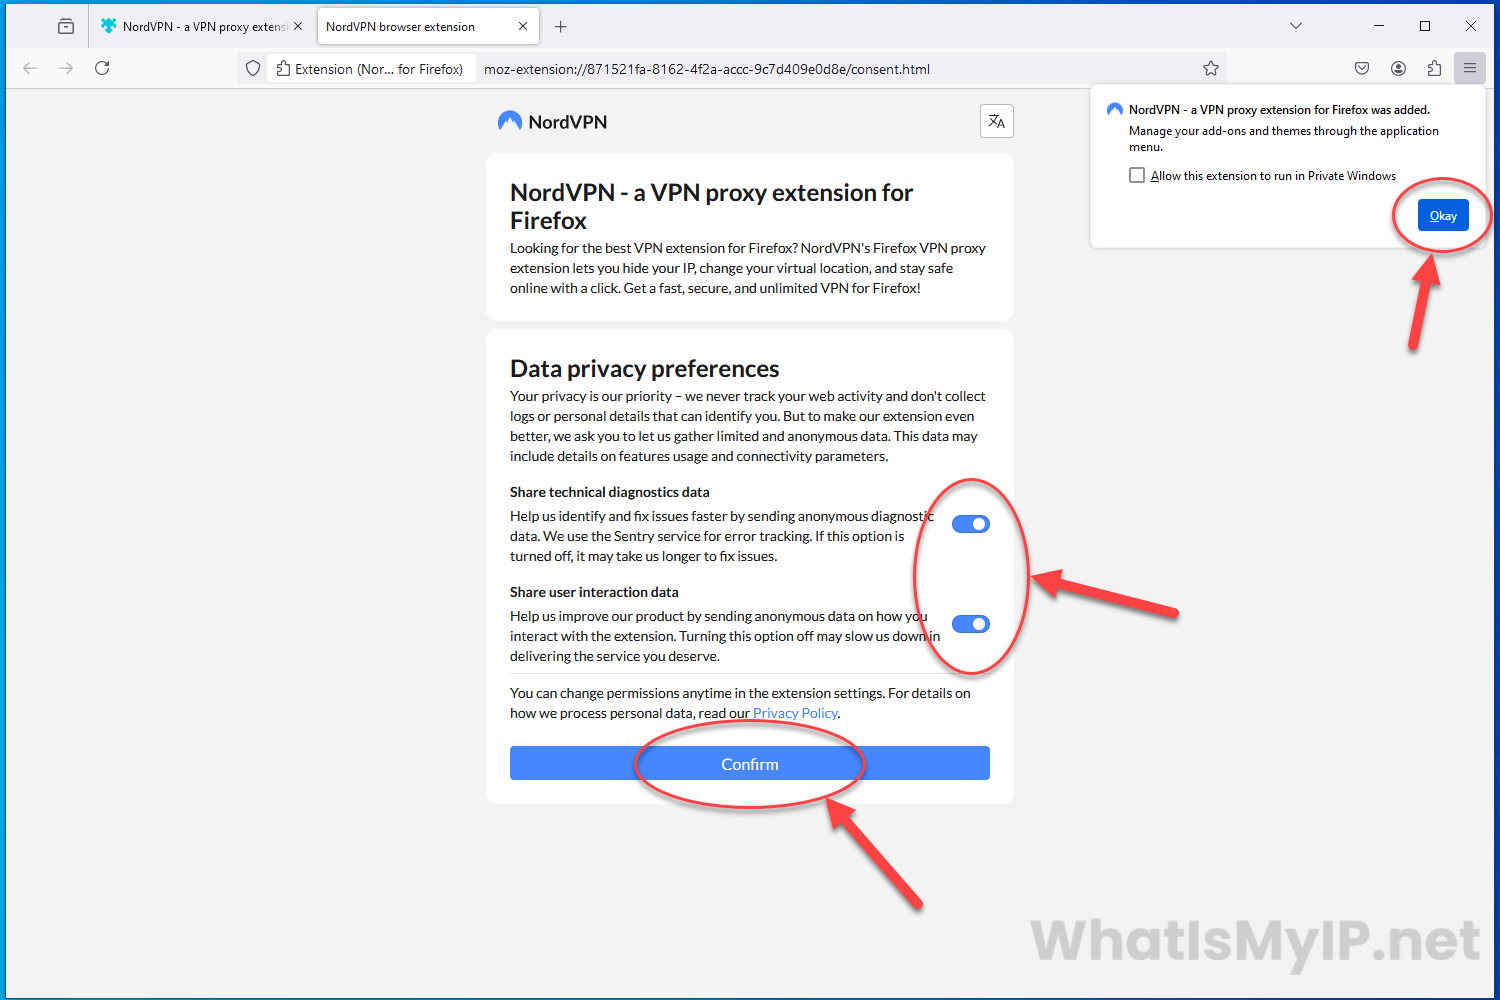
Step 5
Install Complete
Once the extension has been completely installed, the browser will redirect to a consent page and also a popup letting you know the extension was added to Firefox. Click the “Okay” button to close that popup. As for the consent page, it will ask you if you would like to share any user data with the NordVPN extension. You can uncheck these 2 boxes and click the “Confirm” button to continue.
Step 6
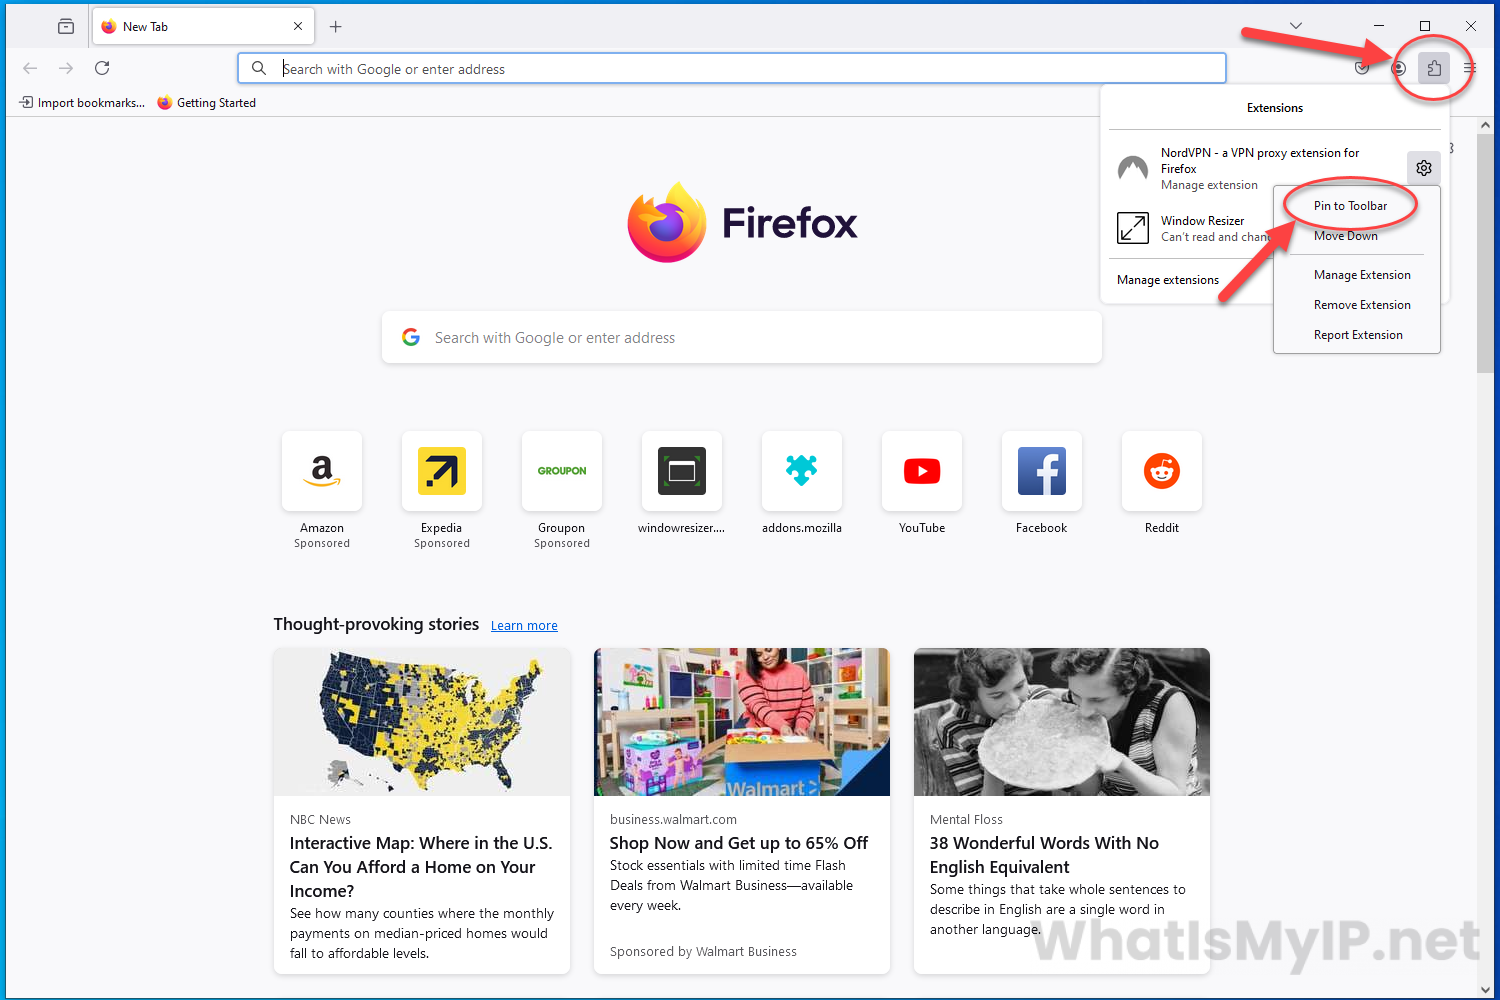
Pin Extension for Firefox Toolbar
Now we need to pin the NordVPN extension to the Firefox toolbar for ease of use. On the upper right corner click the icon that looks like a small puzzle piece which will then open the extensions menu showing you all the extensions you have installed on Firefox. You will see NordVPN on the menu and next to it, click the little gear icon to open a secondary menu, then click the “Pin to Toolbar” link.
Step 7
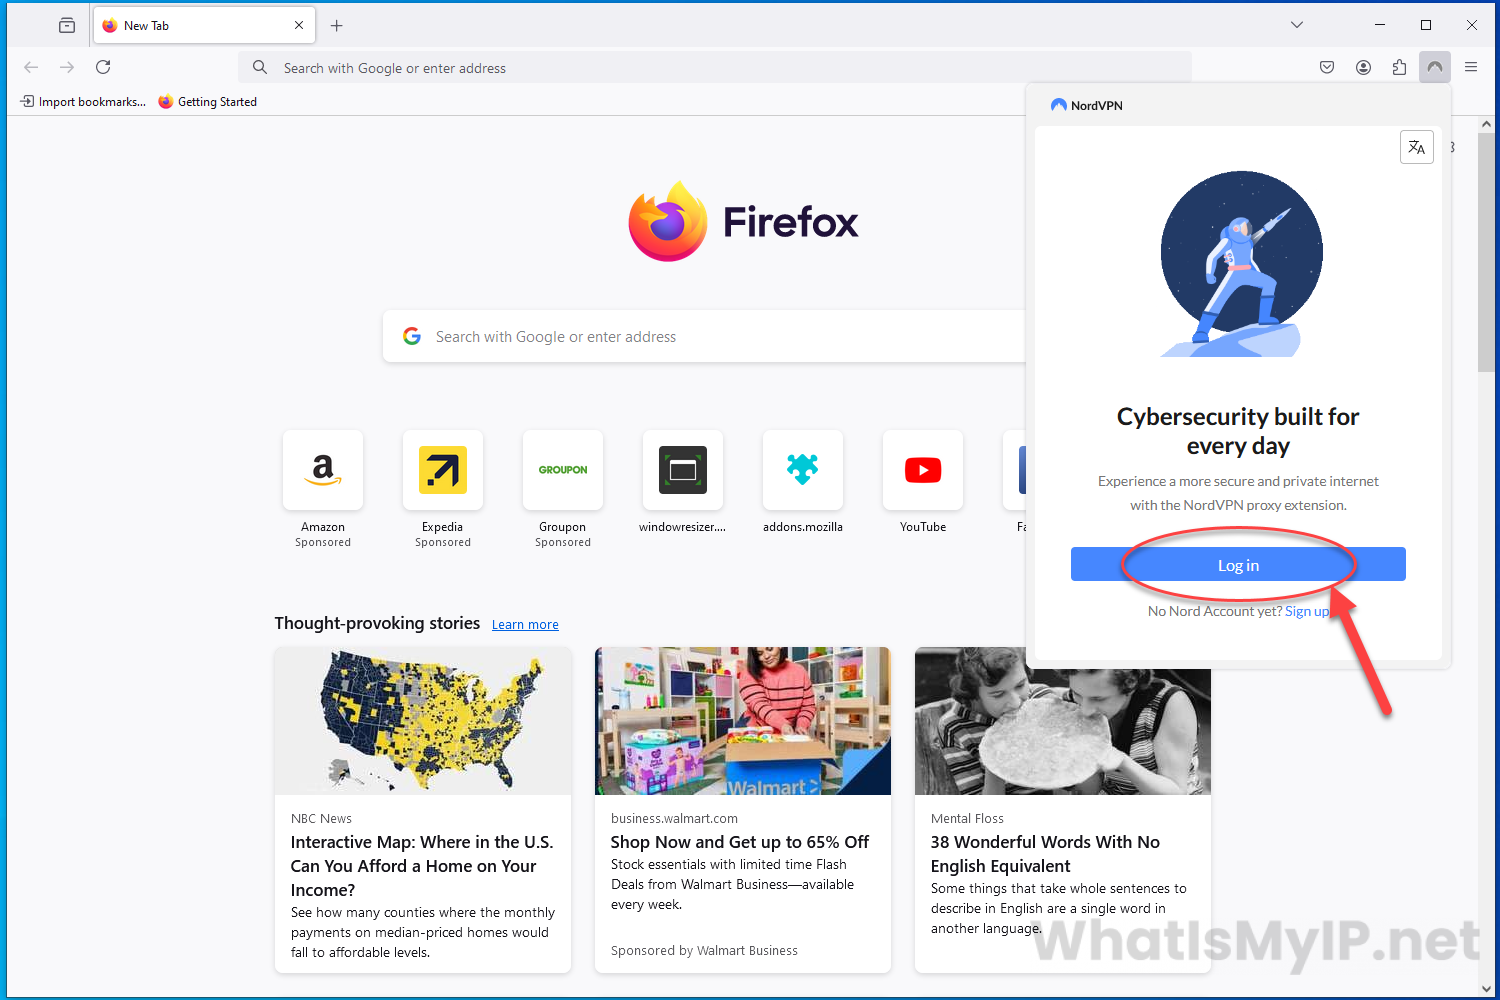
Extension Setup
Now that you have the NordVPN extension pinned to the toolbar, go ahead and click the icon that looks like a mountain to open the app. Here we will need to log in to your nordvpn account or sign up for an account. Since we already have an account, let’s go ahead and click the “Log in” button to continue.
Step 8
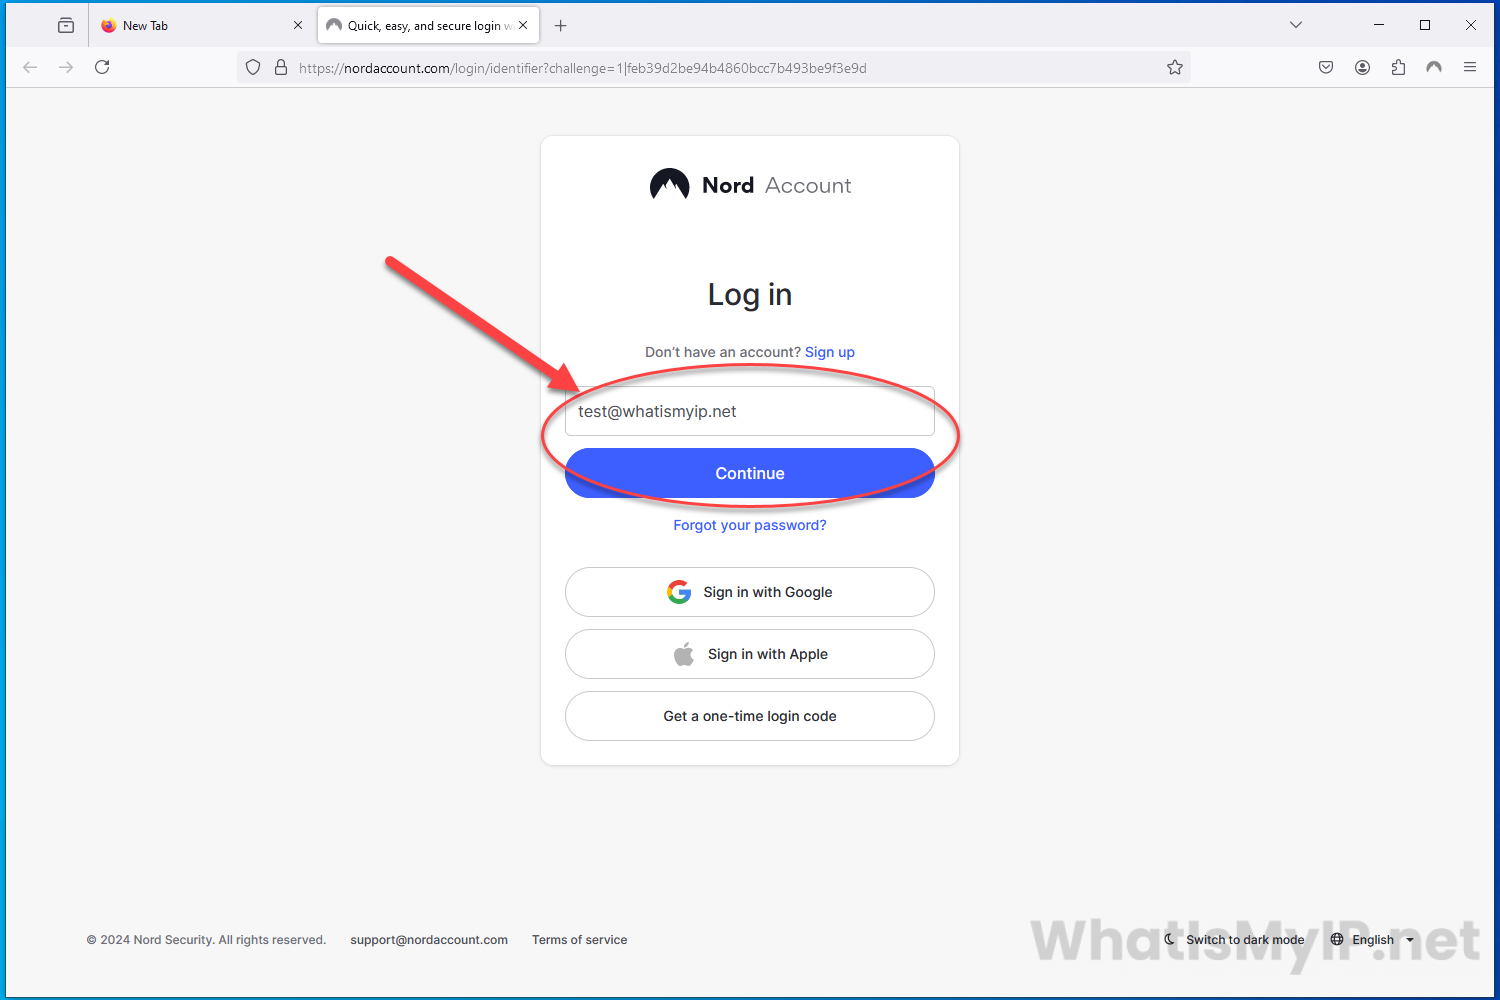
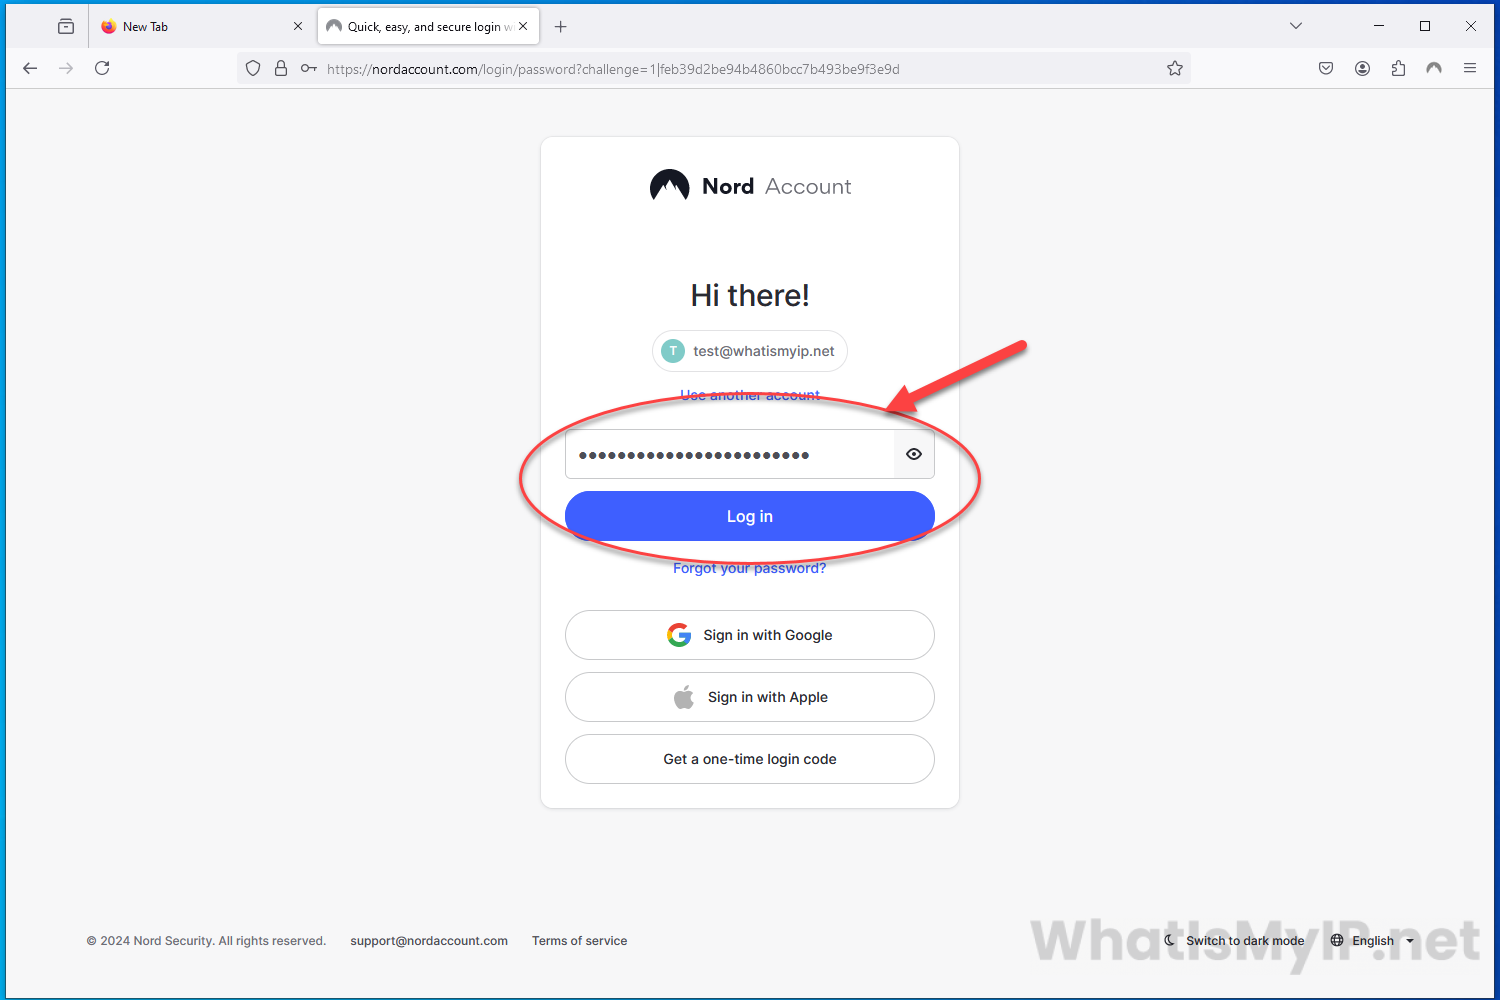
Login to NordVPN
Your browser will open a new page which will redirect you over to Nord Account to login. Here you will need to enter your login credentials, username/email address and password. Then click the “Log in” button to finish up.
Step 9
Sign In Complete
Now you should be logged into your NordVPN account and by clicking the icon in the toolbar, you will see the NordVPN app and some of the settings on the main dashboard.

Step 10
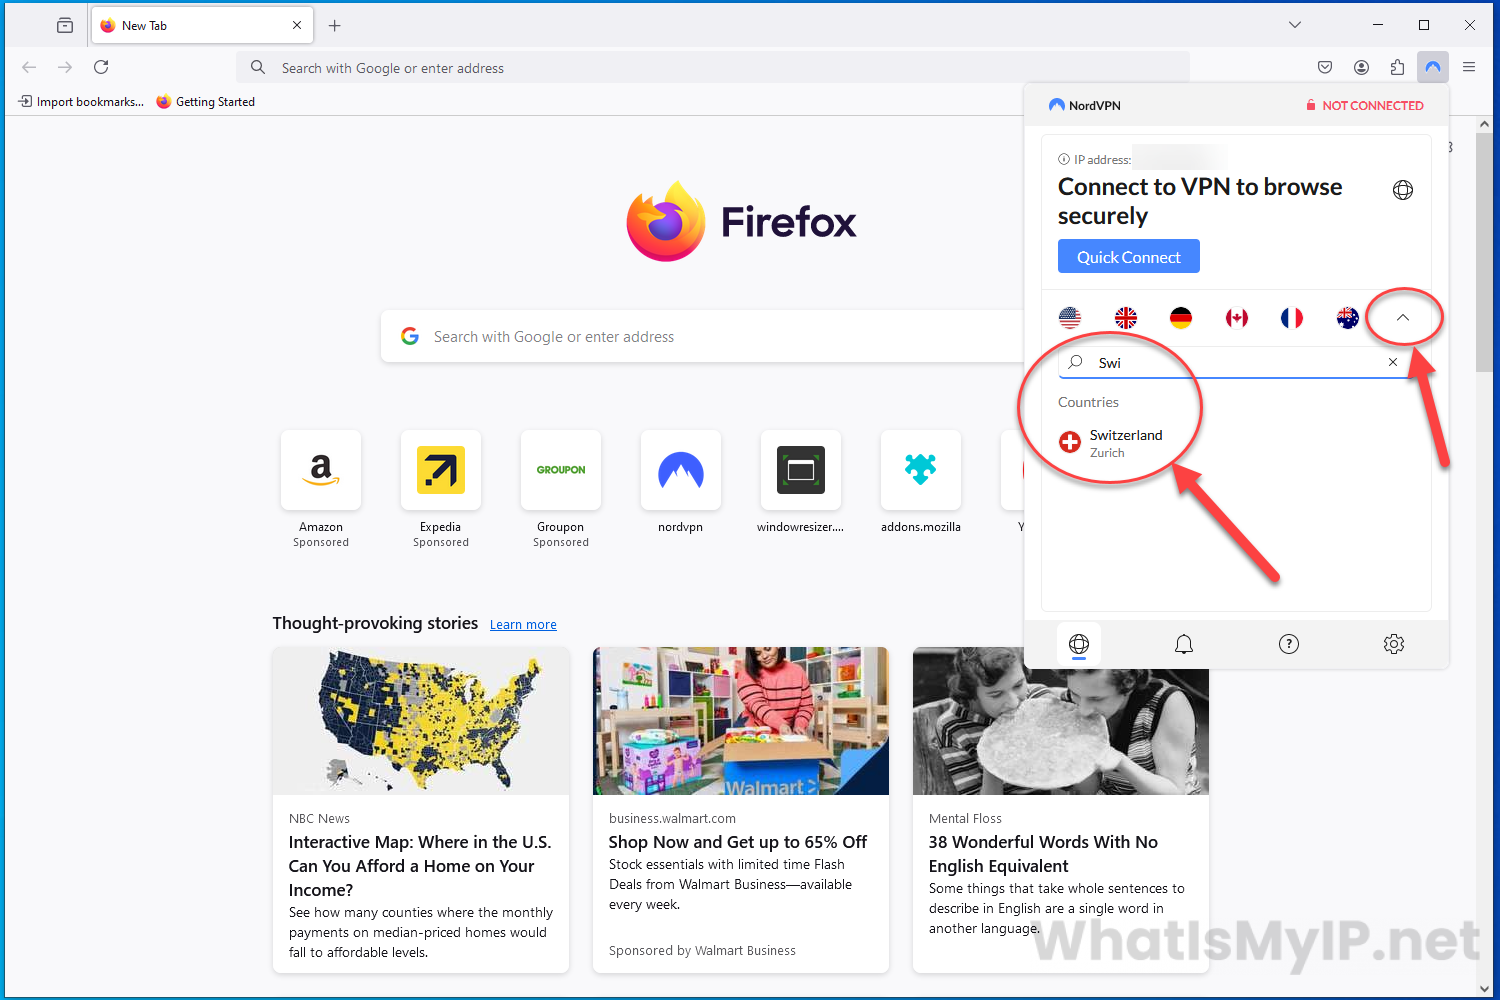
Connecting to a VPN Server
Now let’s connect to a vpn server, you can either click the Quick Connect button to get connected to the closest vpn server to you, or you can search for one in another locations. Here we will be connecting to a vpn server in Switzerland. Start by clicking the up chevron arrow and we will see a search bar. You can start typing the name of the country you are looking for and the app will list them at the bottom. Click the name of the country on the bottom list to connect to a vpn server there.
Step 11
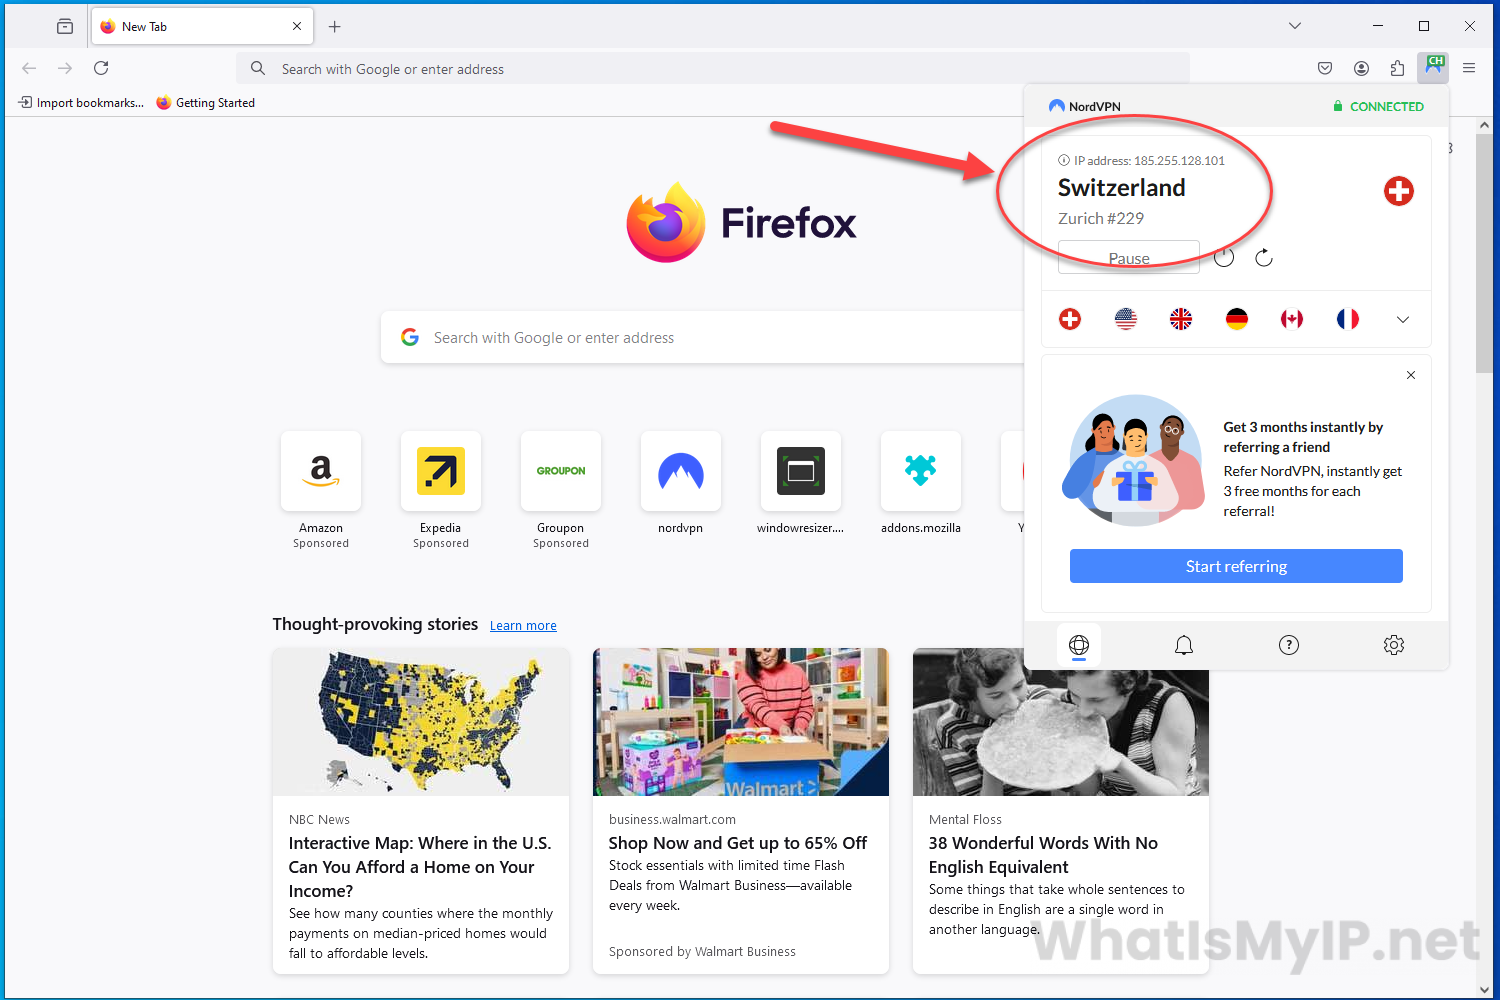
Connected to VPN Server
Once you are connected, by click the NordVPN icon in the toolbar again you will see the wording in green “Connected” at the top and under that you will see your ip address assigned to you by that vpn server and also the country where it is located in.
Step 12
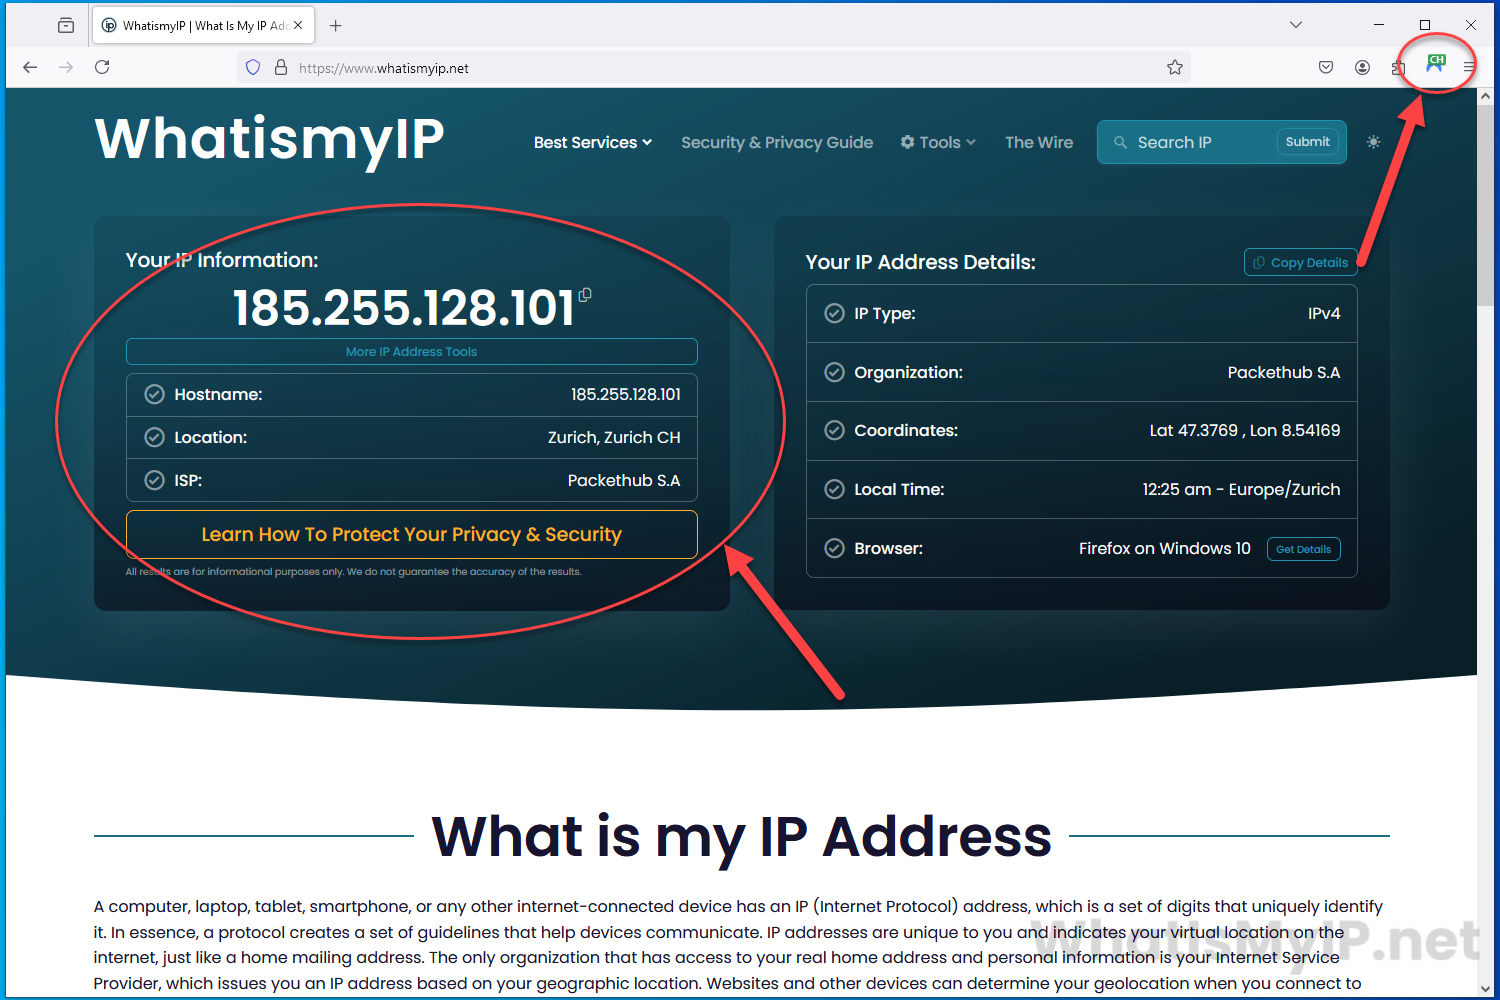
Test VPN Connection
Once you are connected, the NordVPN icon in the toolbar will turn green and you will have the letters of the country you are connected too. If you would like to test your vpn connection and see your ip address details, head over to our main website and it will give you all the details about your ip address. Here you can see we are connected to a vpn server in Zurich and our ip address details.
Step 13
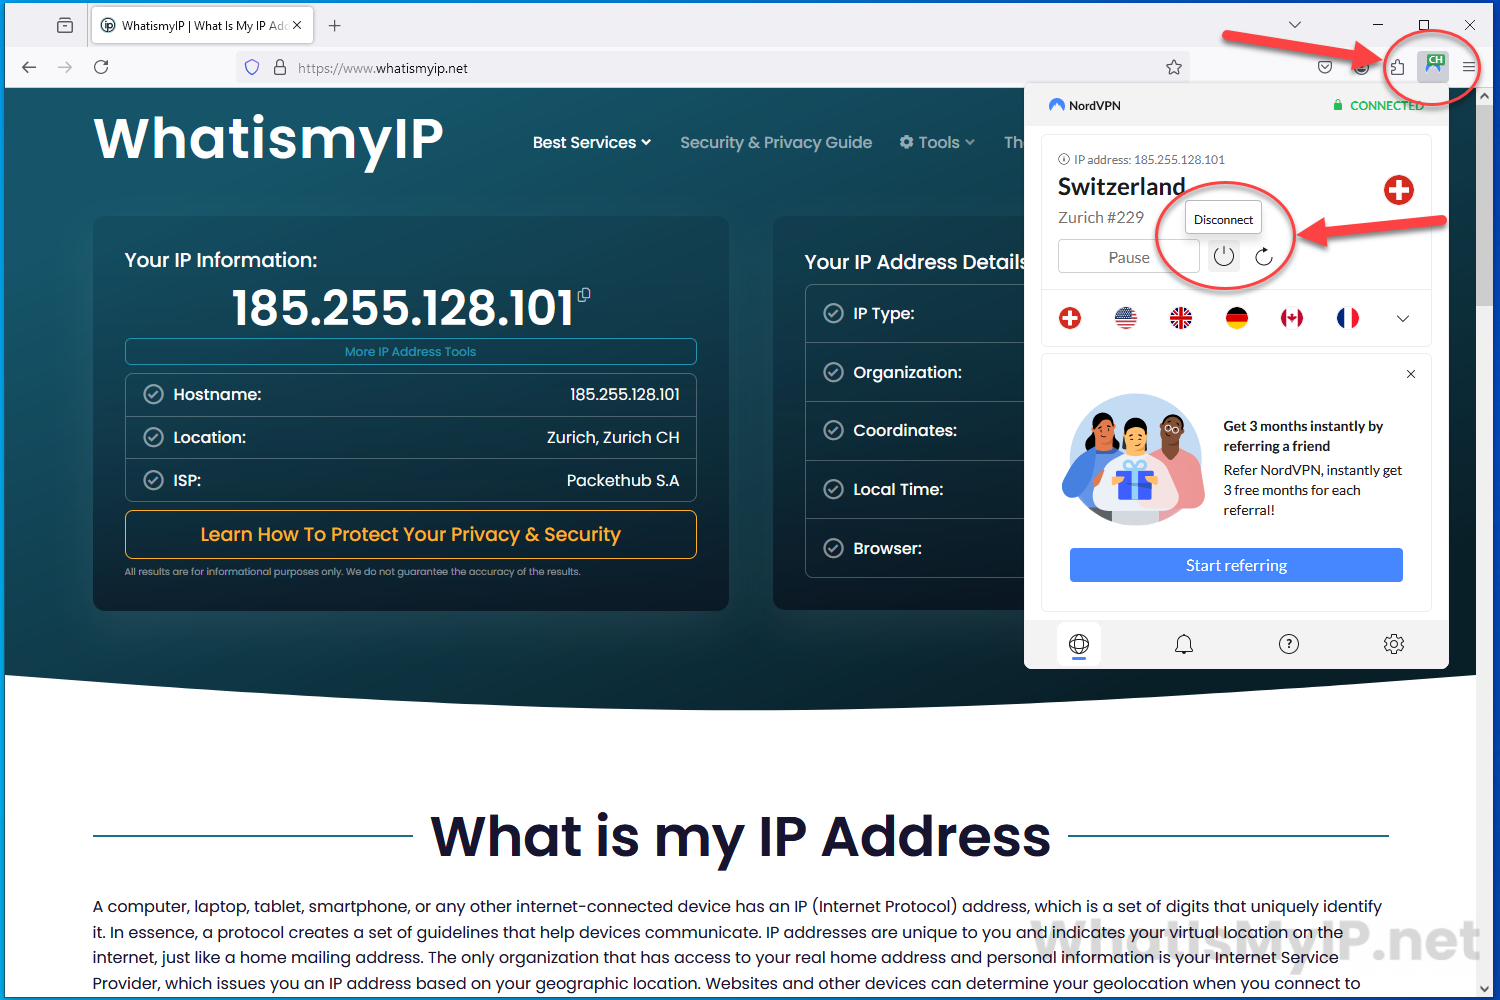
Disconnect for NordVPN
Once you are ready to disconnect from the NordVPN server, click the icon in the toolbar and in the app you will see a power icon. Click the icon and it will disconnect you for the vpn server.
Step 1
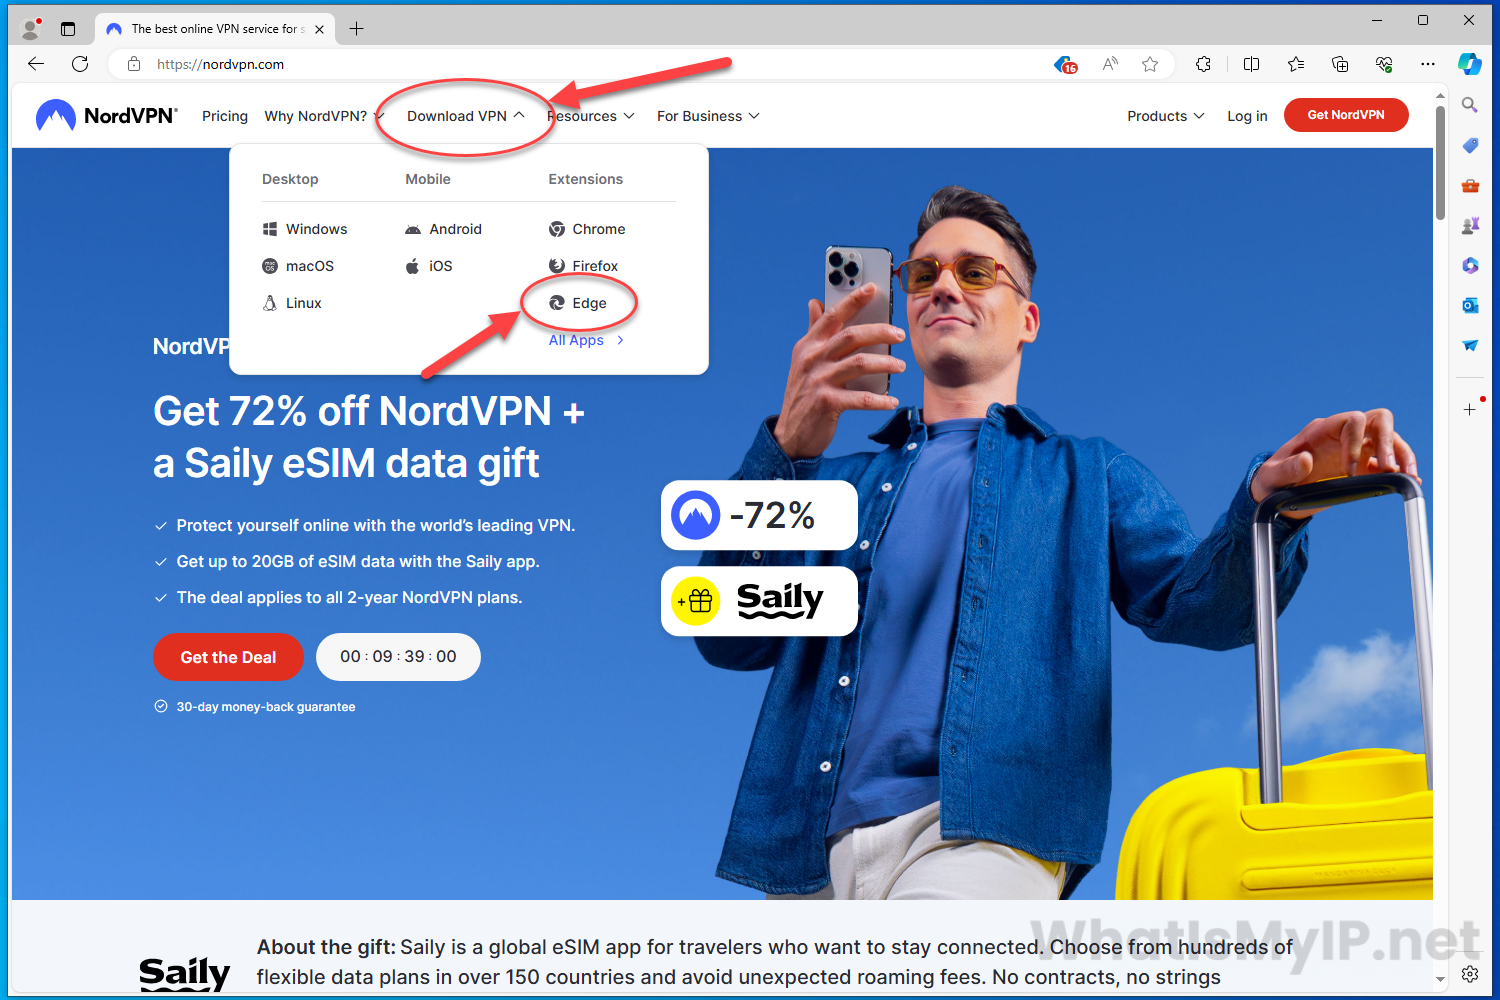
Install Edge NordVPN Extension
Let’s start by going to NordVPN‘s website, and at the top hover over the menu “Download VPN” and click on the link “Edge” under the Extensions section to start.
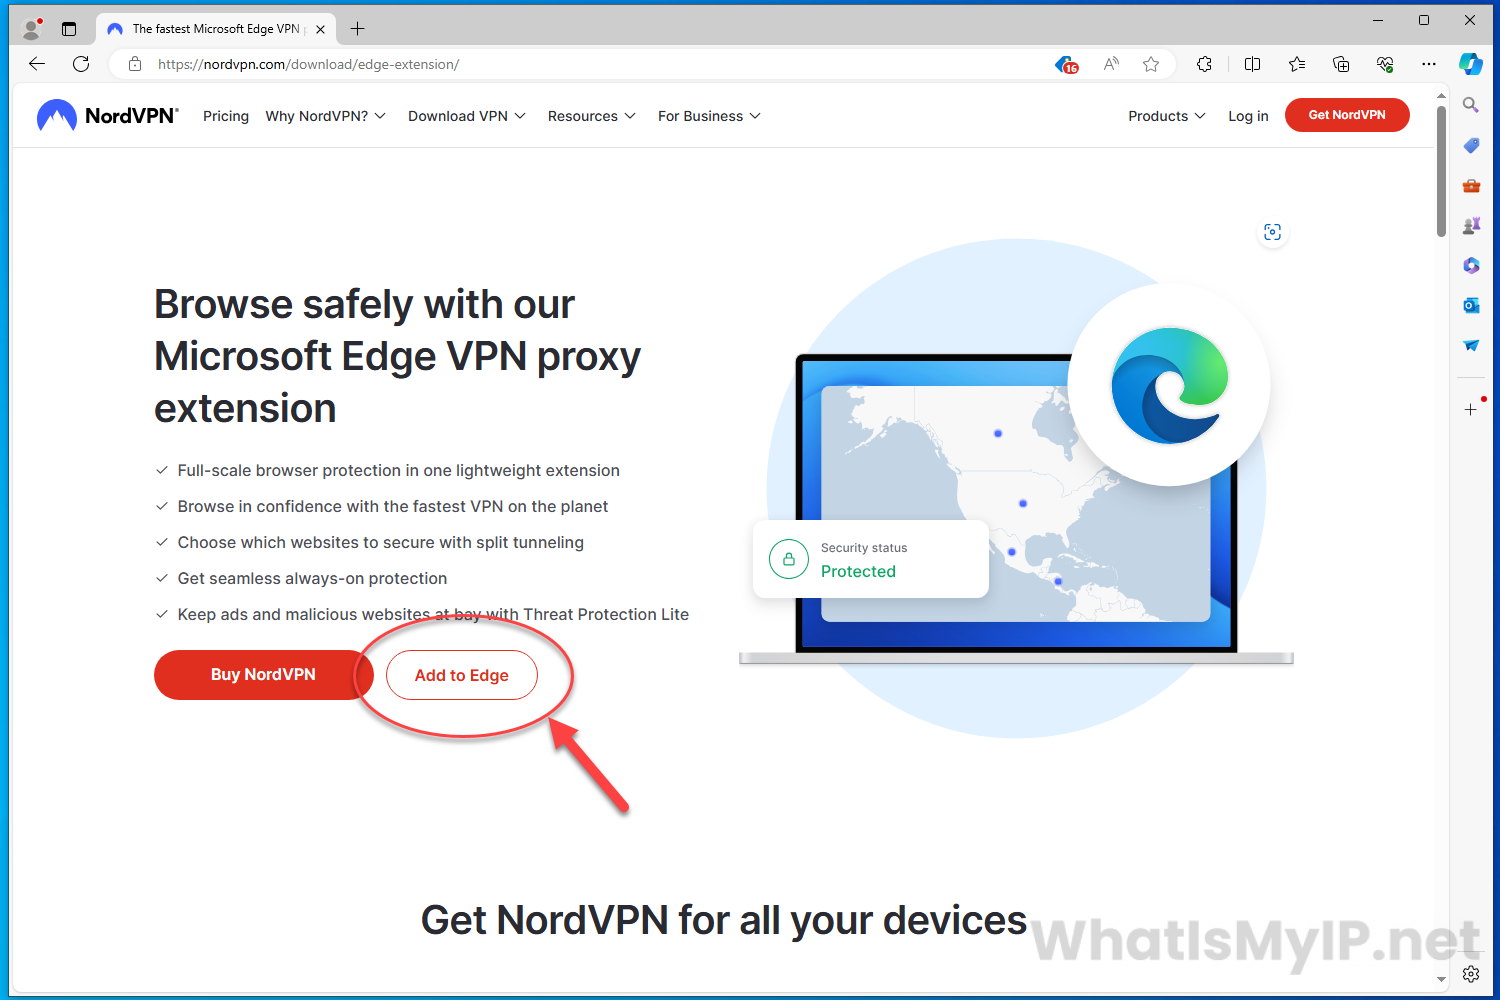
Step 2
Download the Microsoft Edge NordVPN Extension
On this page, you will need to click on the button “Add to Edge” to get started with the download of the extension.
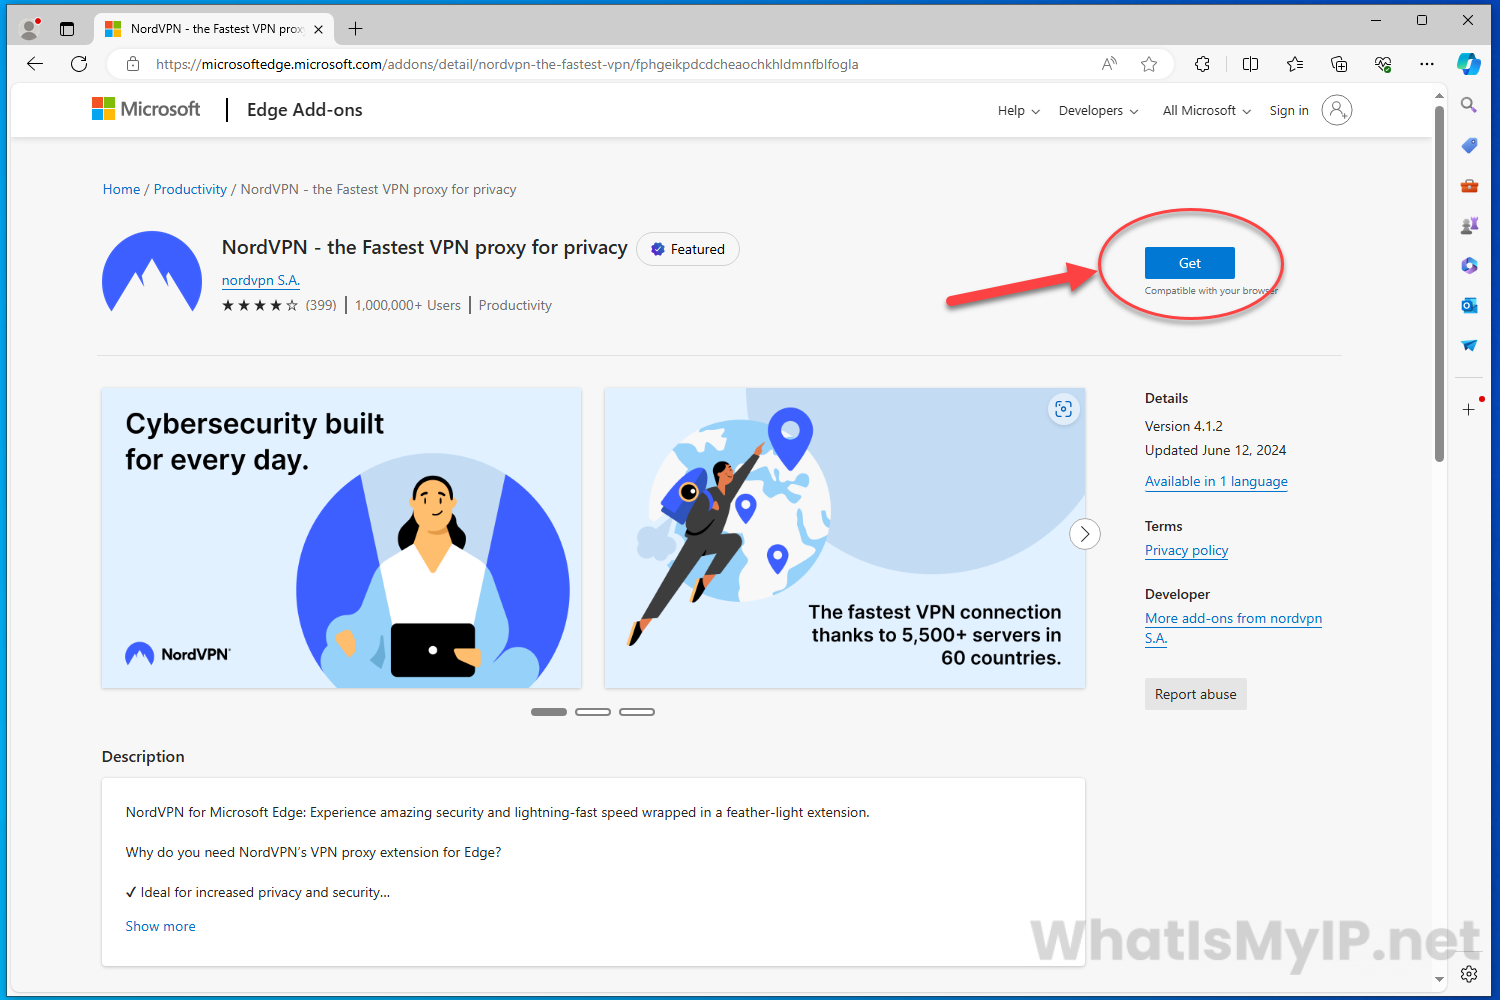
Step 3
Download NordVPN Extension
On the Microsoft Edge Add-ons page for the NordVPN extension, you will need to click on the “Get” button at the upper right to start the download and install process.
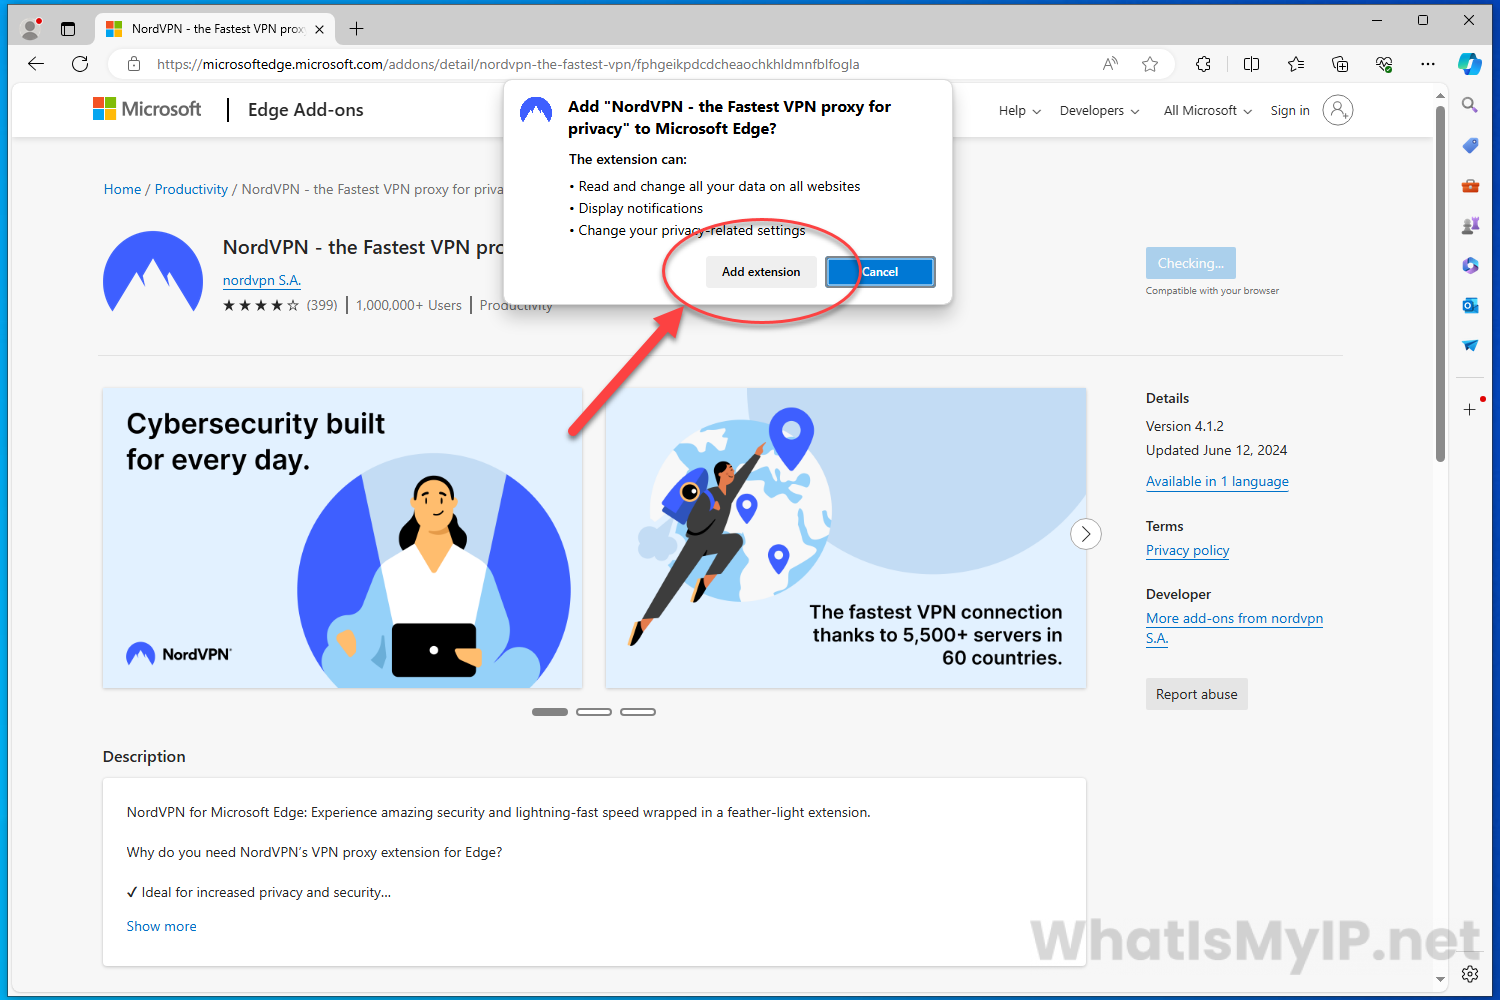
Step 4
Add Extension
You will get a popup from Edge asking if you would like to add the NordVPN extension to Edge. Click the “Add extension” to confirm.
Step 5
Pin to Toolbar
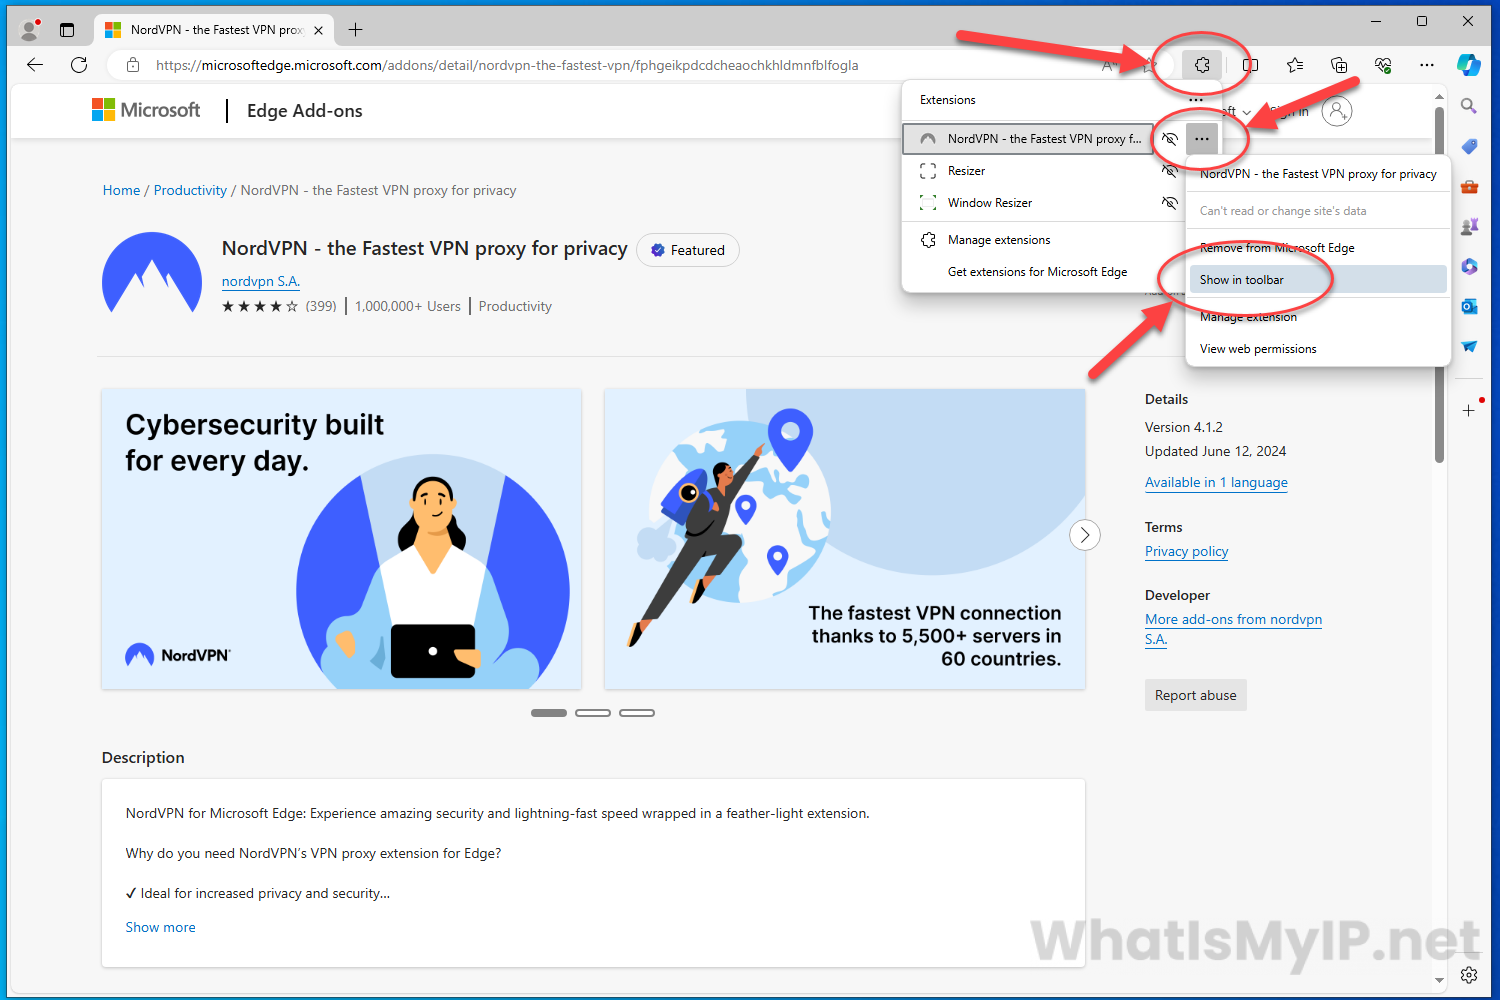
Once the extension is successfully installed, it’s time to pin it to the Edge toolbar for ease of use. At the top, click on the icon that looks like a puzzle piece and it will open up the extension menu. Here it will list all the extensions installed on your Edge browser. You will see NordVPN on that list and next to it you will have a icon of 3 dots. Click the 3 dots icon and a secondary menu will pop open, click the “Show in toolbar” link to pin NordVPN to the edge toolbar.
Step 6
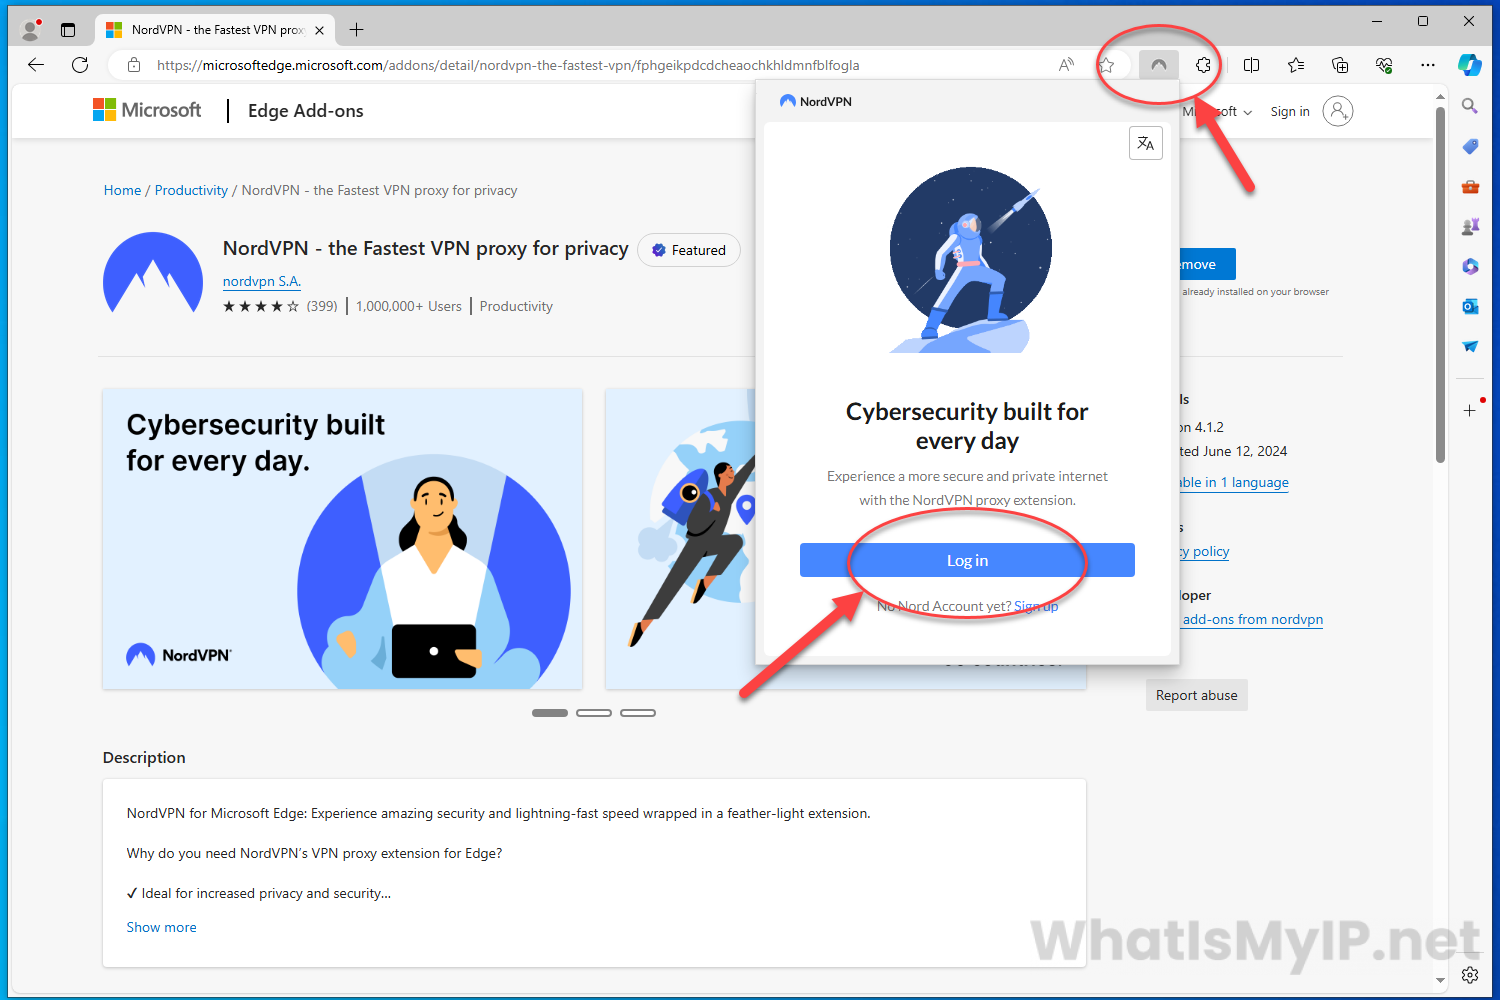
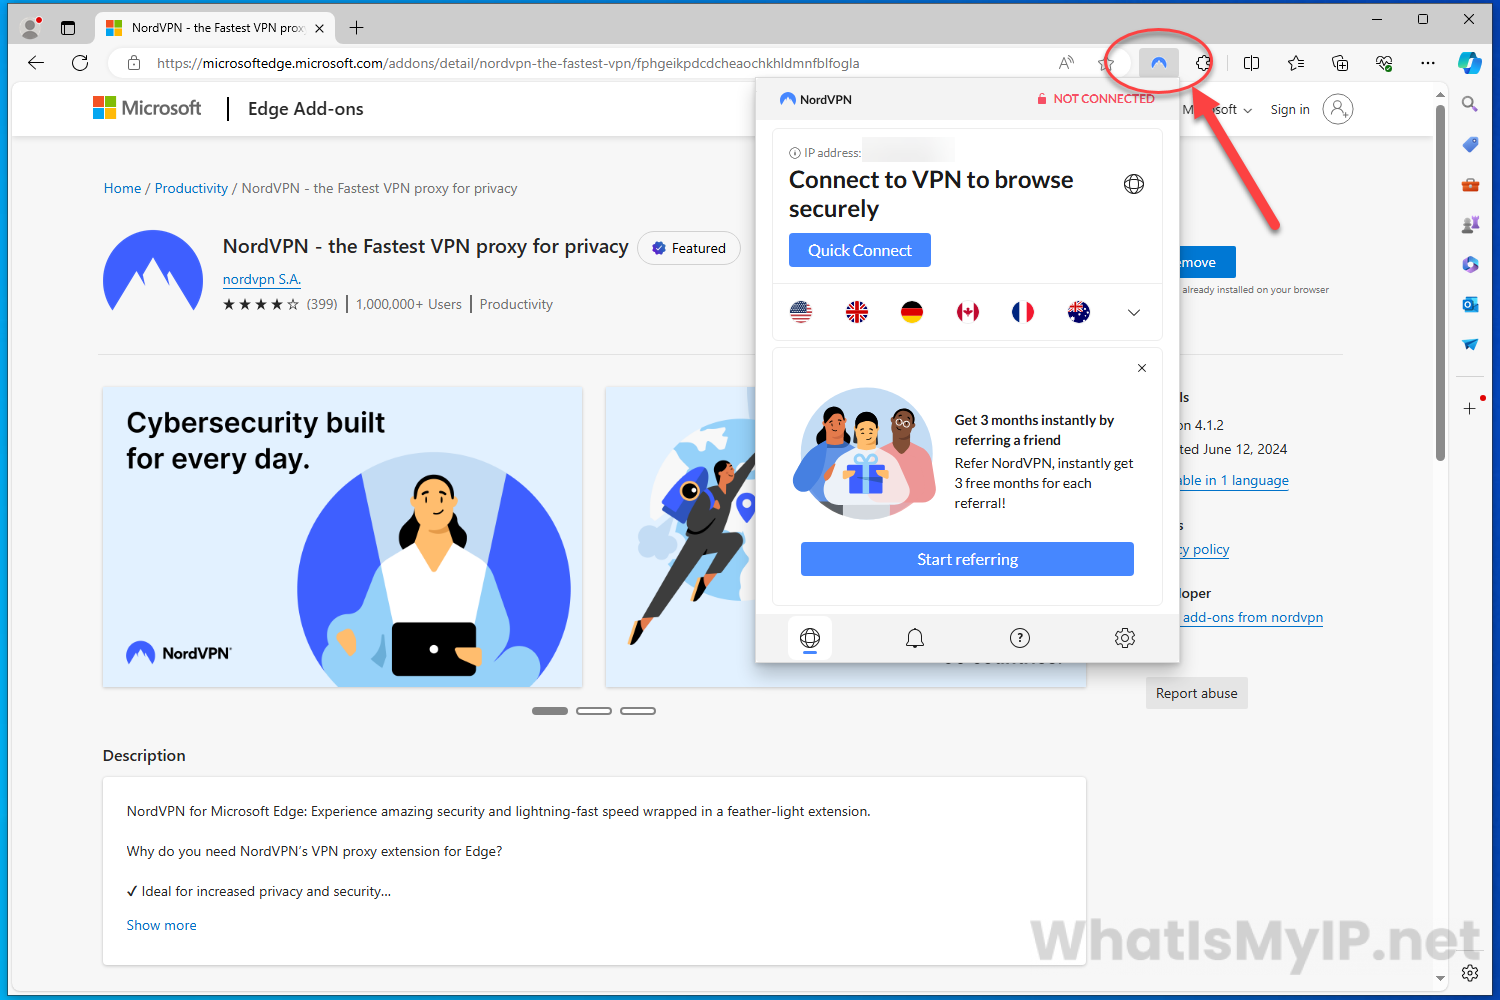
Extension Setup
Now click on the NordVPN icon on the toolbar that looks like a mountain to open the app. Here we will get the Signin/Signup menu. Since we already have an account, we will click the “Log in” button to continue.
Step 7
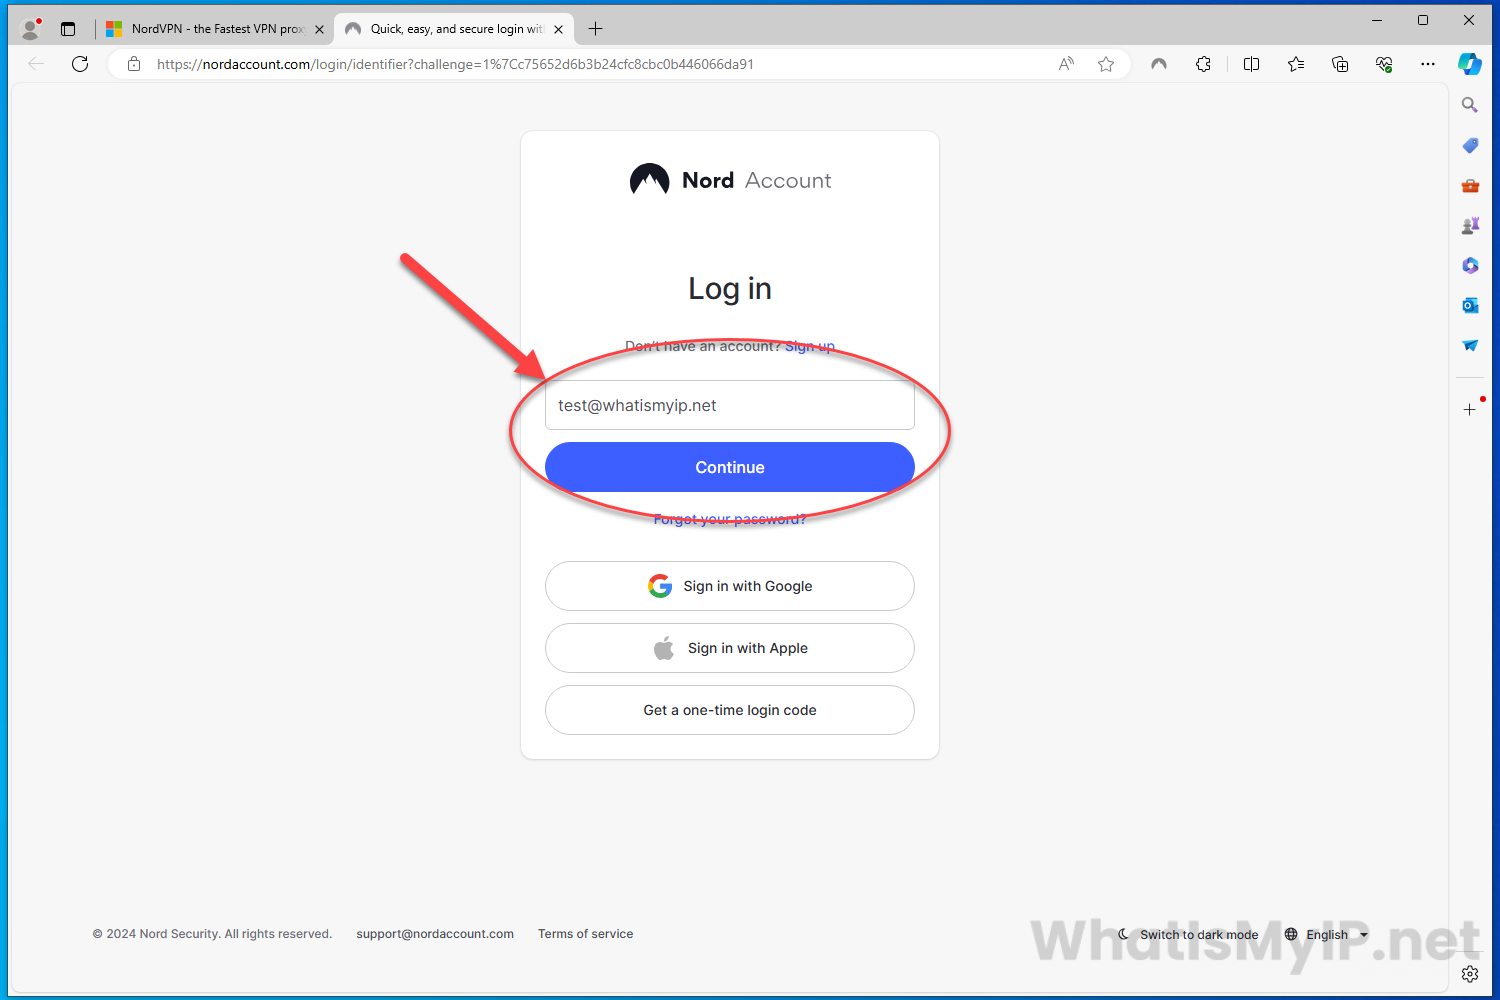
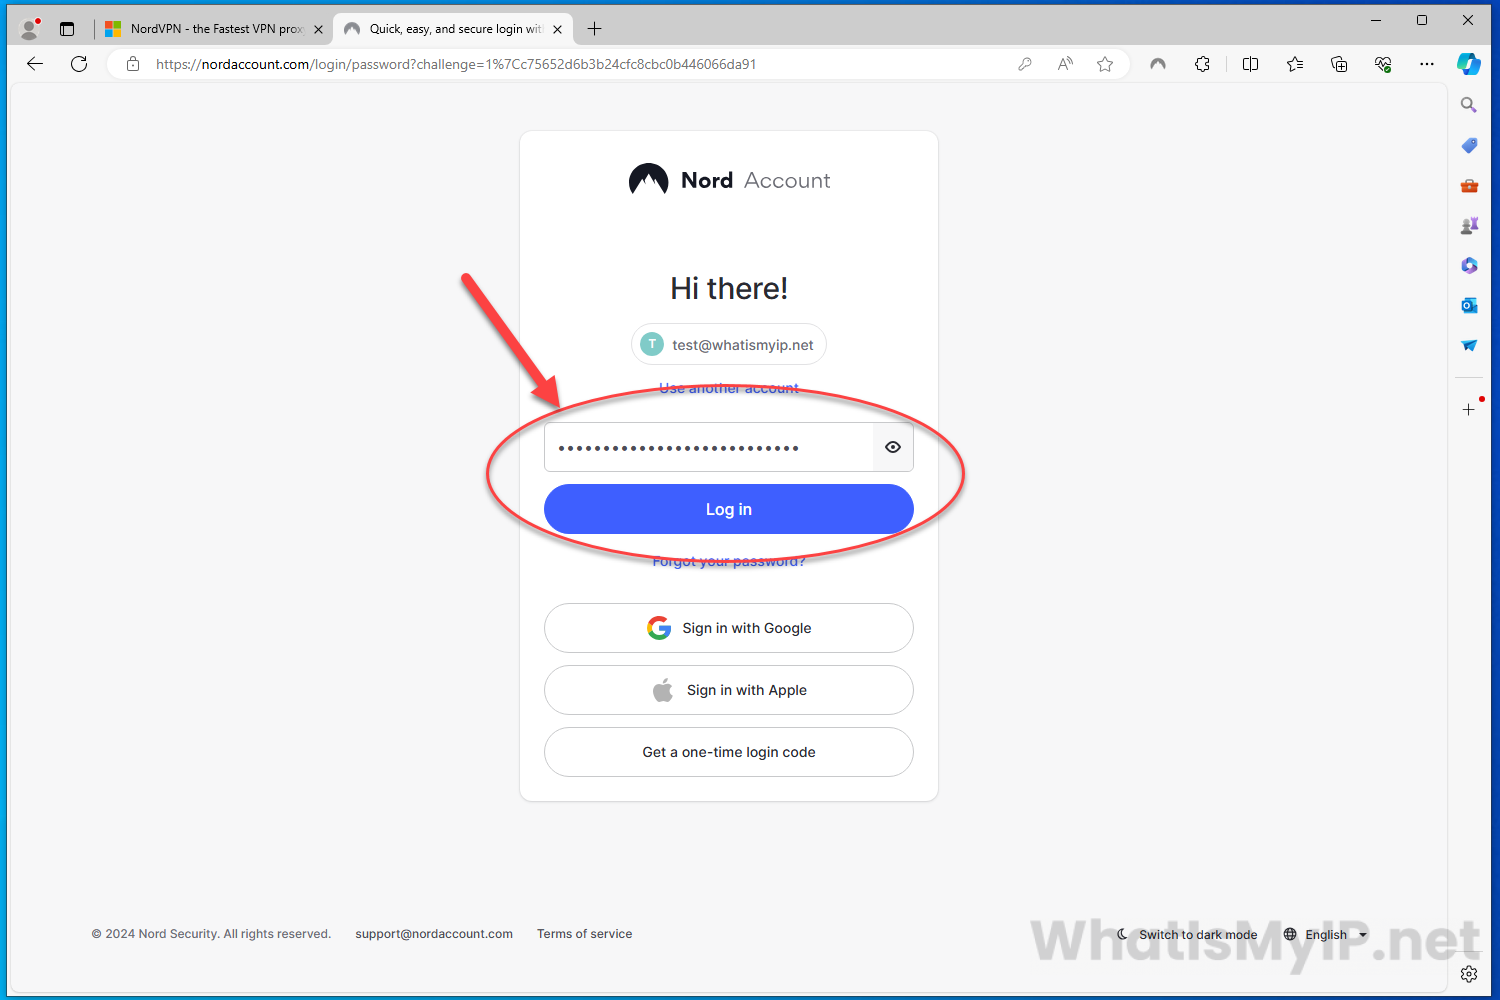
Login to NordVPN
Your browser will be redirected to the Nord Account page. Here you will need to enter your username/email address and password. Once you have entered your credentials, click the “Log in” button to continue.
Step 8
Setup Complete
Now that you have logged into your NordVPN account on the extension, click the icon in the toolbar to open the NordVPN app.
Step 9
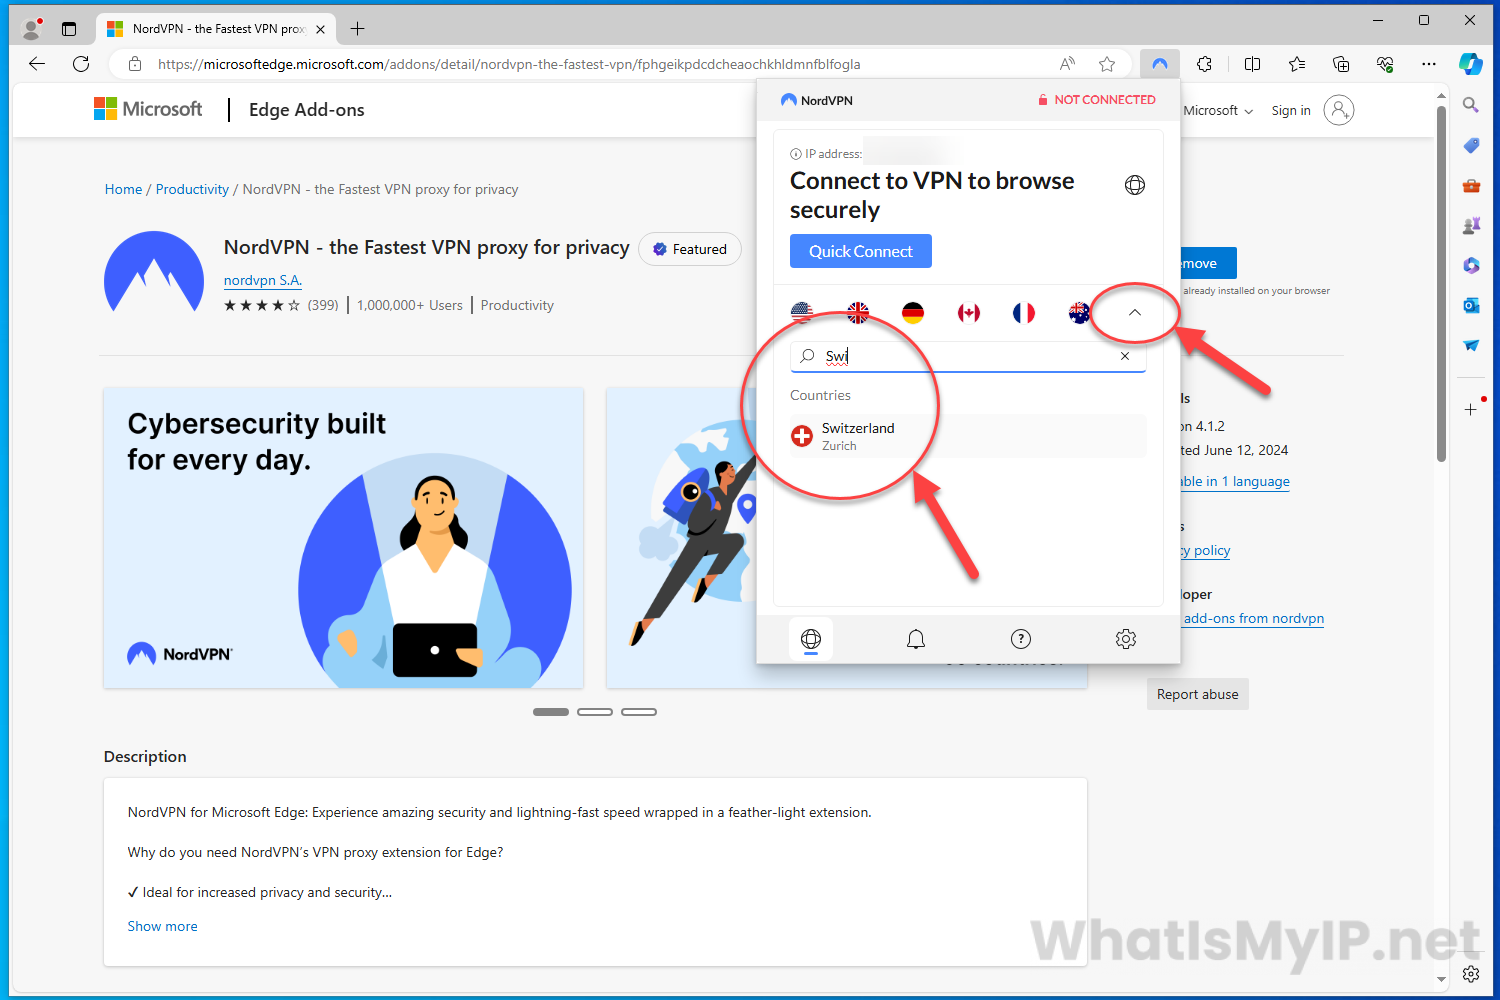
Connecting to VPN Server
Here you can now connect to a vpn server of your choice. You can either click the “Quick Connect” button, or search for a vpn server in another region. Here we will be connecting to a vpn server in Switzerland. To start, click the up chevron arrow to big up the search bar. Start by typing in the name of the country you would like to connect through, in our case we will do “Swi” and on the bottom you will see the list of countries that come up. To connect to a vpn server in that country, simply click on the name of the country and Nord will connect you.
Step 10
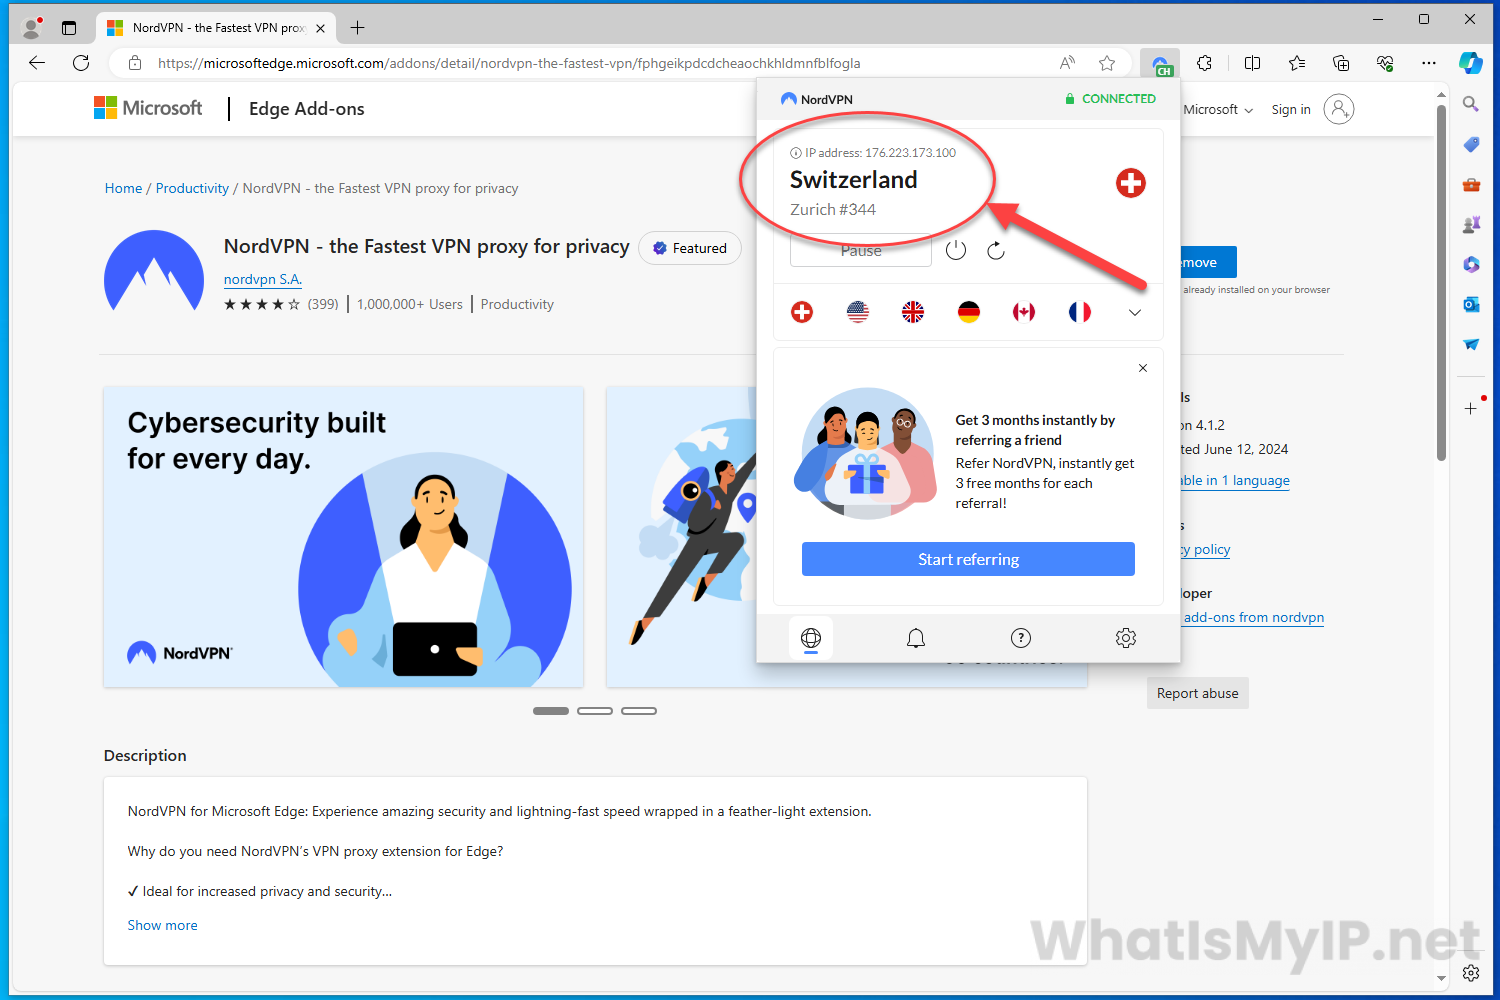
Connected to VPN Server
Now that you have connect, click the icon in the toolbar and you will see the word “Connected” in green at the top. You can also see the details of the vpn server you are connect to as in ip address and country and vpn server number.
Step 11
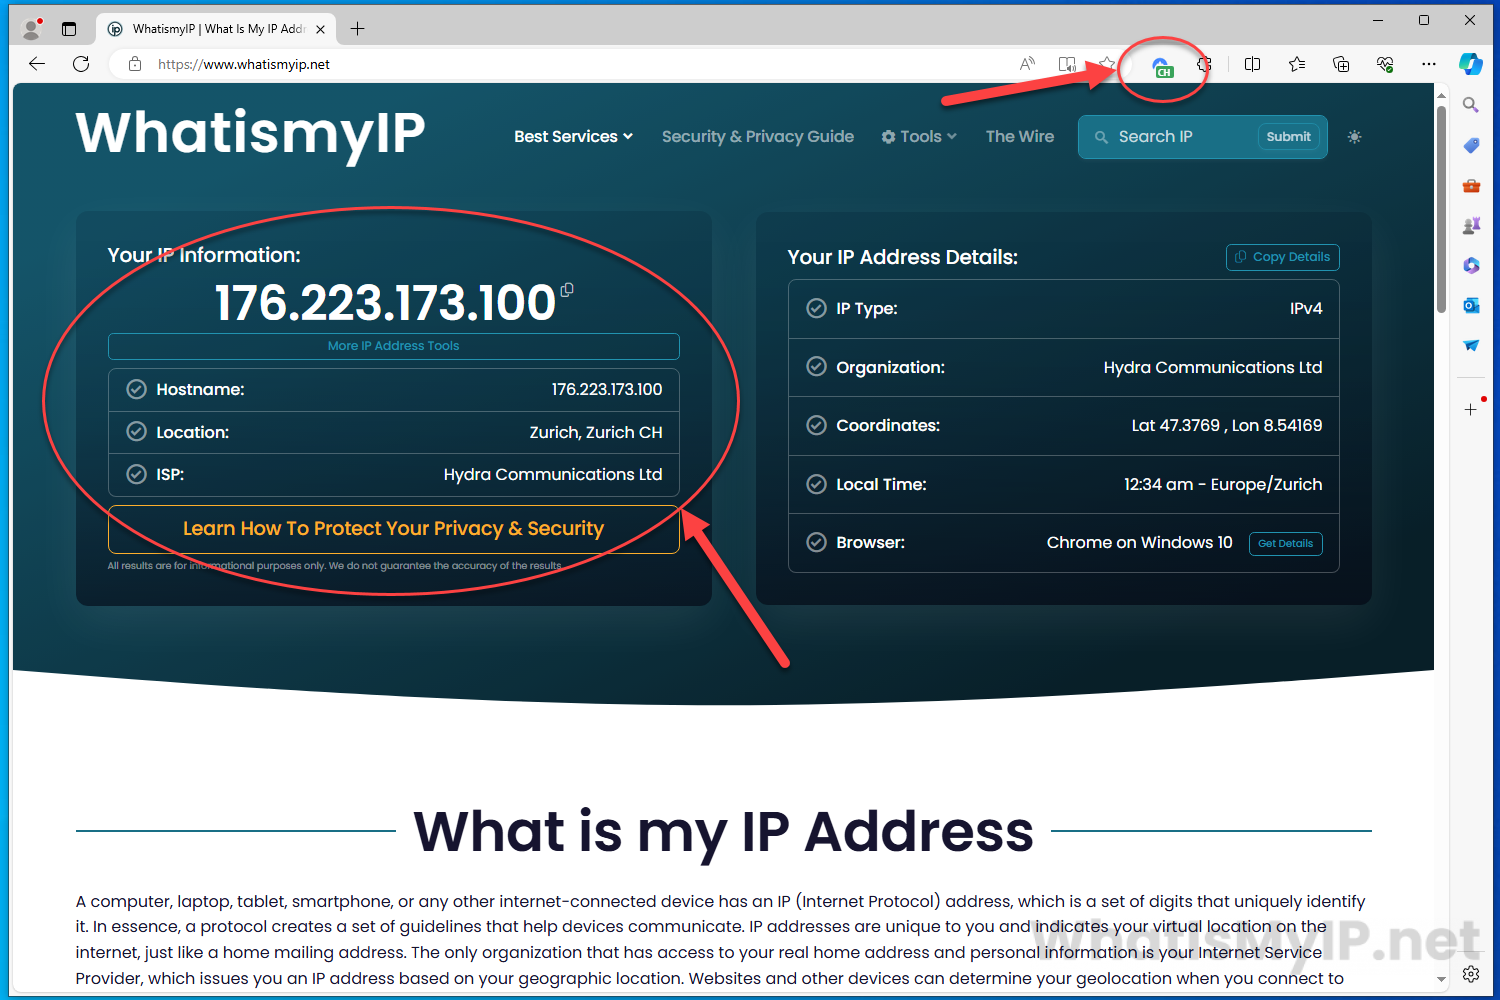
Test Your VPN Connection
The NordVPN icon in the toolbar will turn green and have the letters of the country you are connected through. Now you can test your vpn connection by simply going over to our main wepage whatismyip.net and we will give you all the ip address details you need. Here you can see we are connected through Zurich and the details of our ip address.
Step 12
Disconnect from VPN
To disconnect from the vpn server, simply click the NordVPN icon in the toolbar and you will see a power icon under the server details. Click the power icon and you will disconnect from the vpn server.