Written By: Christian Sanchez
Last Updated: July 3, 2024
Setting up Backblaze Cloud Storage for your personal computer is an easy and reliable way to ensure your data is continuously protected. With automatic backups, unlimited storage, and user-friendly restoration options, Backblaze offers peace of mind by safeguarding your valuable files from potential data loss. Follow the simple steps outlined in this guide to secure your digital assets effortlessly.
In today’s digital age, data is one of our most valuable assets. From precious family photos to important work documents, the loss of such data can be devastating. Thankfully, cloud storage solutions like Backblaze offer a reliable and straightforward way to back up your personal computer. In this article, we’ll guide you step-by-step on how to set up personal backup services using Backblaze Cloud Storage.
Backblaze is renowned for its simplicity, affordability, and unlimited storage. It provides automatic and continuous backup for all your files, ensuring that you never have to worry about losing your data again. Here’s how you can get started with Backblaze:
Step 1
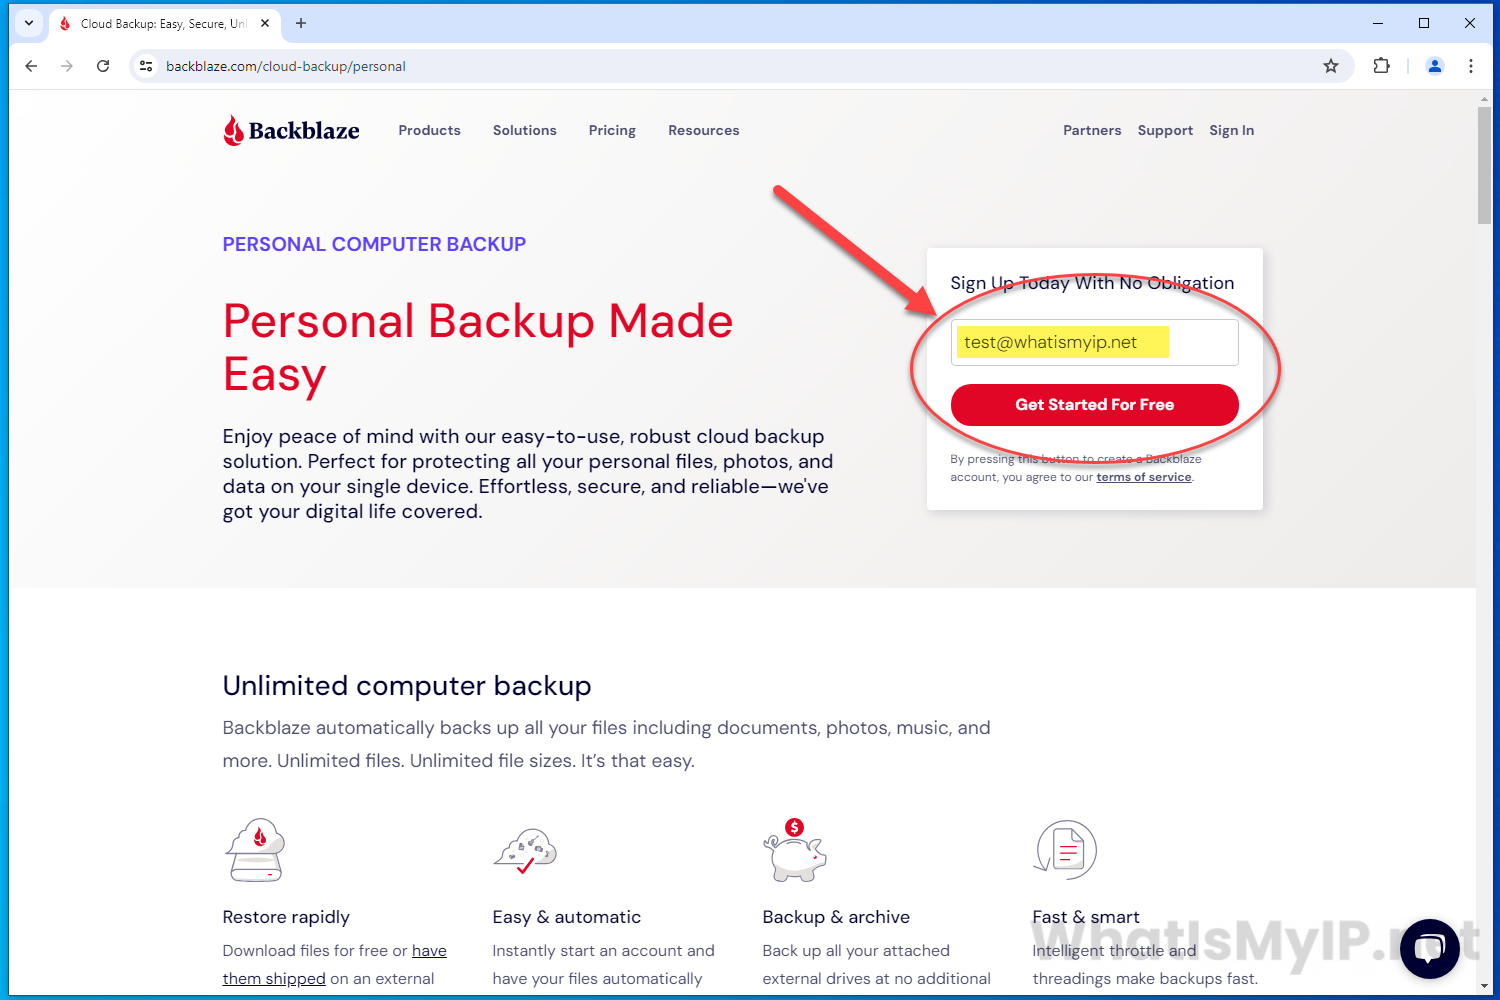
Visit the Backblaze Website
Head on over to Backblaze.com and type in your email address to sign up for Free.
Step 2
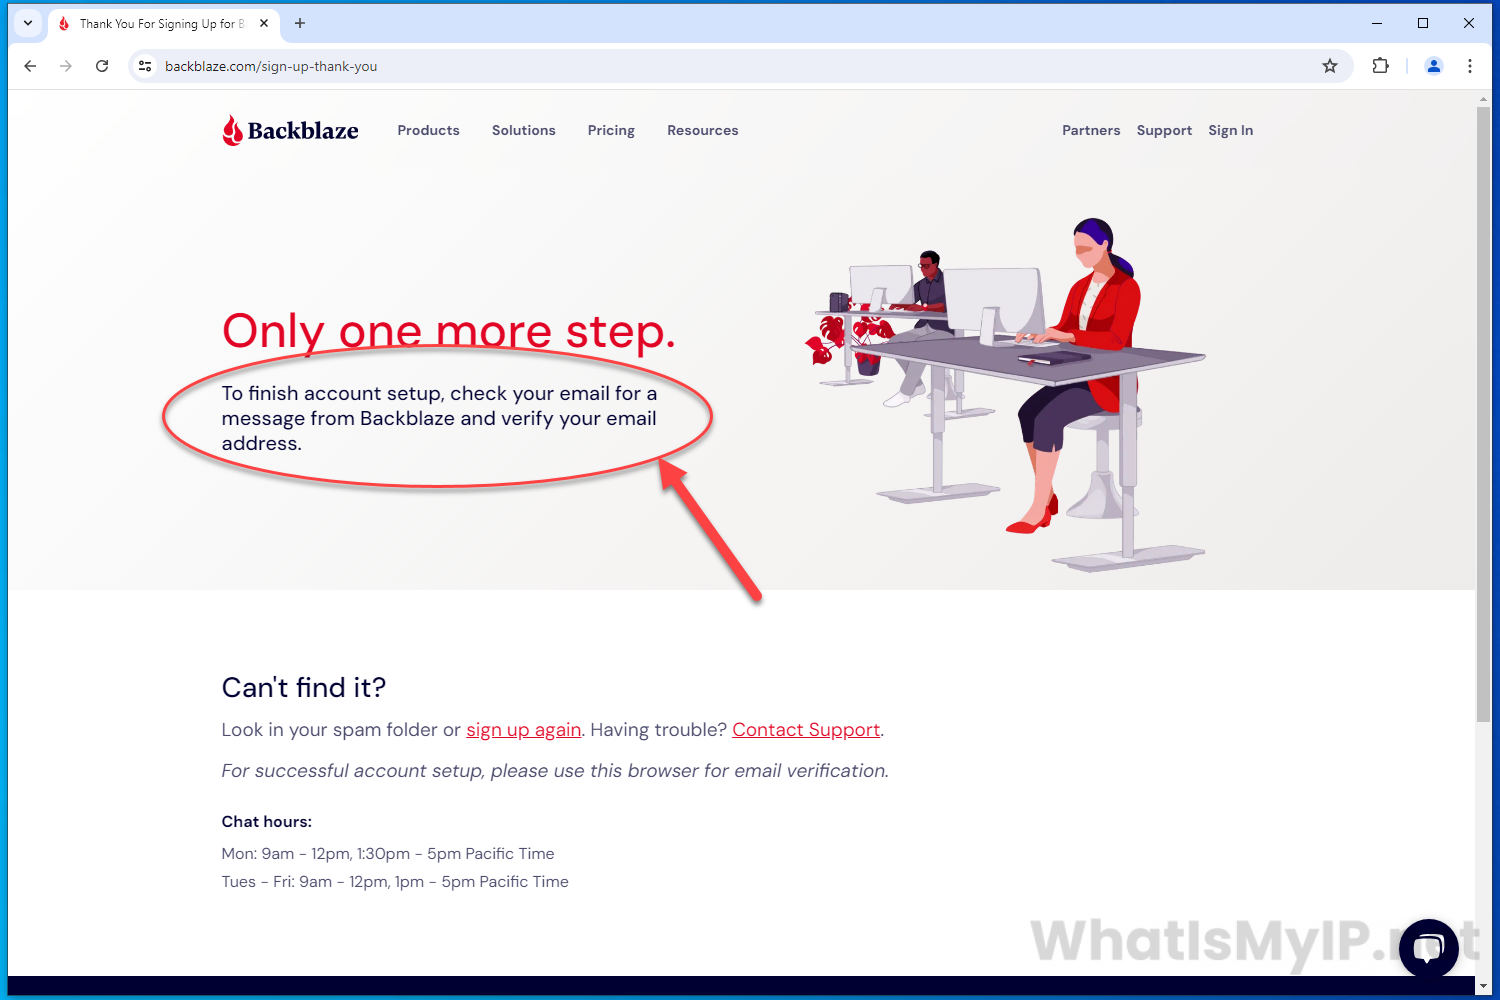
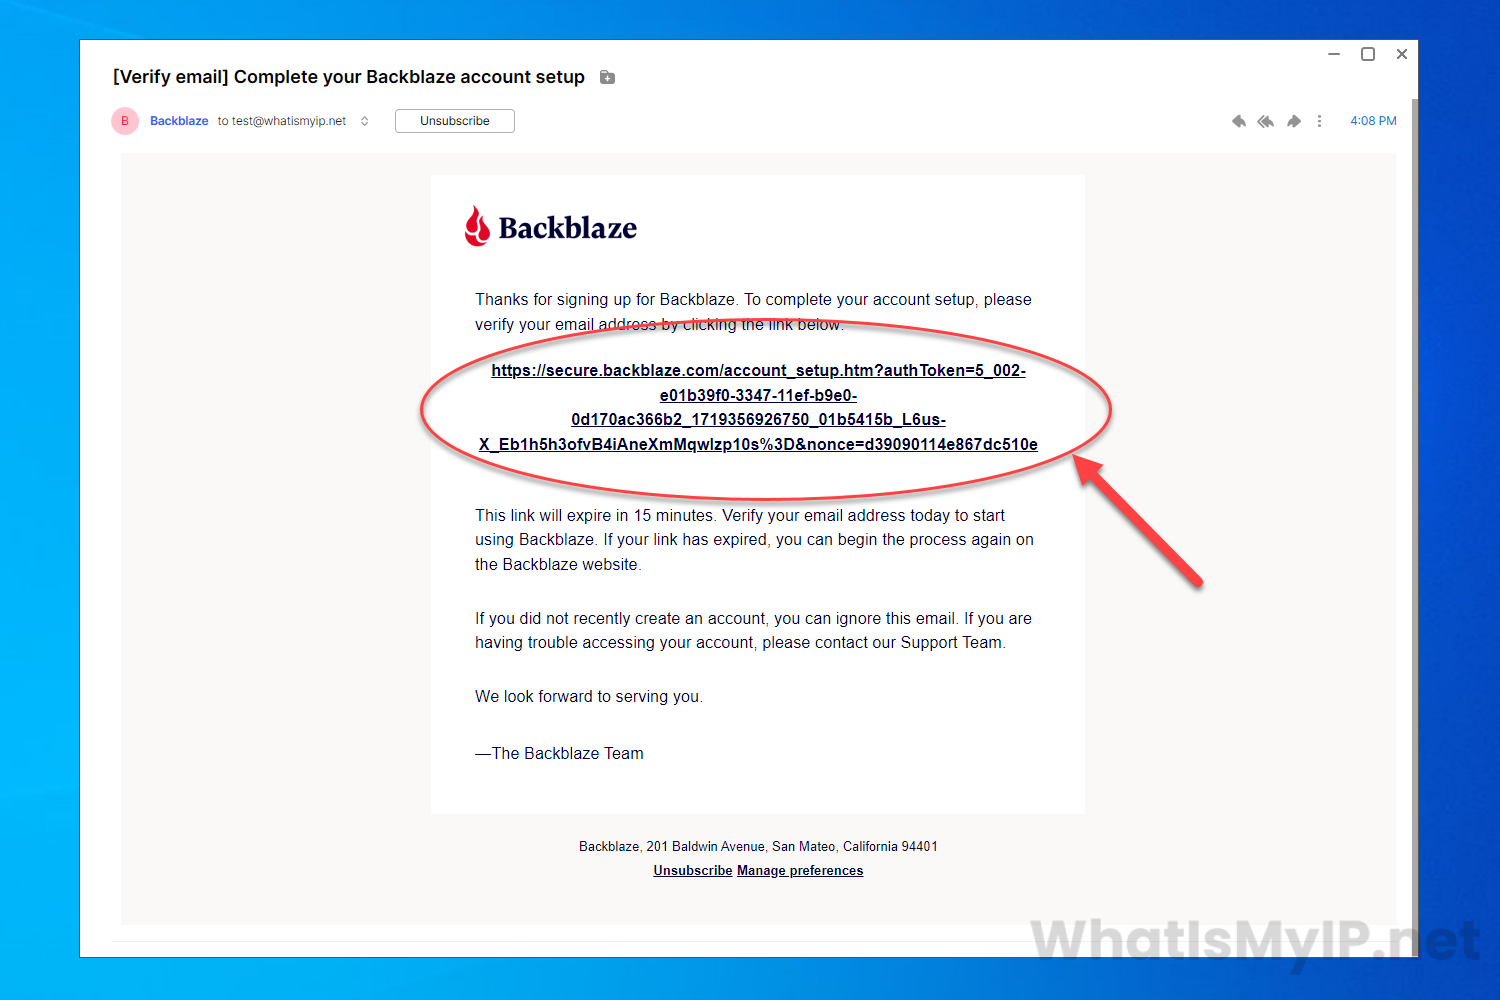
Confirm Email Address
Once you typed in your email address, you will have to complete one more step before they can setup your account. Check your email account for an email from Backblaze asking to confirm your email address. All you have to do is click on the link in the email to continue.
Step 3
Create Account
Now that you have confirmed your email address, you will have a screen to create your account. First you will need to setup a password for your account (make sure it’s a good one or use our Password Generator). Second, you will need to select a “Storage Region“, either US West, US East, or EU Central, whichever you are closer too. Last, check the box to agree with the Terms of Service. Then click the “Create Account” button to continue.

Step 4
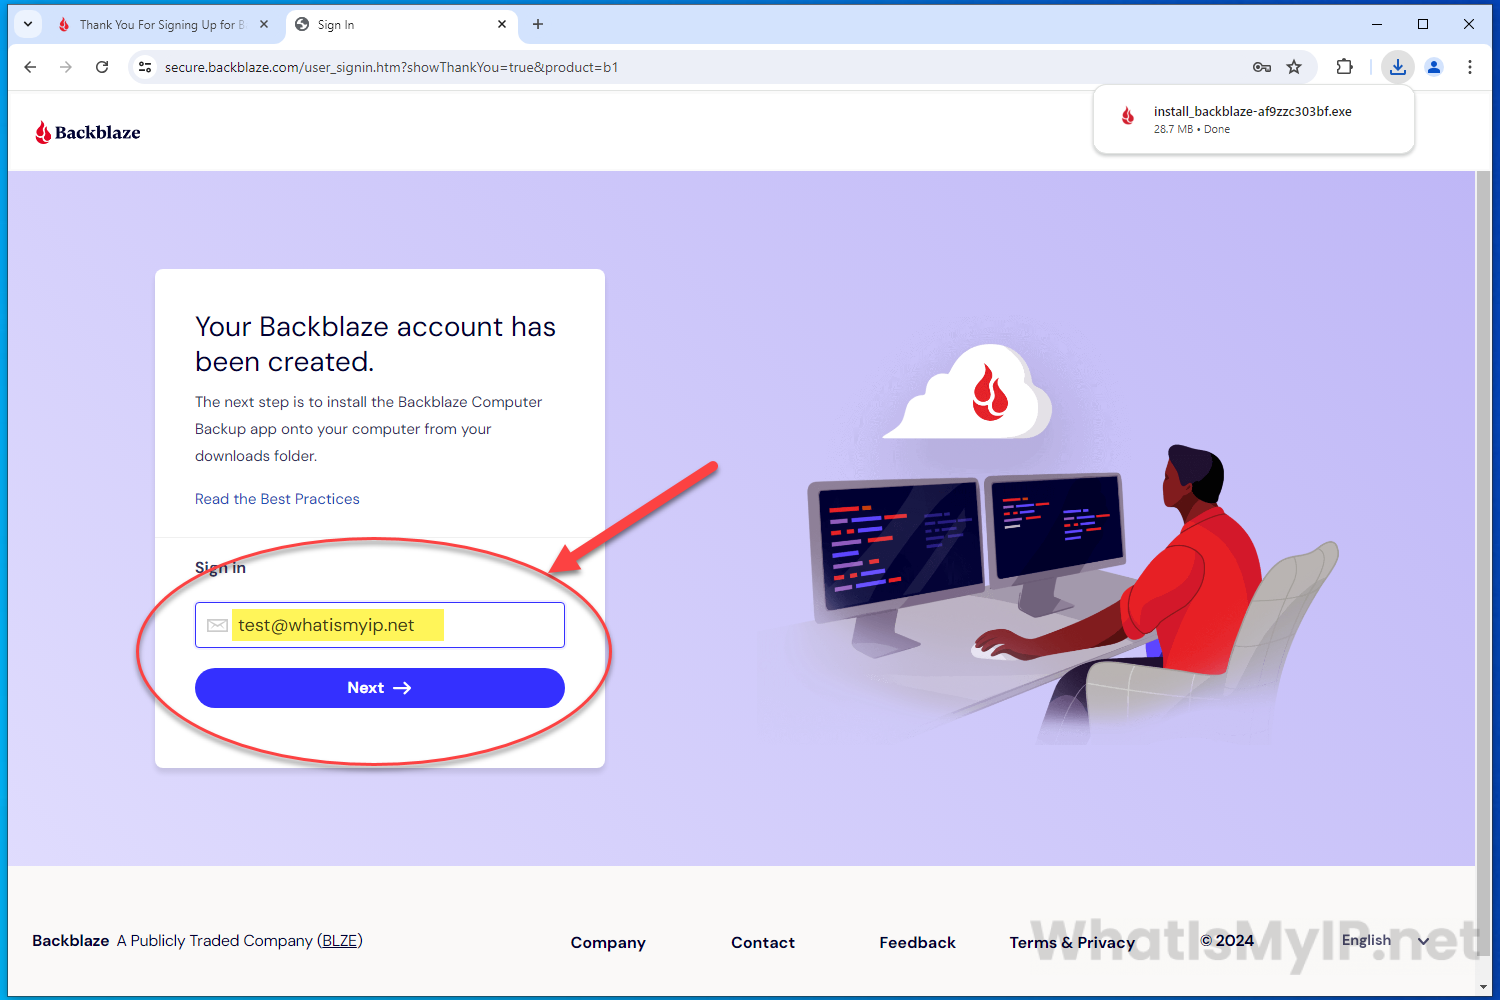
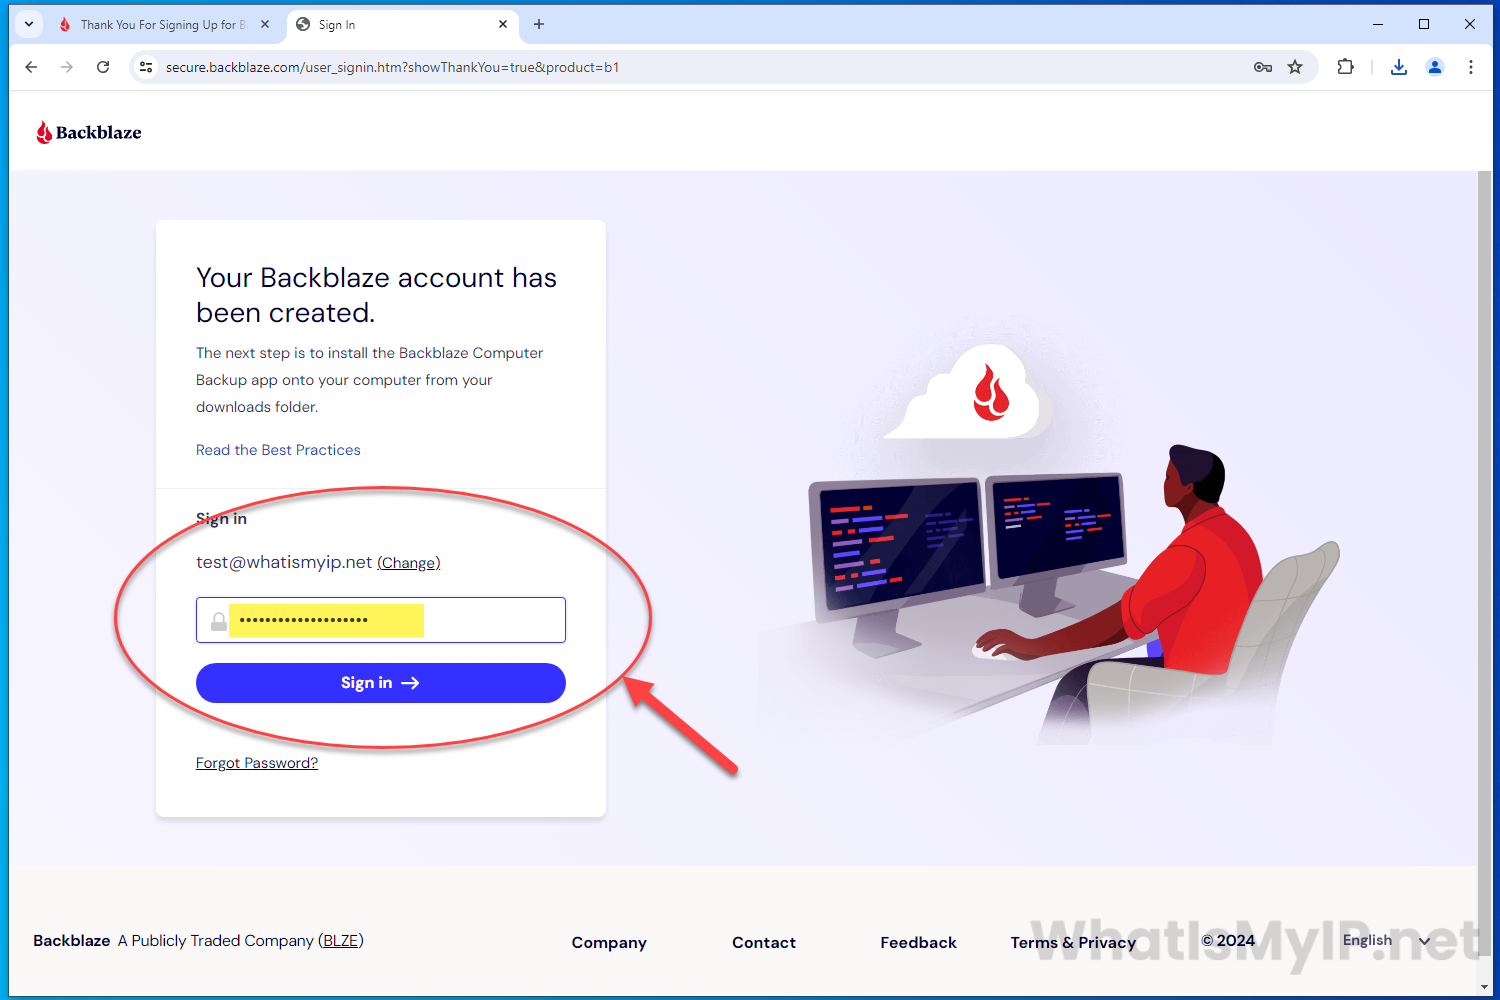
Sign in to Account
Once you have created your account, you will be redirected to the sign in page of Backblaze. Enter your email address and password and click the “Sign in” button.
Step 1
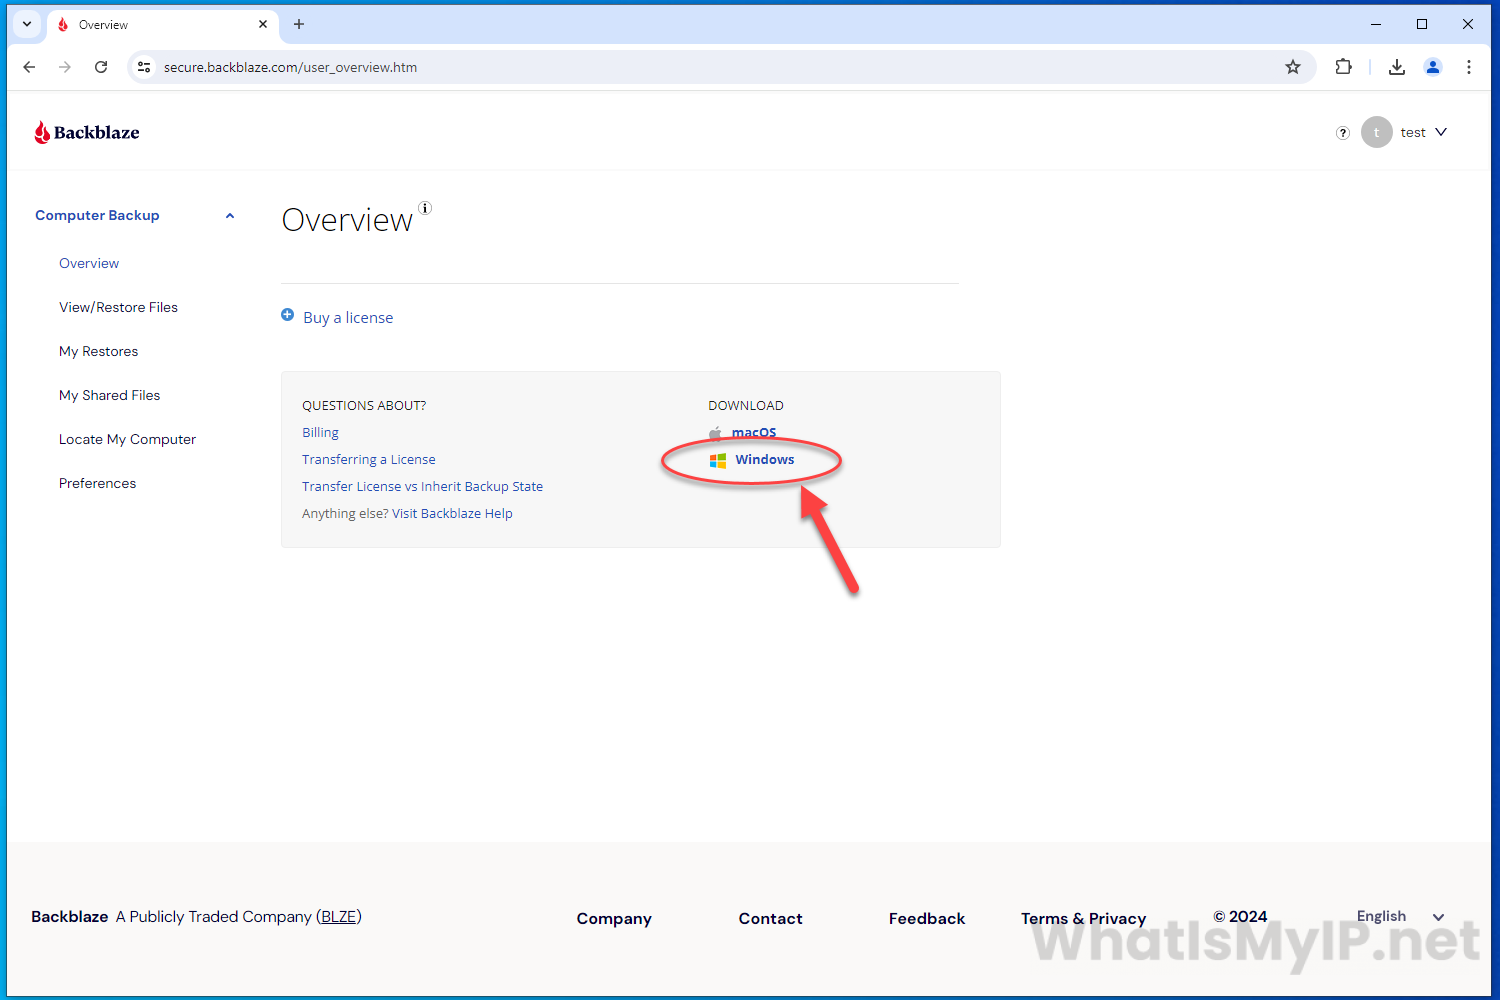
Download the Installer
Once you are signed into your account, on the Overview you will see a section called “DOWNLOAD“. You will need to click on the “Windows” link to start the download of the Backblaze Windows Backup Client.
Step 2
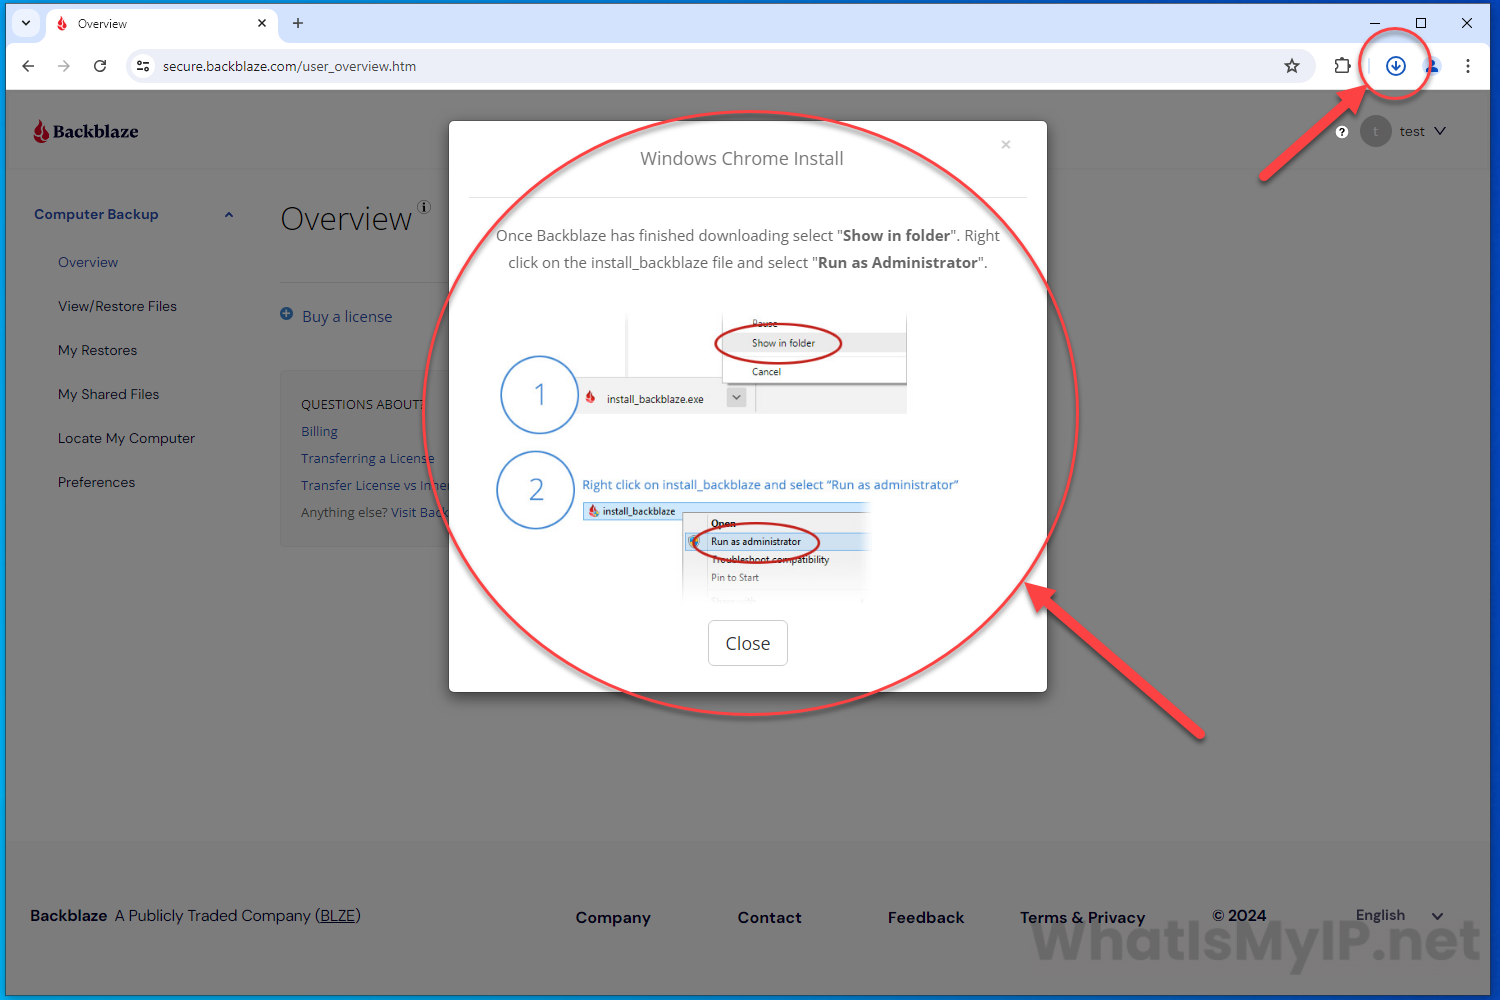
Start the Installation
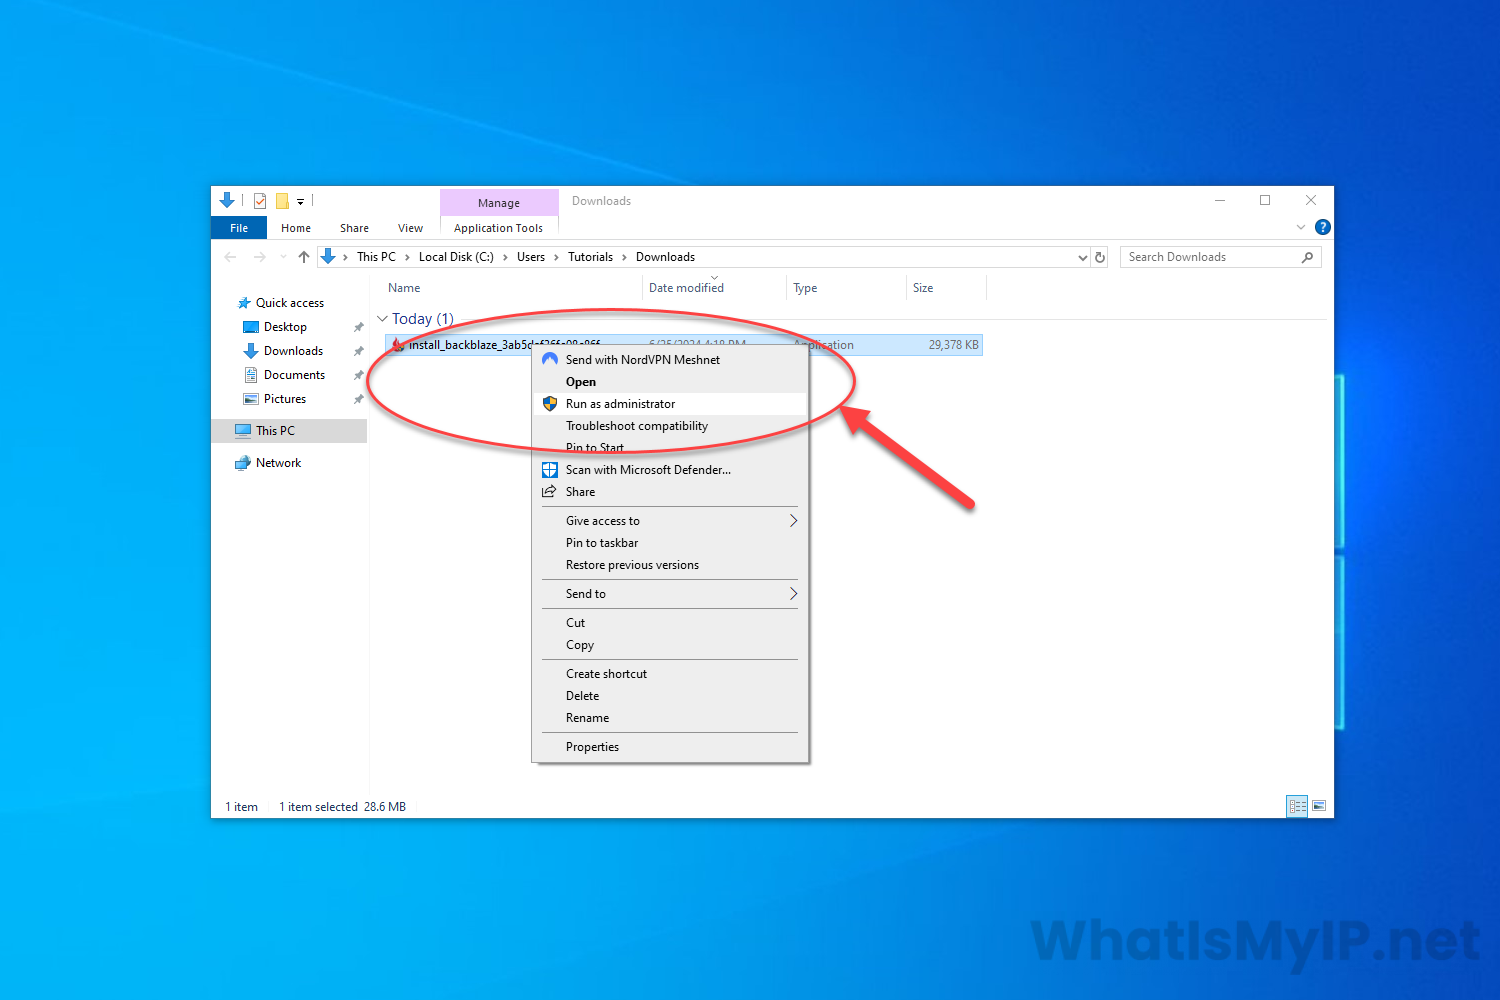
Once the file has downloaded, you will see a popup instructing you one how to need to run the installer. Click on the Download icon on your browsers toolbar and you will see the downloaded file in the list. Right click on the name of the file and click on “Show in folder“. Once the folder it opened with the file that just downloaded, right click on the file which should start with install_backblaze name and click on “Run as administrator“. The install process should start.
Step 3
Backblaze Installer
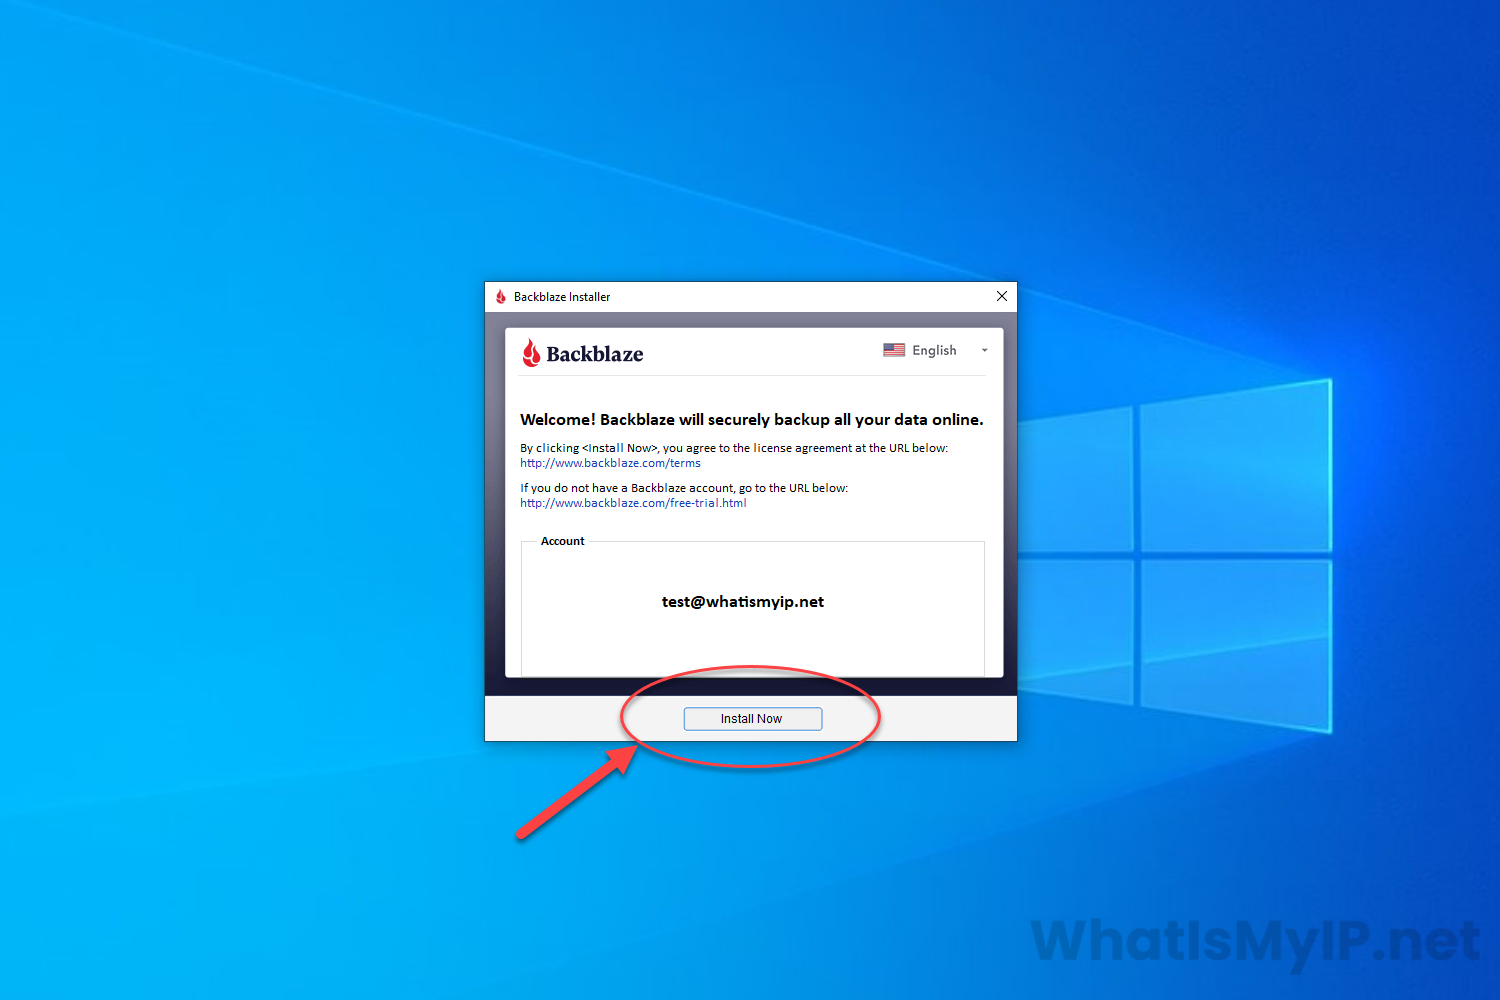
Once the Backblaze Installer begins, you will see a box that will show you your account email address and a “Install Now” button on the bottom. Click that to start.
Step 4
Analyzing Drive
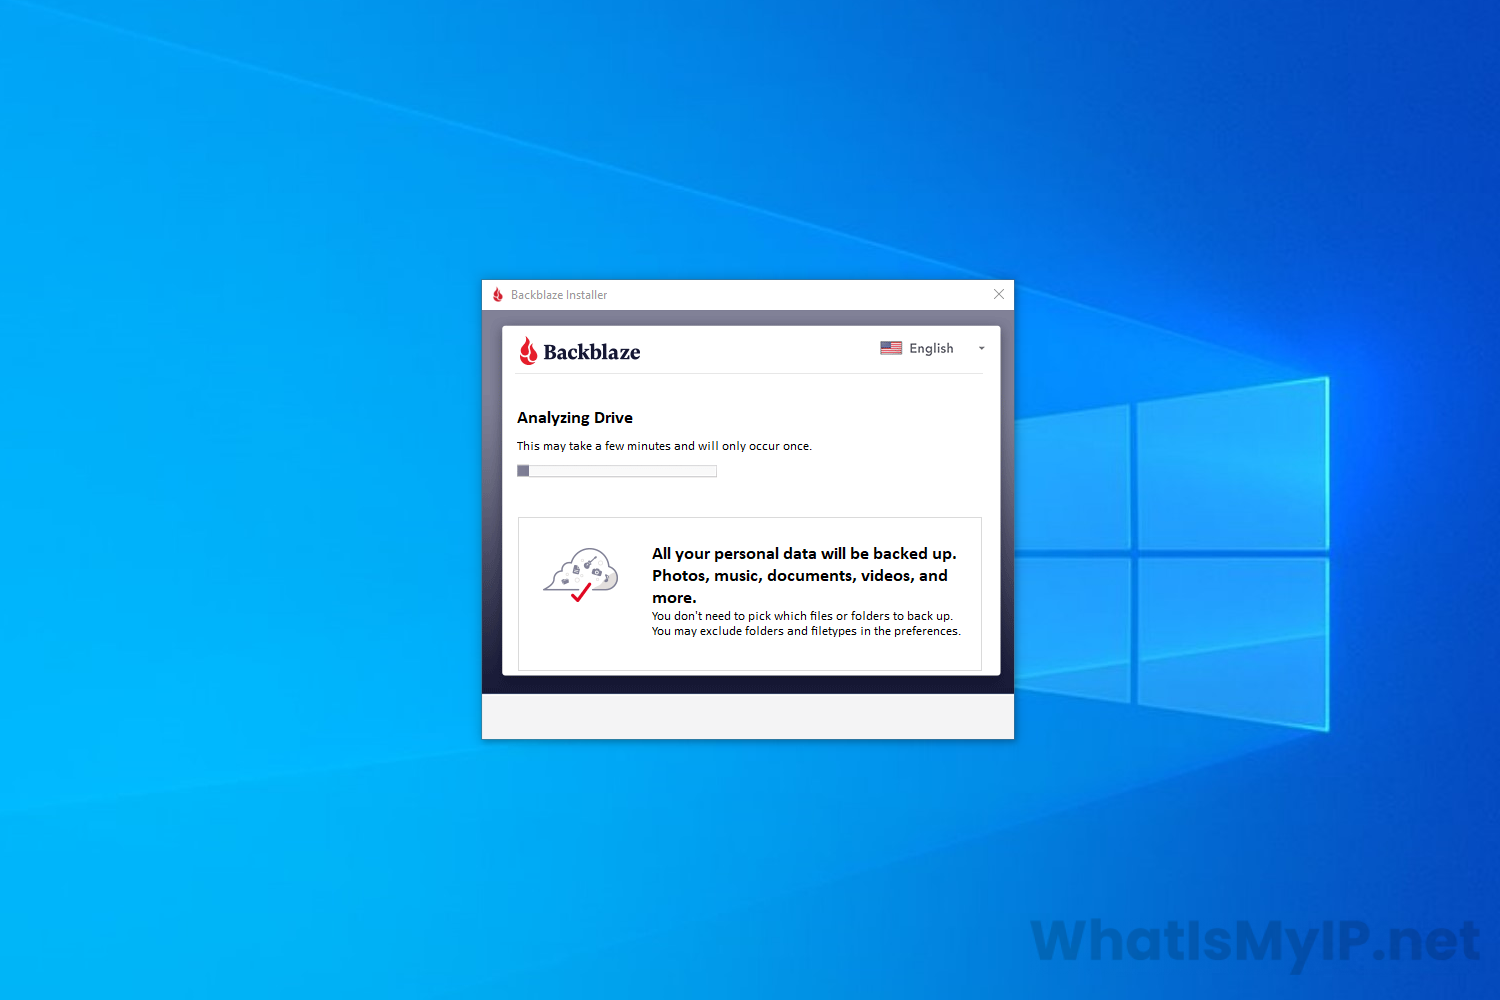
At this point the installer will run through some analyzing of some data and also your hard drive. This should take a few minutes.
Step 5
Install Complete
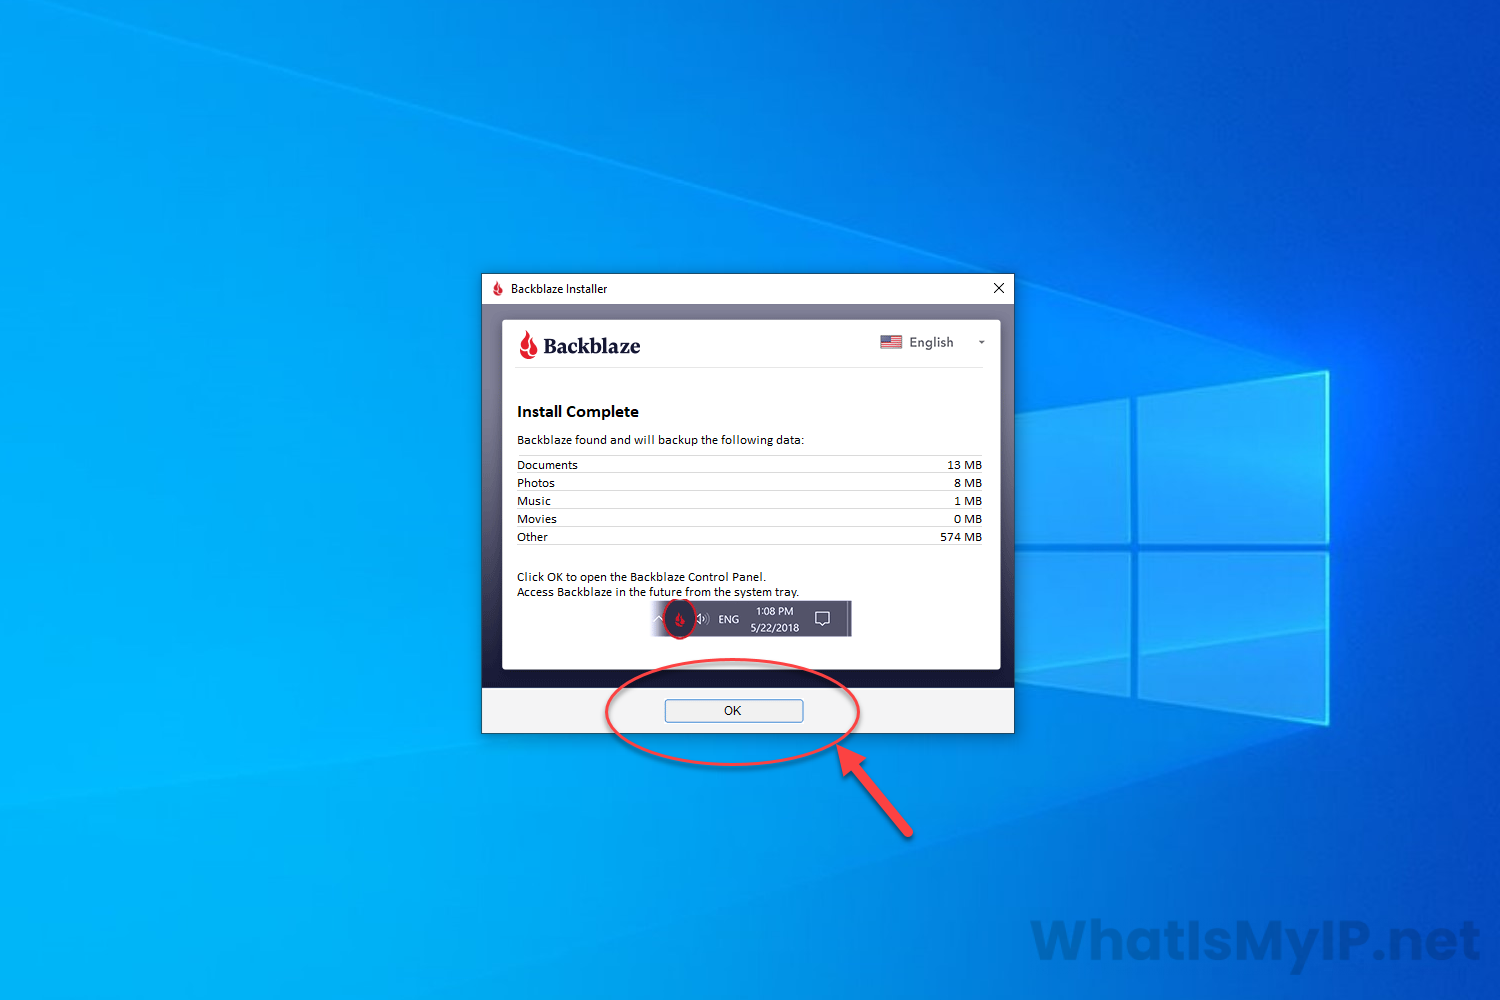
Once the installation of the Backblaze Client is complete, it will show you all the type of files it found on your computer. It will also show you where you can access the control panel of the client. It will be a Backblaze icon in your task tray. Click on the “OK” button to close the installer.
Step 1
Initial Launch
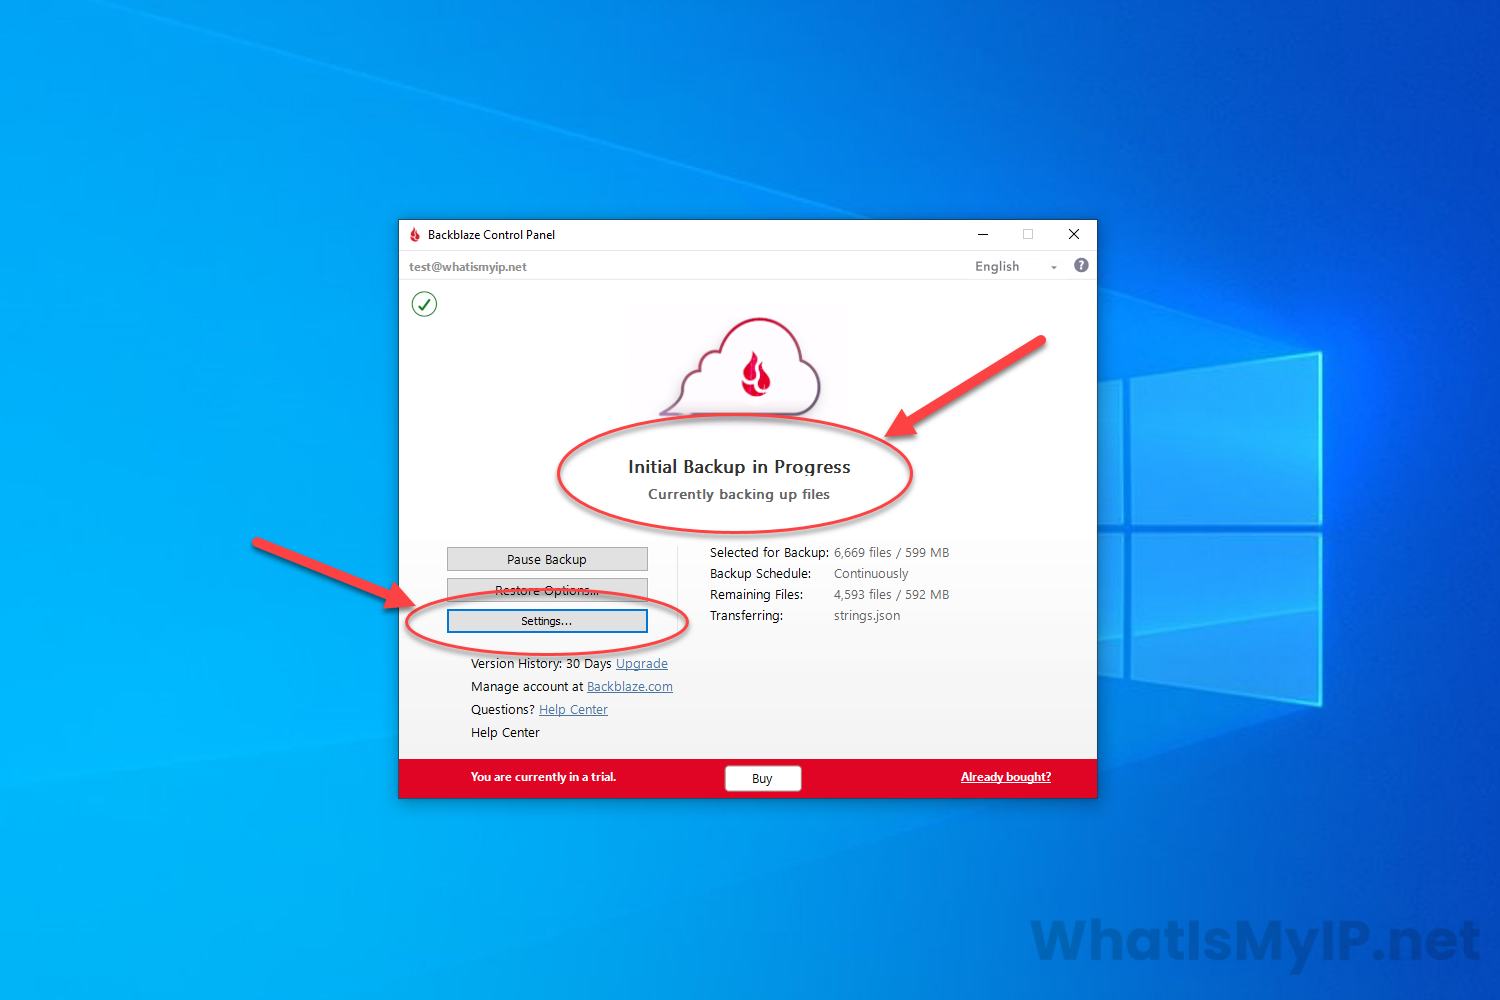
With the Backblaze Personal Cloud Backup, there really isn’t much to configure. Once installed it already start the initial backup process. You can launch the control panel from the task bar and you will see the progress on the main window. For some basic settings, you can click on the “Settings” button to open a new window so you can do some changes.
Step 2
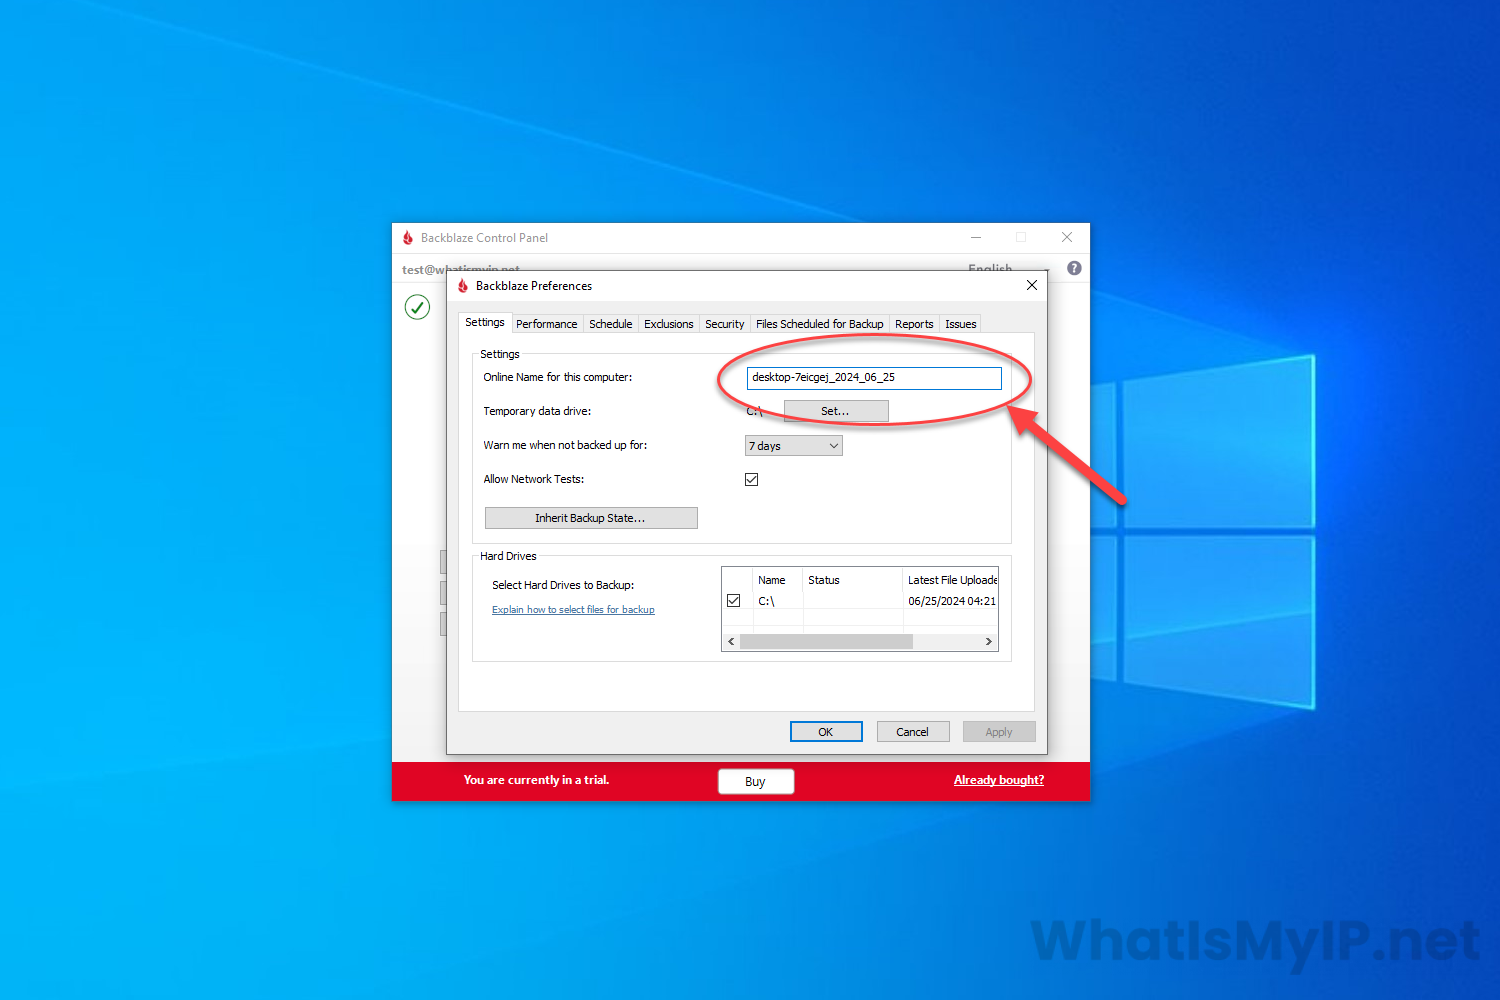
Settings
In the settings area you will see some tabs at the top which gives you control over some aspects of the client. The only one I would recommend changing is on the settings tab, the “Online Name for this computer” so you will be able to tell on your account which is which. The other settings can be left default if you like or you can read the official Backblaze documentation on them and change to your liking.
Step 1
Restoring Backup Files
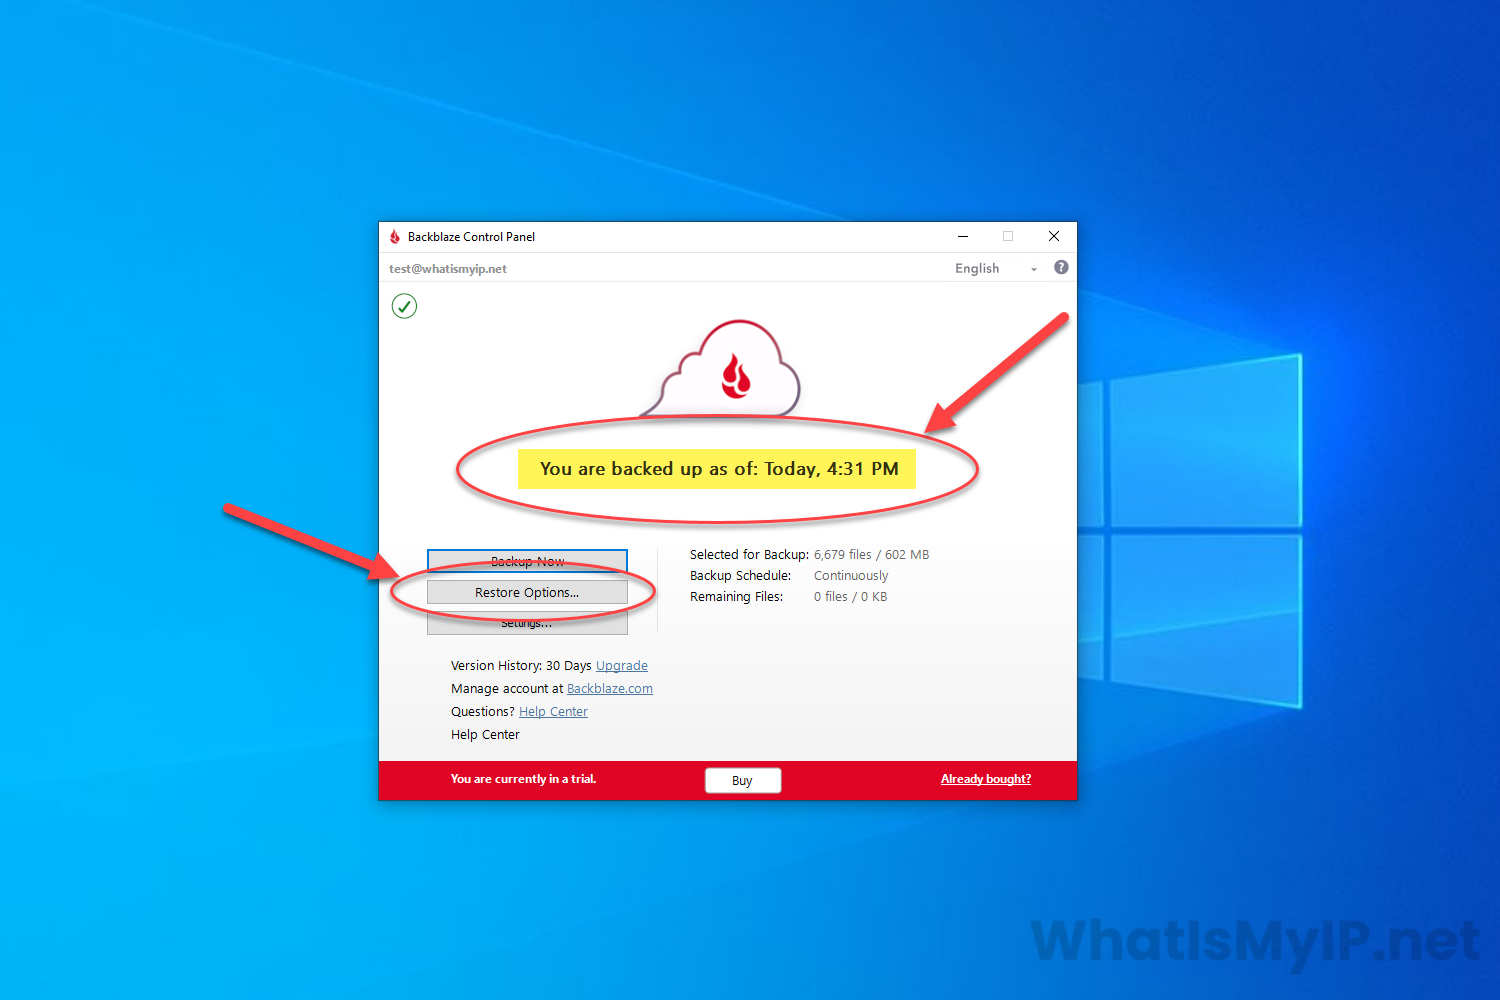
When it comes to restoring files, there are multiple ways of going about it. It really depends on the amount of file you are restoring which Backblaze has made it easy for which ever way you need. We will walk through restoring a few files so you can see the easy process. On the Control Panel, you just click on the “Restore Options…” button to open the restore screen.
Step 2
Restore Options
On this screen you will see 4 different restore options. We will be using the first option to restore which is called the “Restore App“. It will let us choose from which backup date and which files we would like to restore and to where. You would just click on the first section to get started.

Step 3
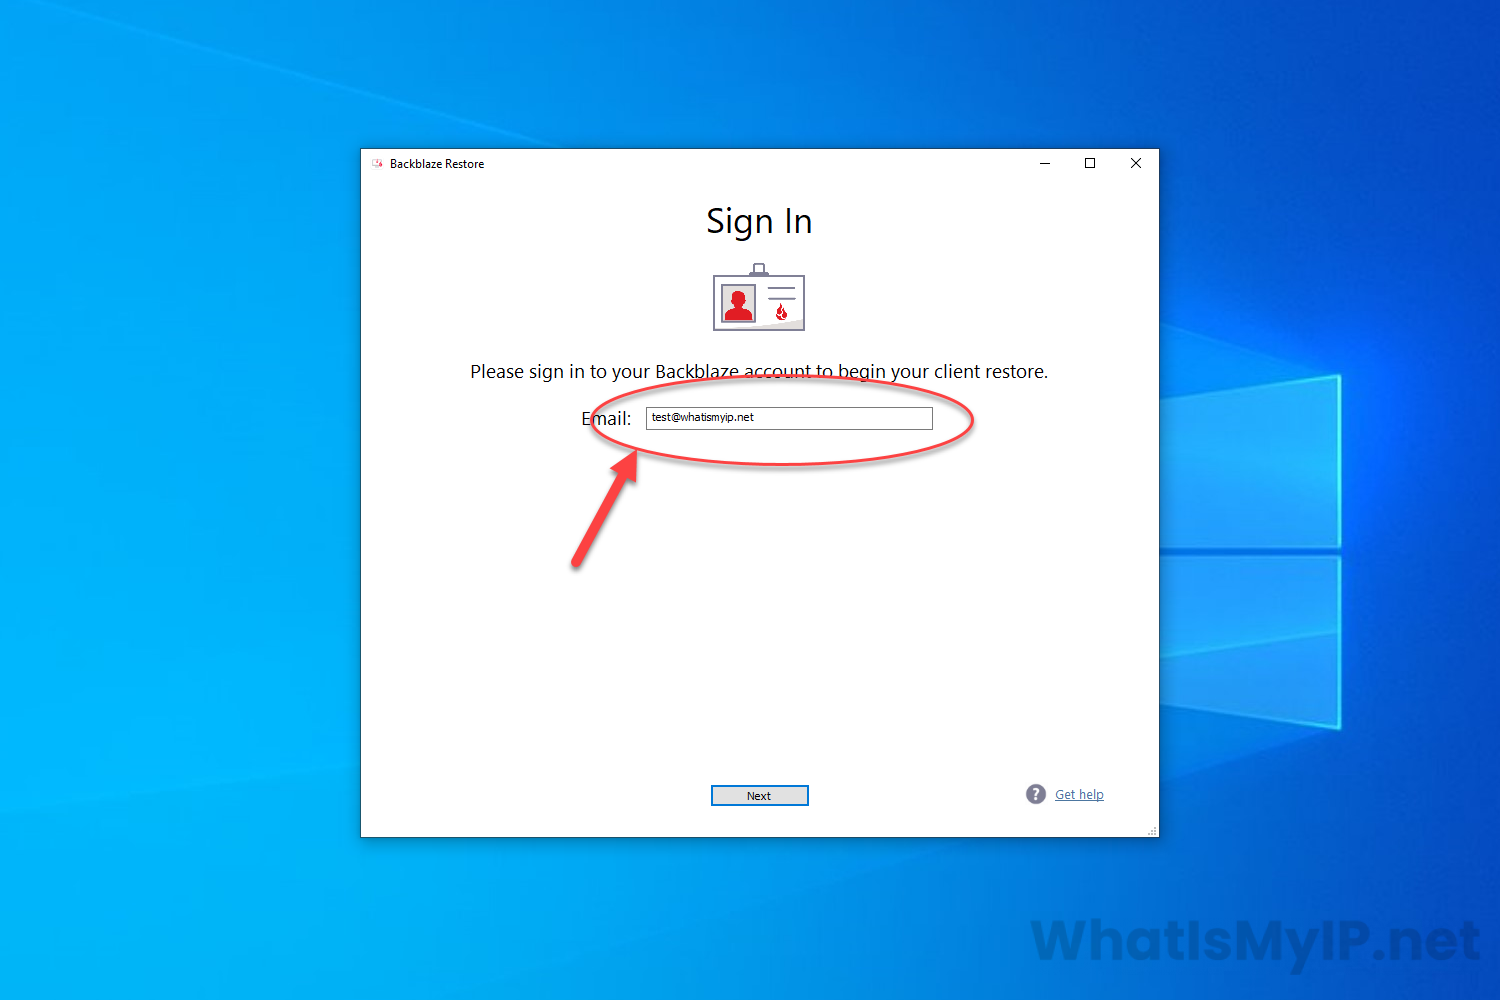
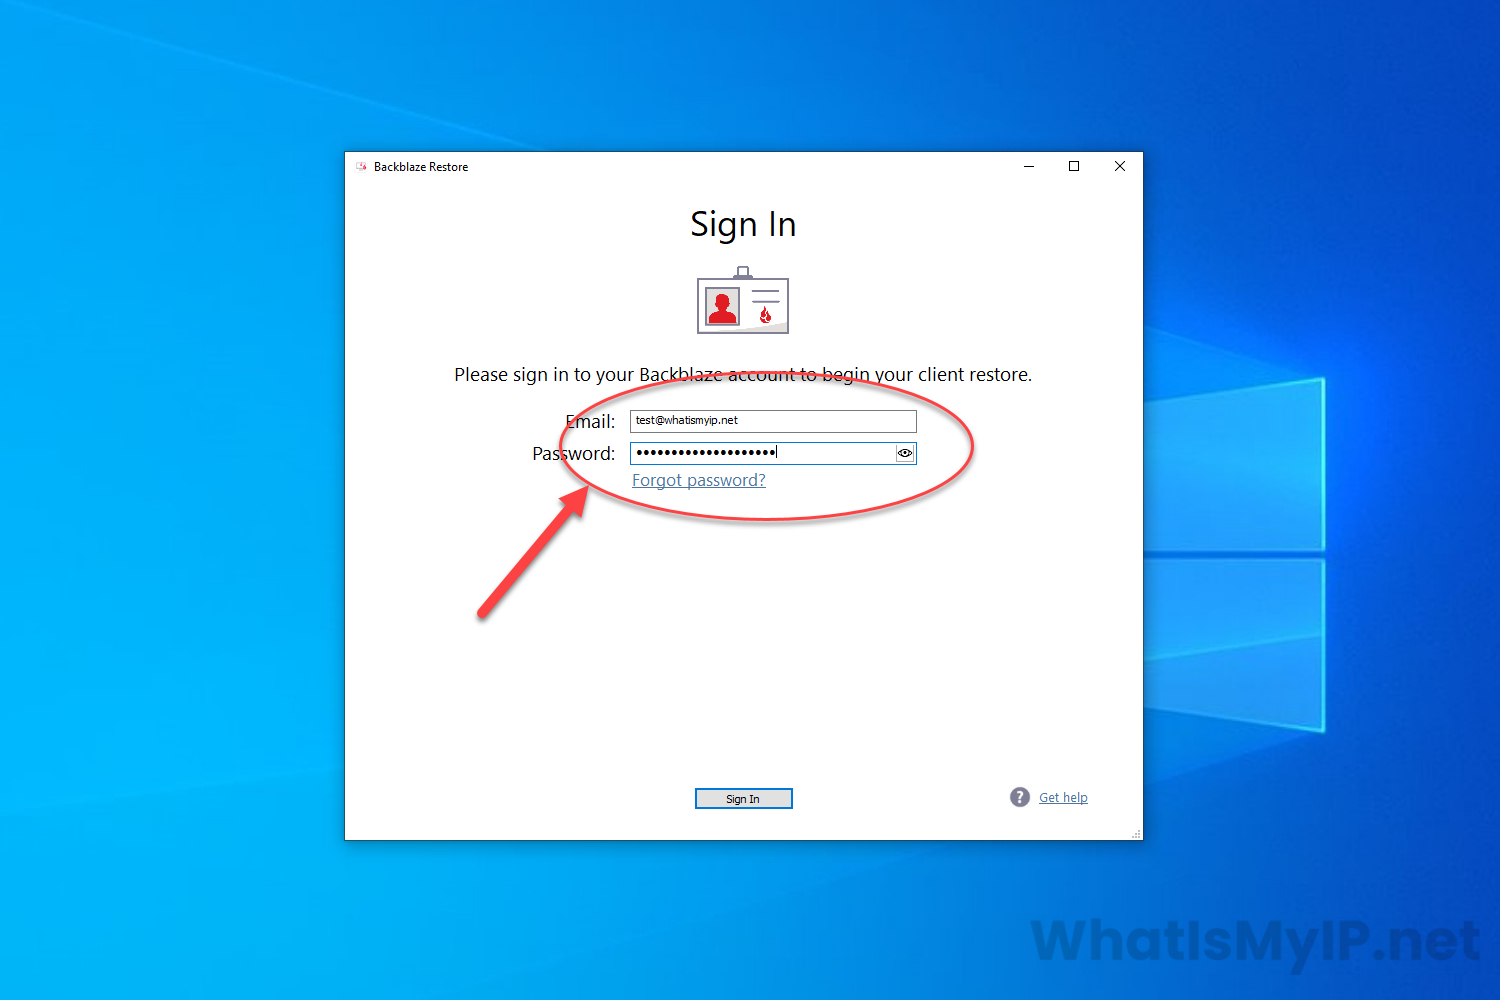
Restore App Sign In
Since the restore app is it’s own piece of software and you can always use it to restore other accounts as well, it will ask you to sign in to the account we will be restoring files from. Enter your username and password of that account. Then click “Sign In” to continue.
Step 4
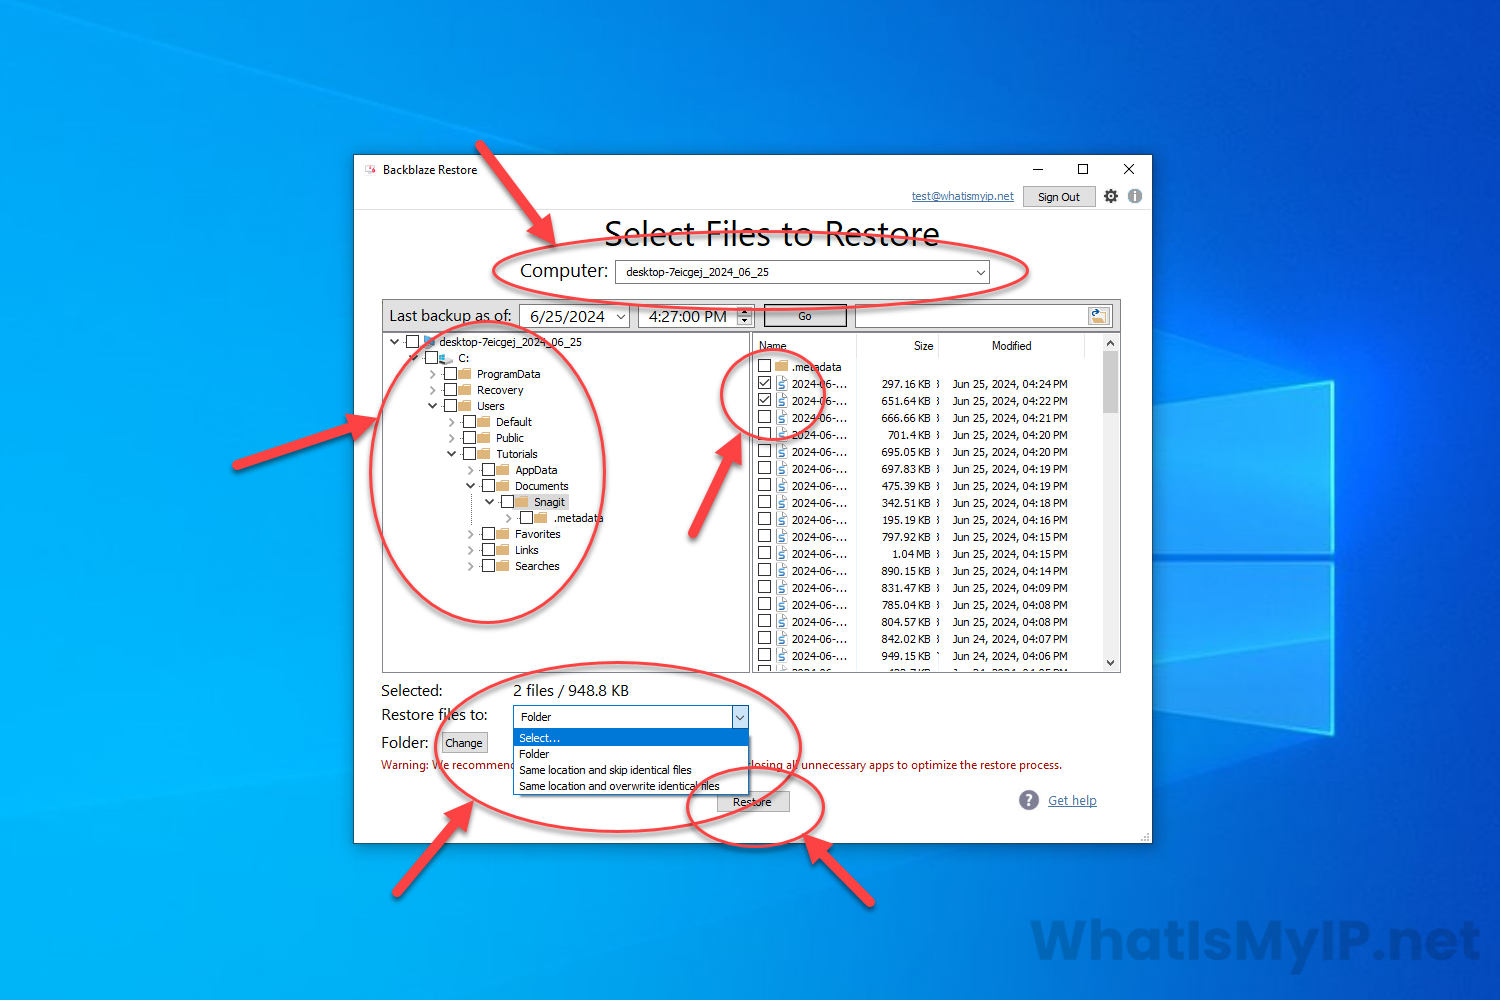
Select Files to Restore
On this screen you will be asked which files from which backup dates you would like to restore. At the top, you can select which Computer files you are restoring.
• On the left hand side of the window, you will see the date pulldown of all your backups from the last 7 days (by default). Under that you will also see your computer file structure tree and you can select where you want to drill down too.
• On the right hand side you will see the files in the selected folder. It will have all the files that have been backed up from that folder. You can select the files you would like to restore from there by checking the boxes next to the filenames.
• On the bottom, you will see how many files you have selected to be restored as well as where you would like to restore the files too. You can select the dropdown and either select a Folder, Same location and skip identical files, or Same location and overwrite identical files. We will select a folder for this tutorial and put it on our desktop.
• Once you have all the files selected that you would like to restore, click the button “Restore” on the bottom to continue with the restore.
Step 5
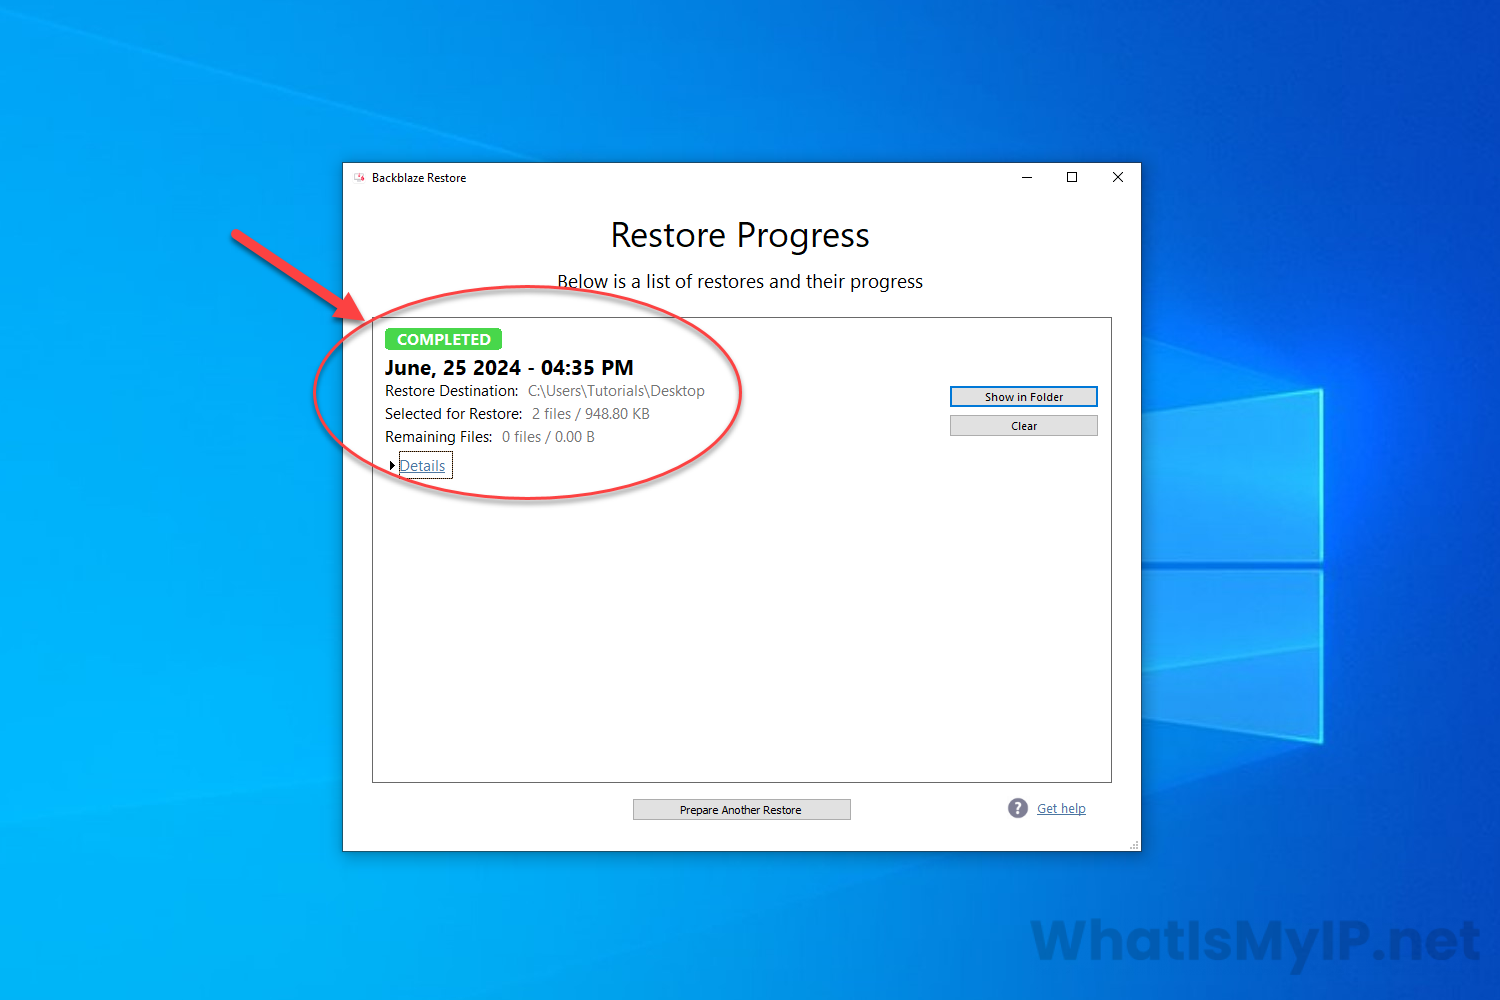
Restore App Complete
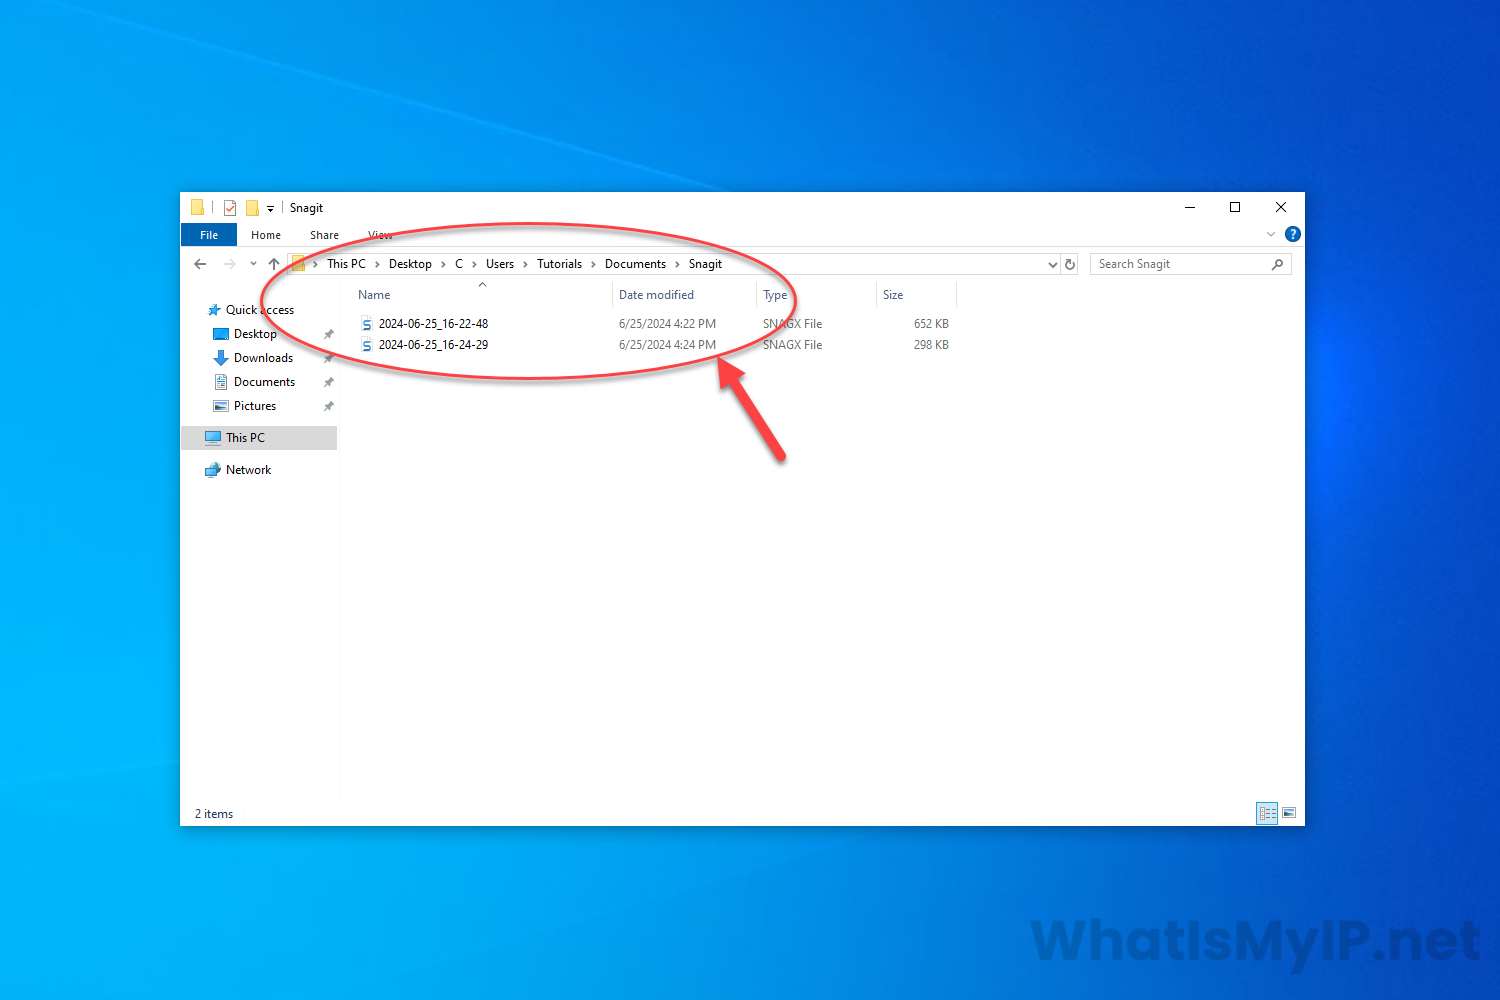
Once you hit that Restore button, it will open a new window that will show you the progress of the restore. Once complete, it will show you when it restore completed, where the files were restored too, and how many files were restored. You can also click on the “Show in Folder” to open the folder you restored the files too. At this point you can either close this window or Prepare Another Restore on the bottom.
Step 6
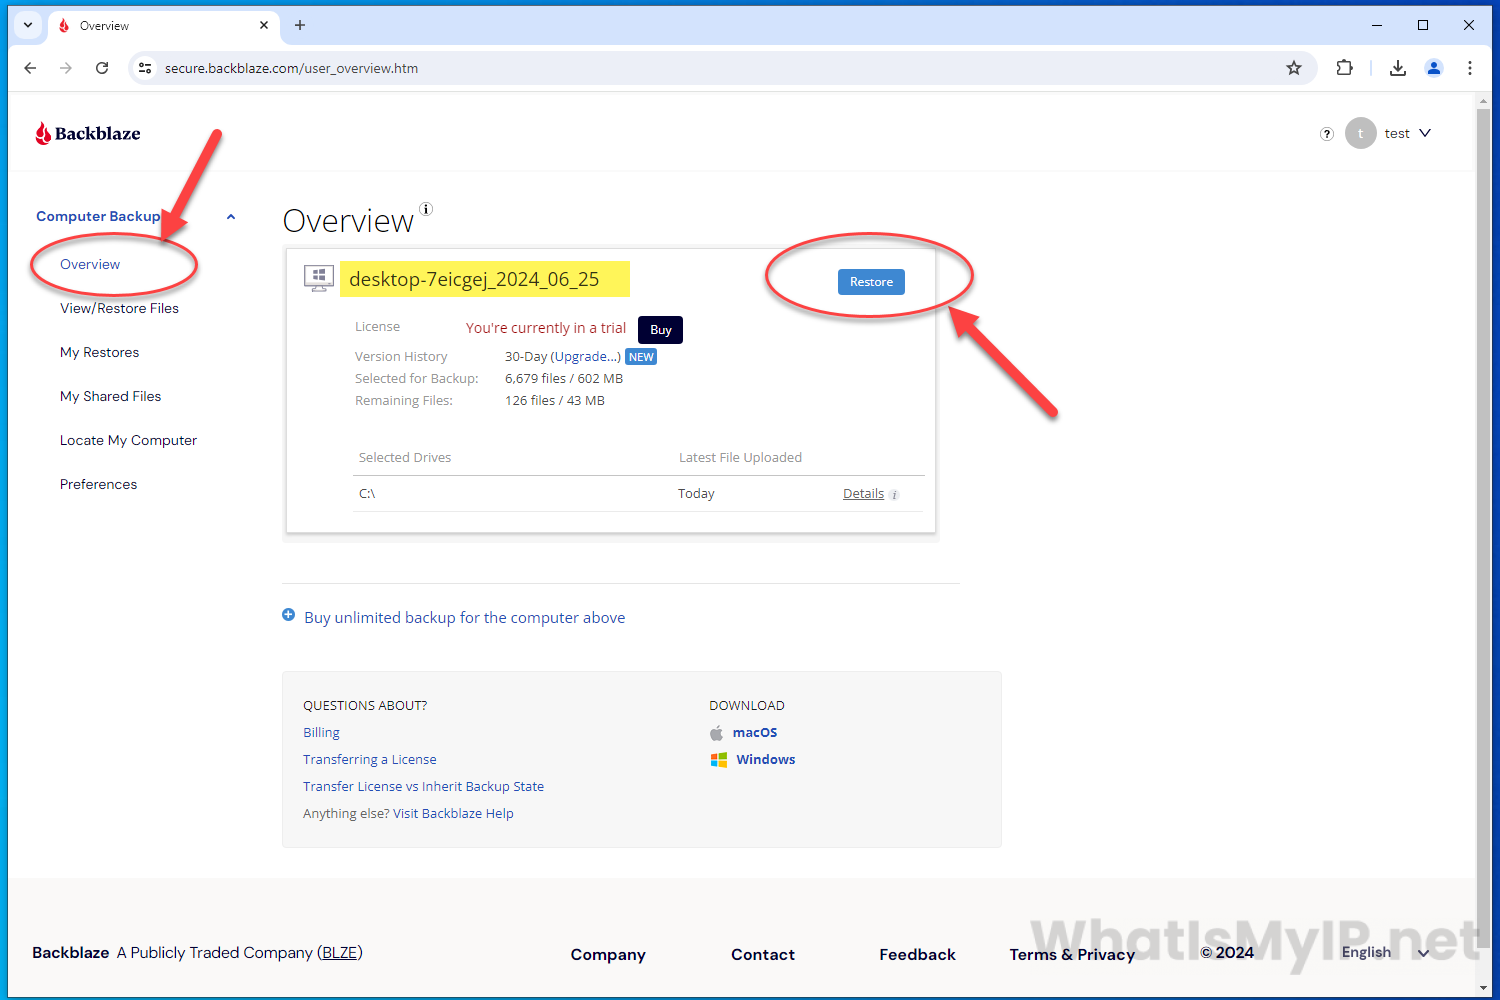
Restoring from Web Browser
You can also do a restore of backed up files from your web browser. Her we will show you what that looks like as well. It is very similar to the Restore App from above. Open your account on the web browser and in the Overview tab, you will see your computers listed in the middle that have been backed up. Next to the name of the computer you will see a button “Restore“. Click that button to get started.
Step 7
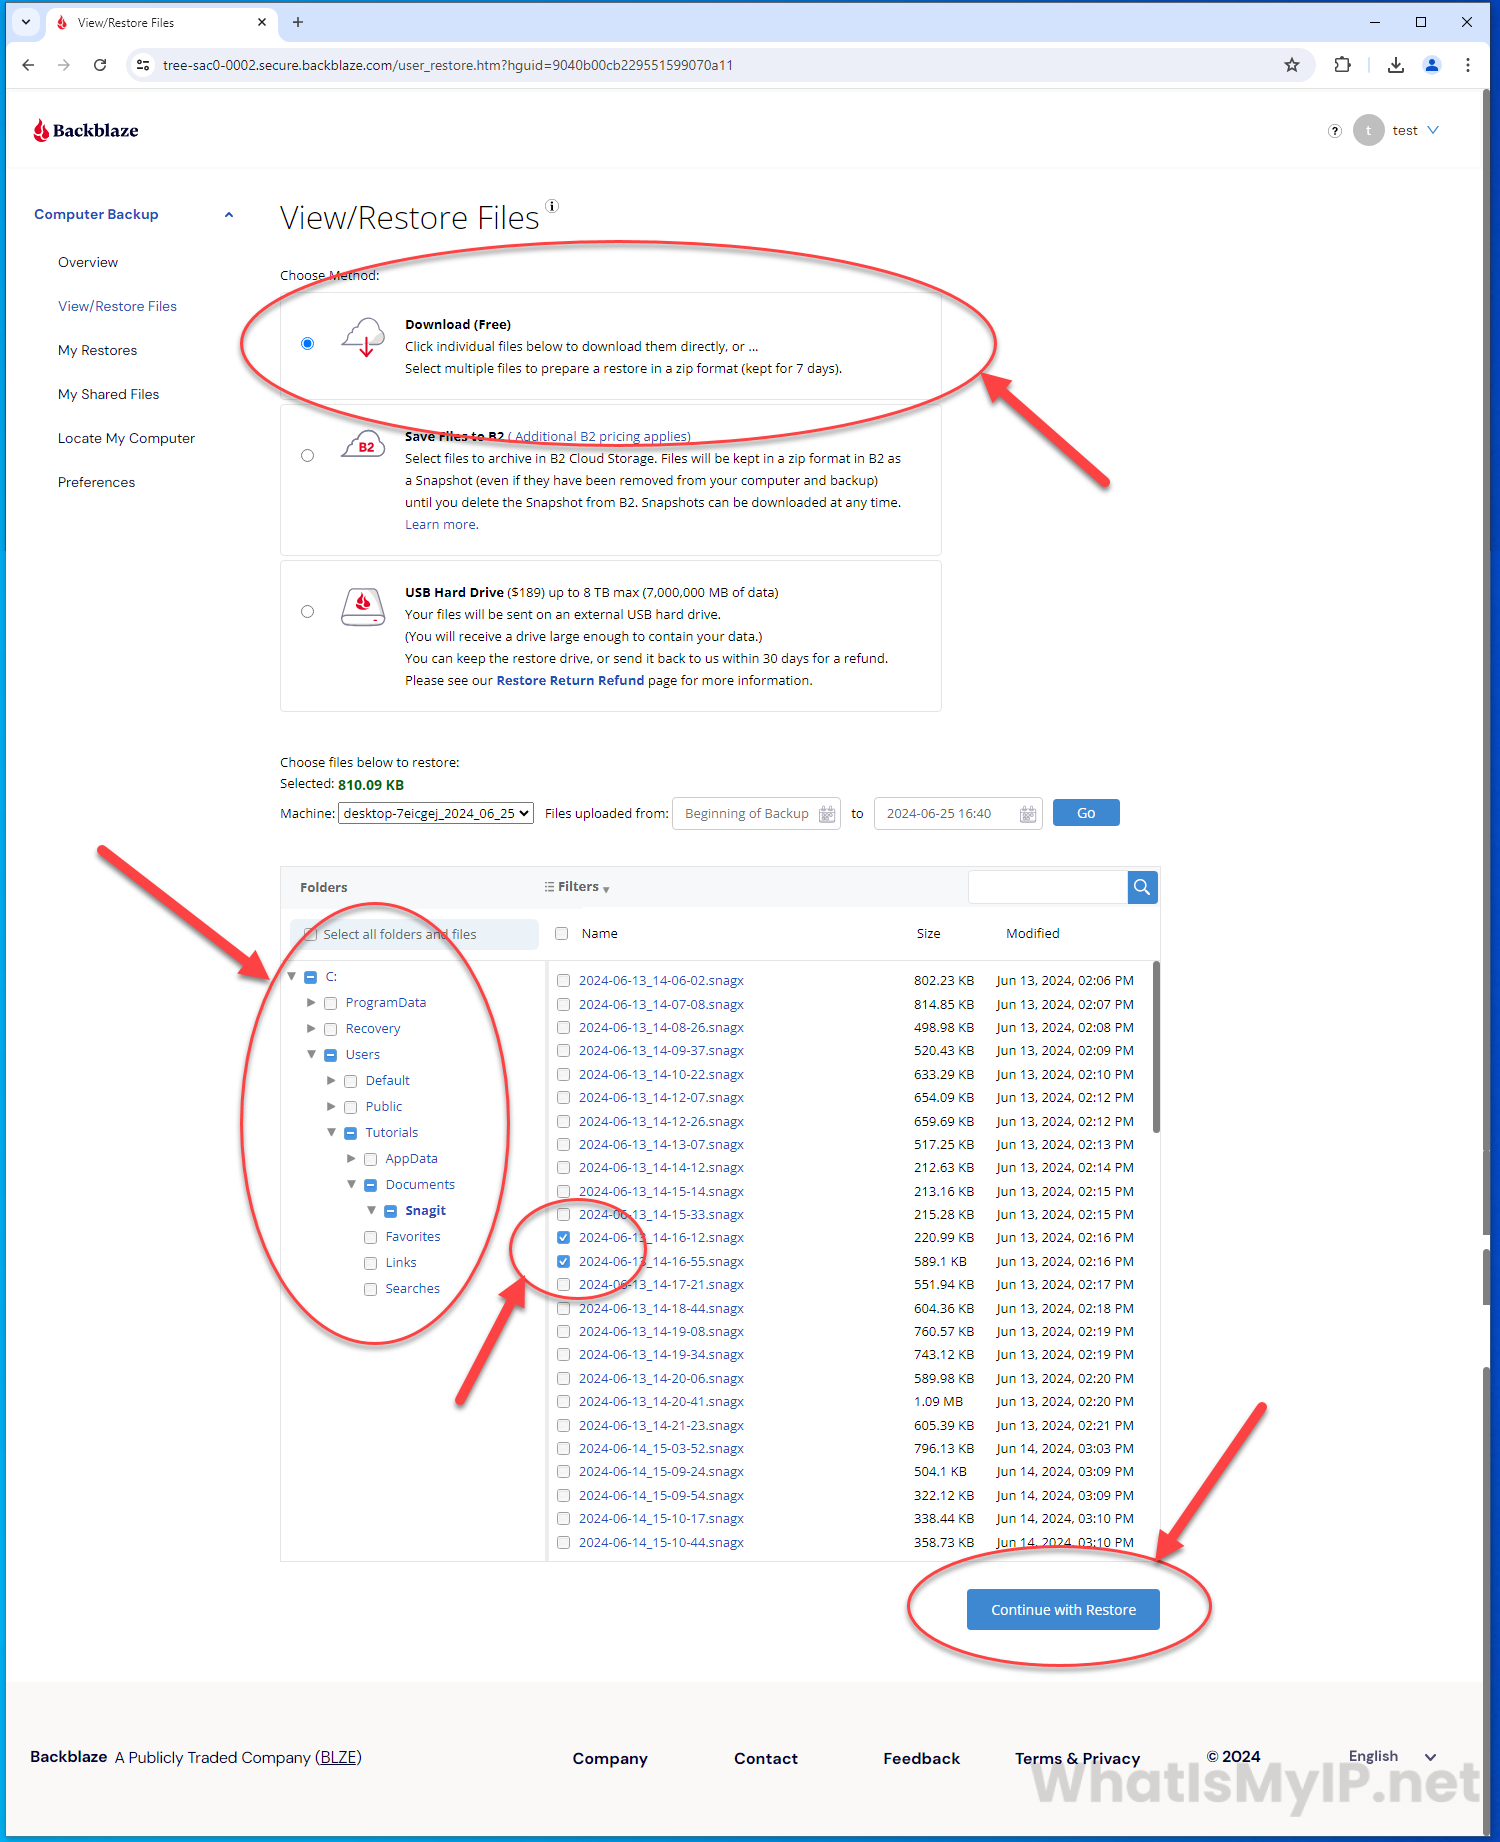
Selected Files to Restore on Browser
On this page you will have 3 options at the top on how you would like to restore files. For this tutorial, we will show you the first option which is called “Download“. Just check off that option and scroll down a little and you will see the same file structure tree again for your backups. You will see the ability to change the computer, backup date, and select the files you would like to restore. Once you have selected the files, click the “Continue with Restore” button.
Step 8
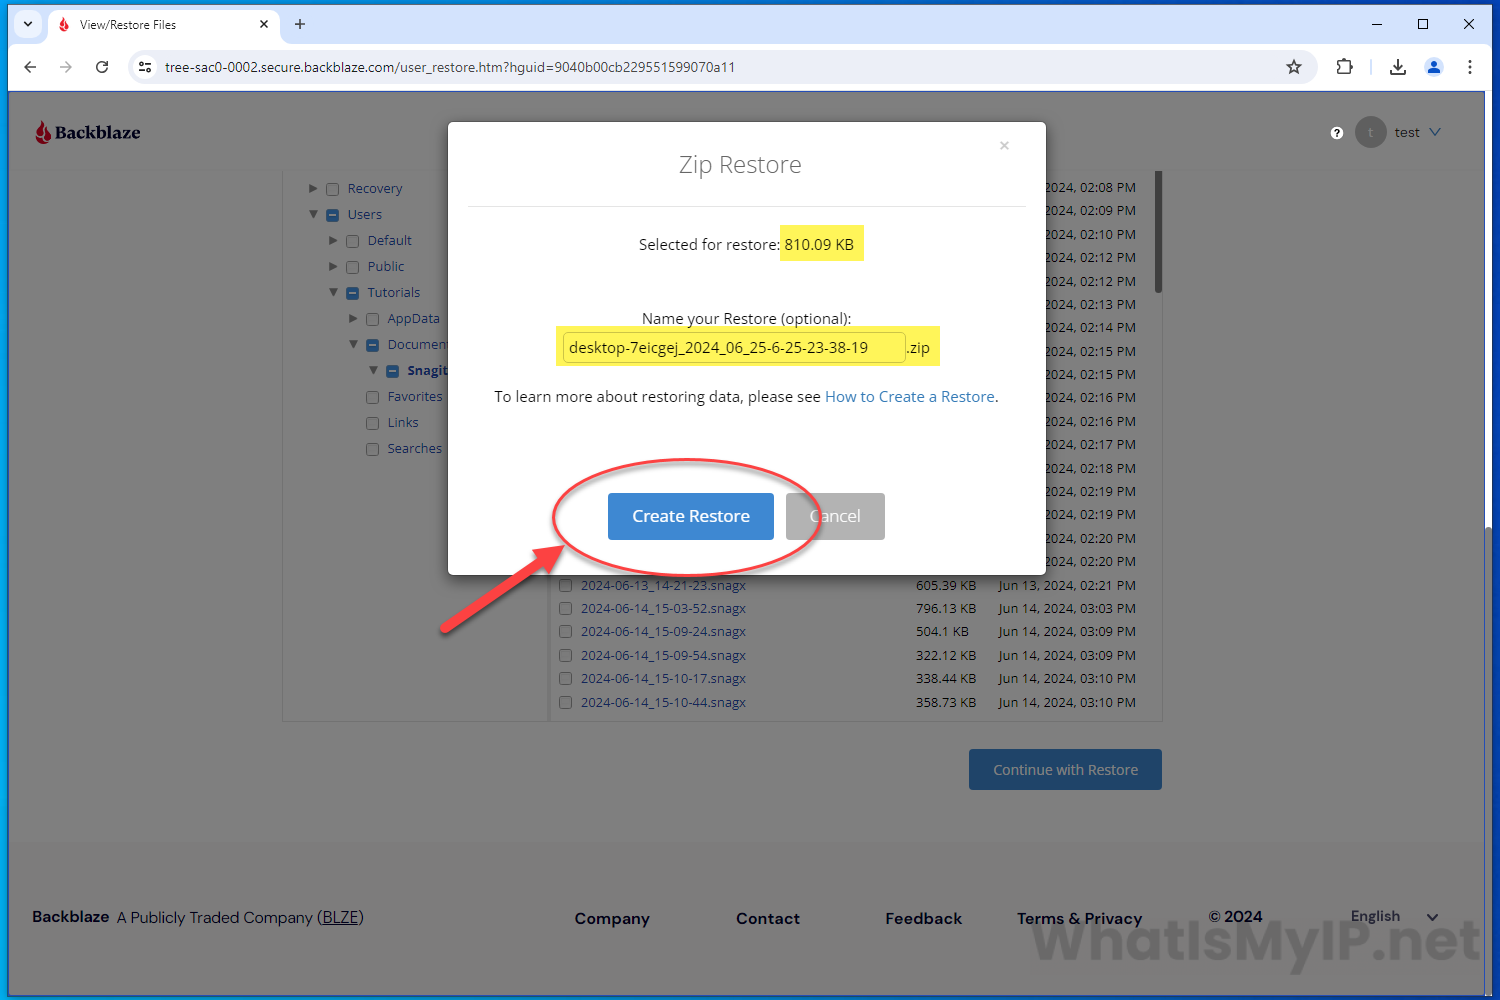
Browser Restore Options
You will get a popup of what you would like to name this restore or you can leave it default. Click the “Create Restore” once you can ready. This will set the restore and get it going for you.
Step 9
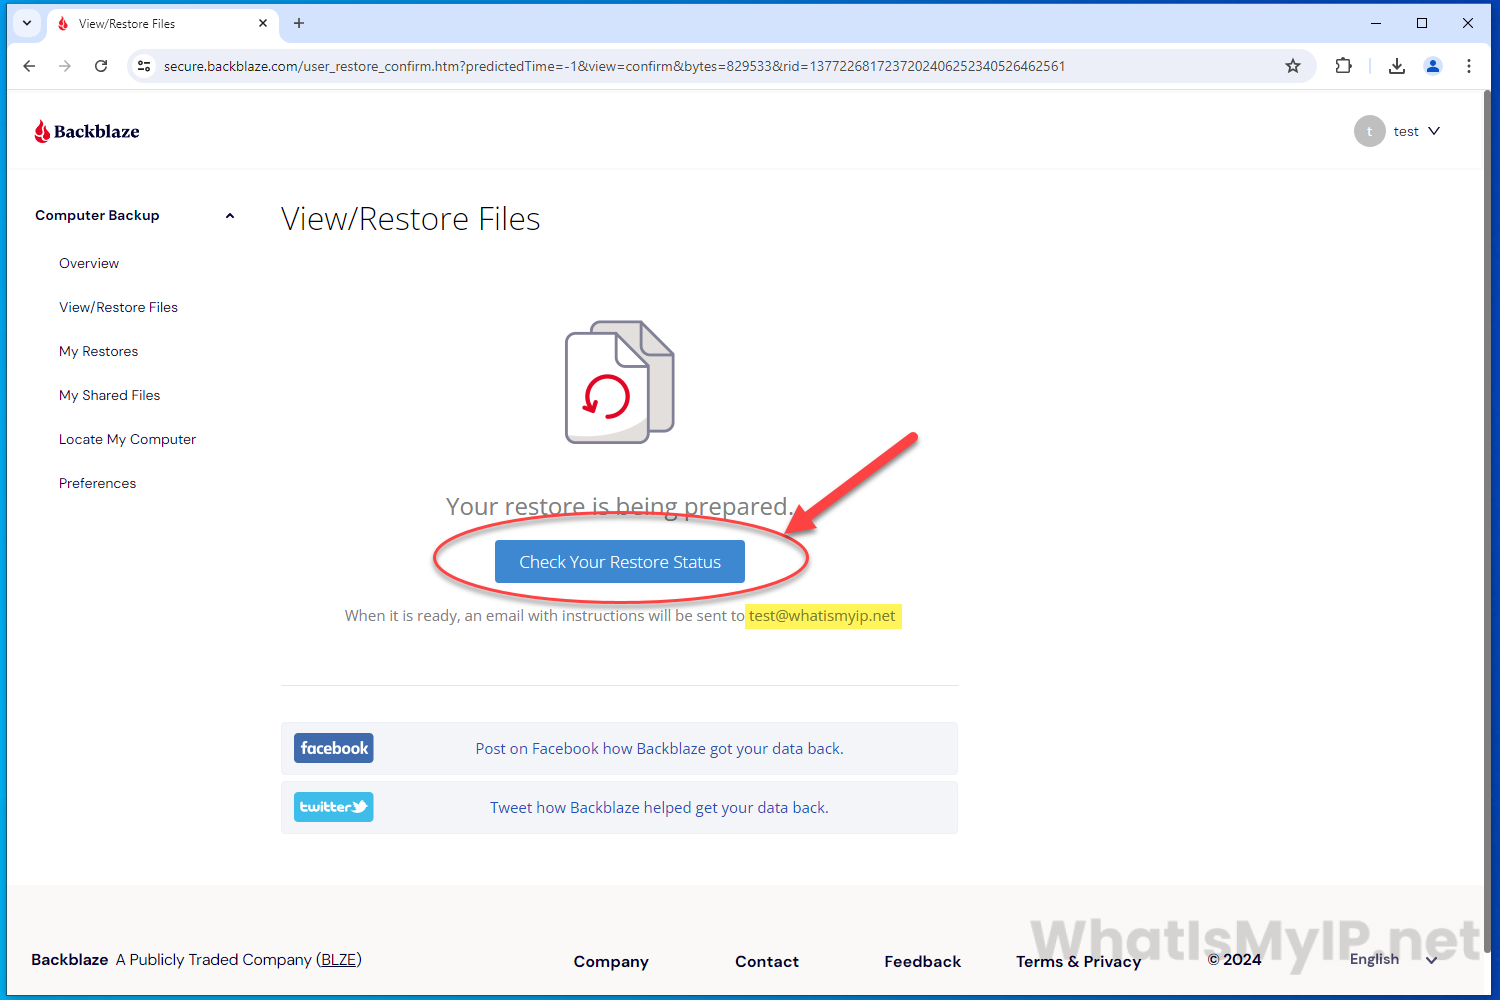
View Restored Files
On this page you will see a message that your restore is being prepared. If there are a lot of files, you don’t have to wait on this page, you will get a email once the restore is ready. You can also click the “Check your Restore Status” button if you would like to see the progress.
Step 10
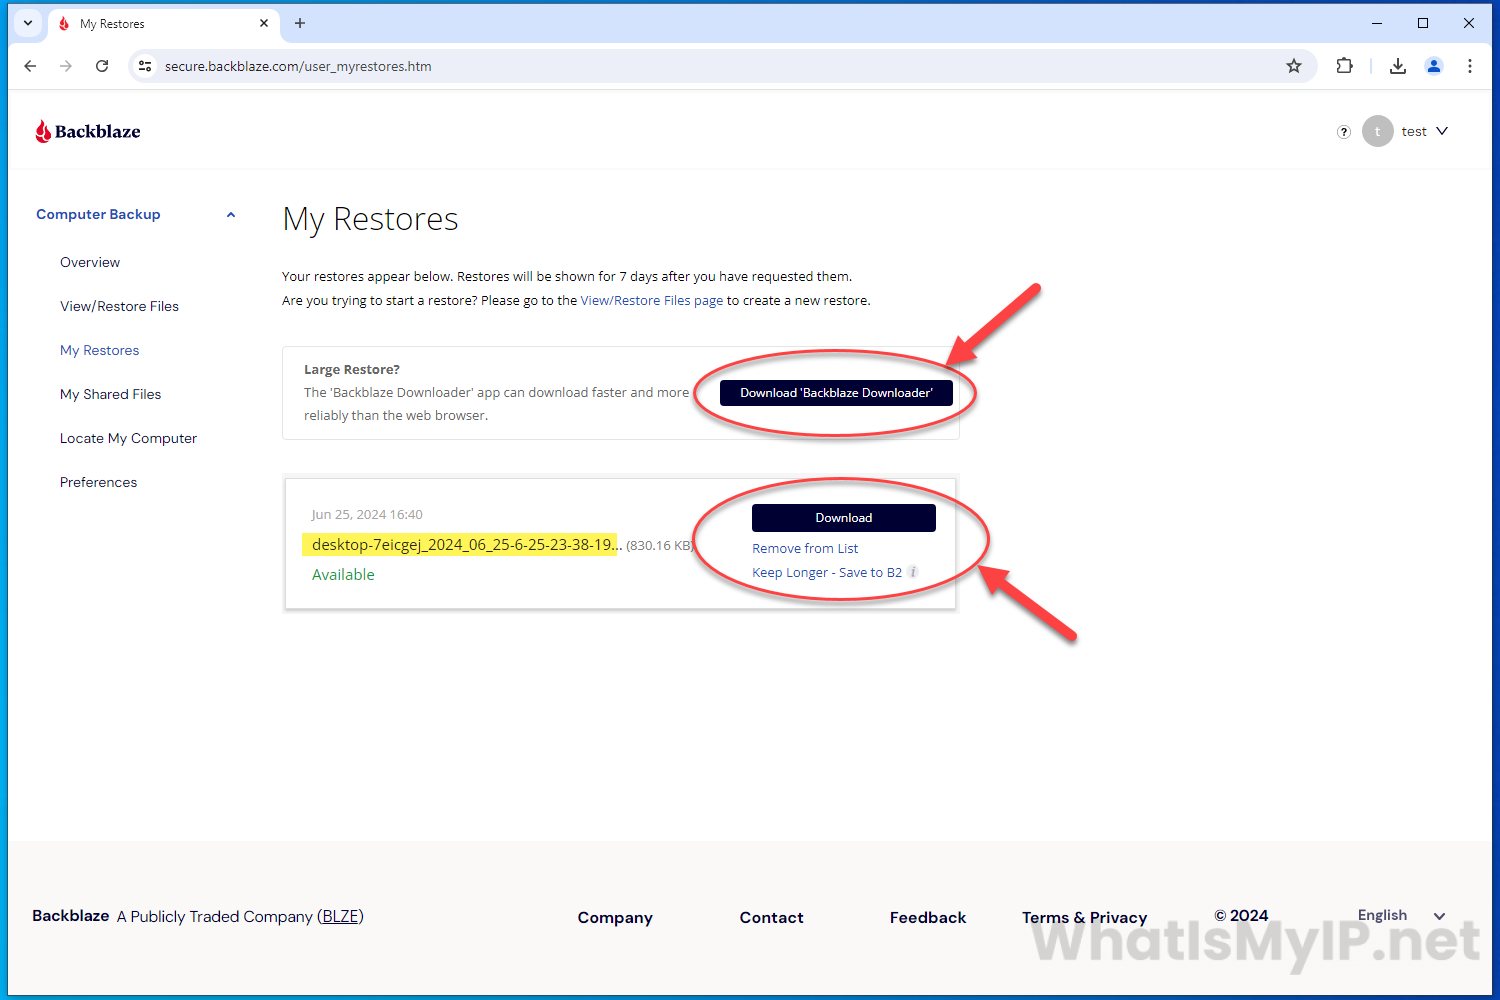
My Restores
On this page you will see all the restores you have created for your account. These restores will be available here for 7 days from when you requested them. Now if your restore is complete, you can click on the “Download” button next that restore and it will download the zip file of all the files you requested in that restore. You also have the option to download the “Backblaze Downloader” app which is good for larger restore files.
Step 1
Pricing and Billing
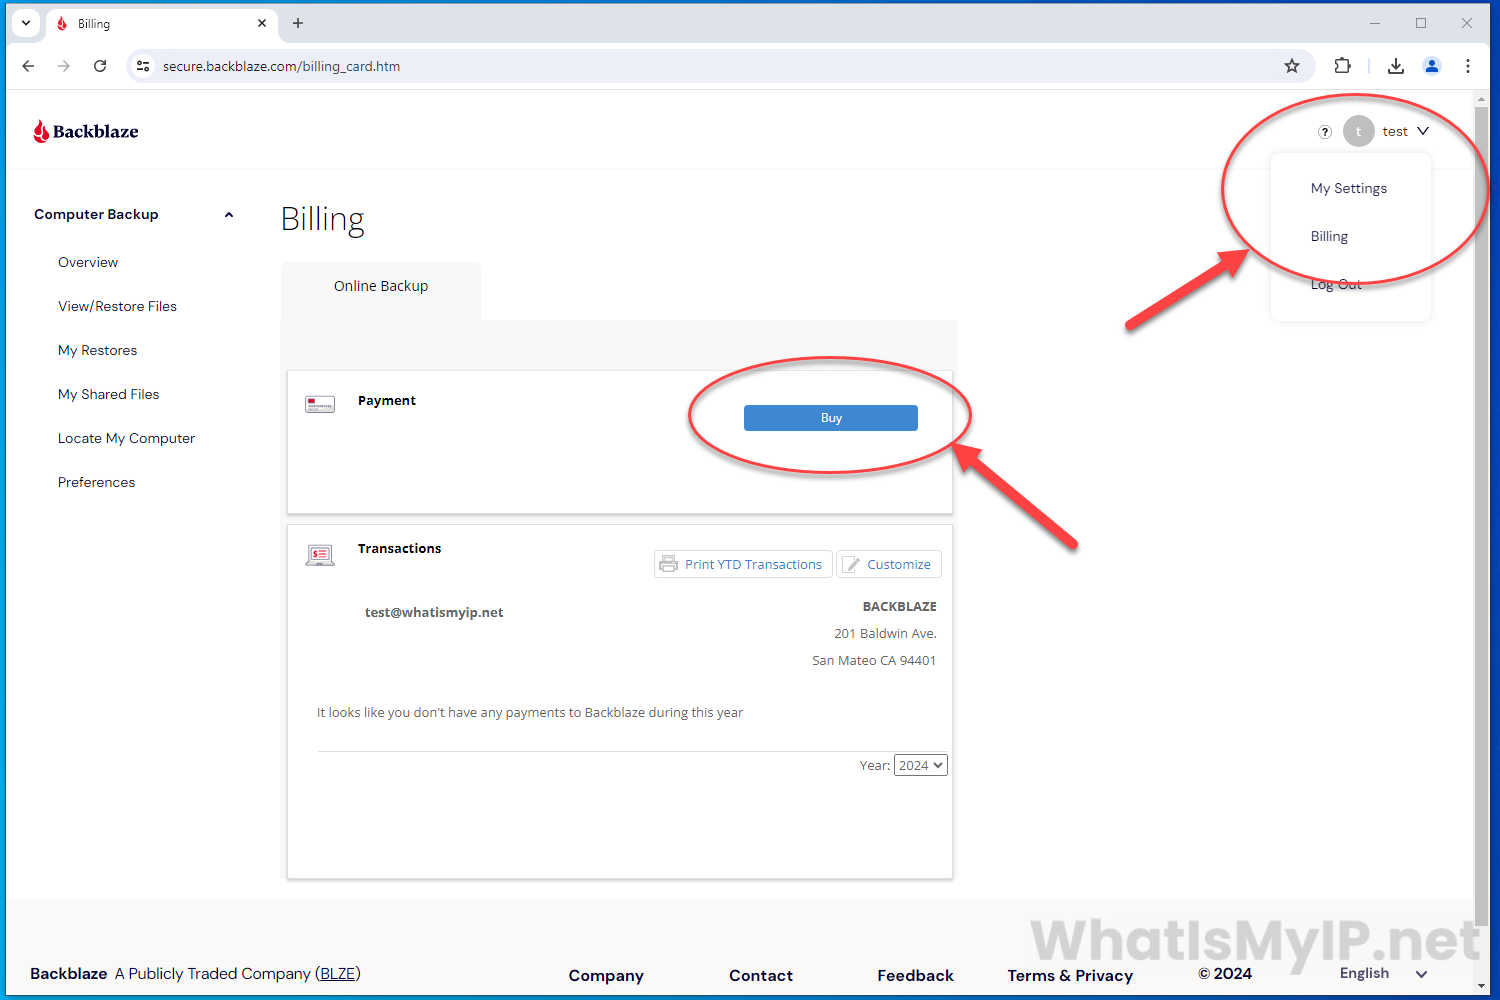
Your new Backblaze account will be fully functional for a limited time while you are on trial. In order to keep everything working smoothly, you will need to purchase a license for ever computer you are backing up. On the main account page, you can hover over your name at the top right and click on the “Billing” link to go over to the Billing section.
On this page, you will see a Payment section at the top and next to it a button “Buy“. Click the buy button to be redirected to the payment page.
Step 2
Purchase a License
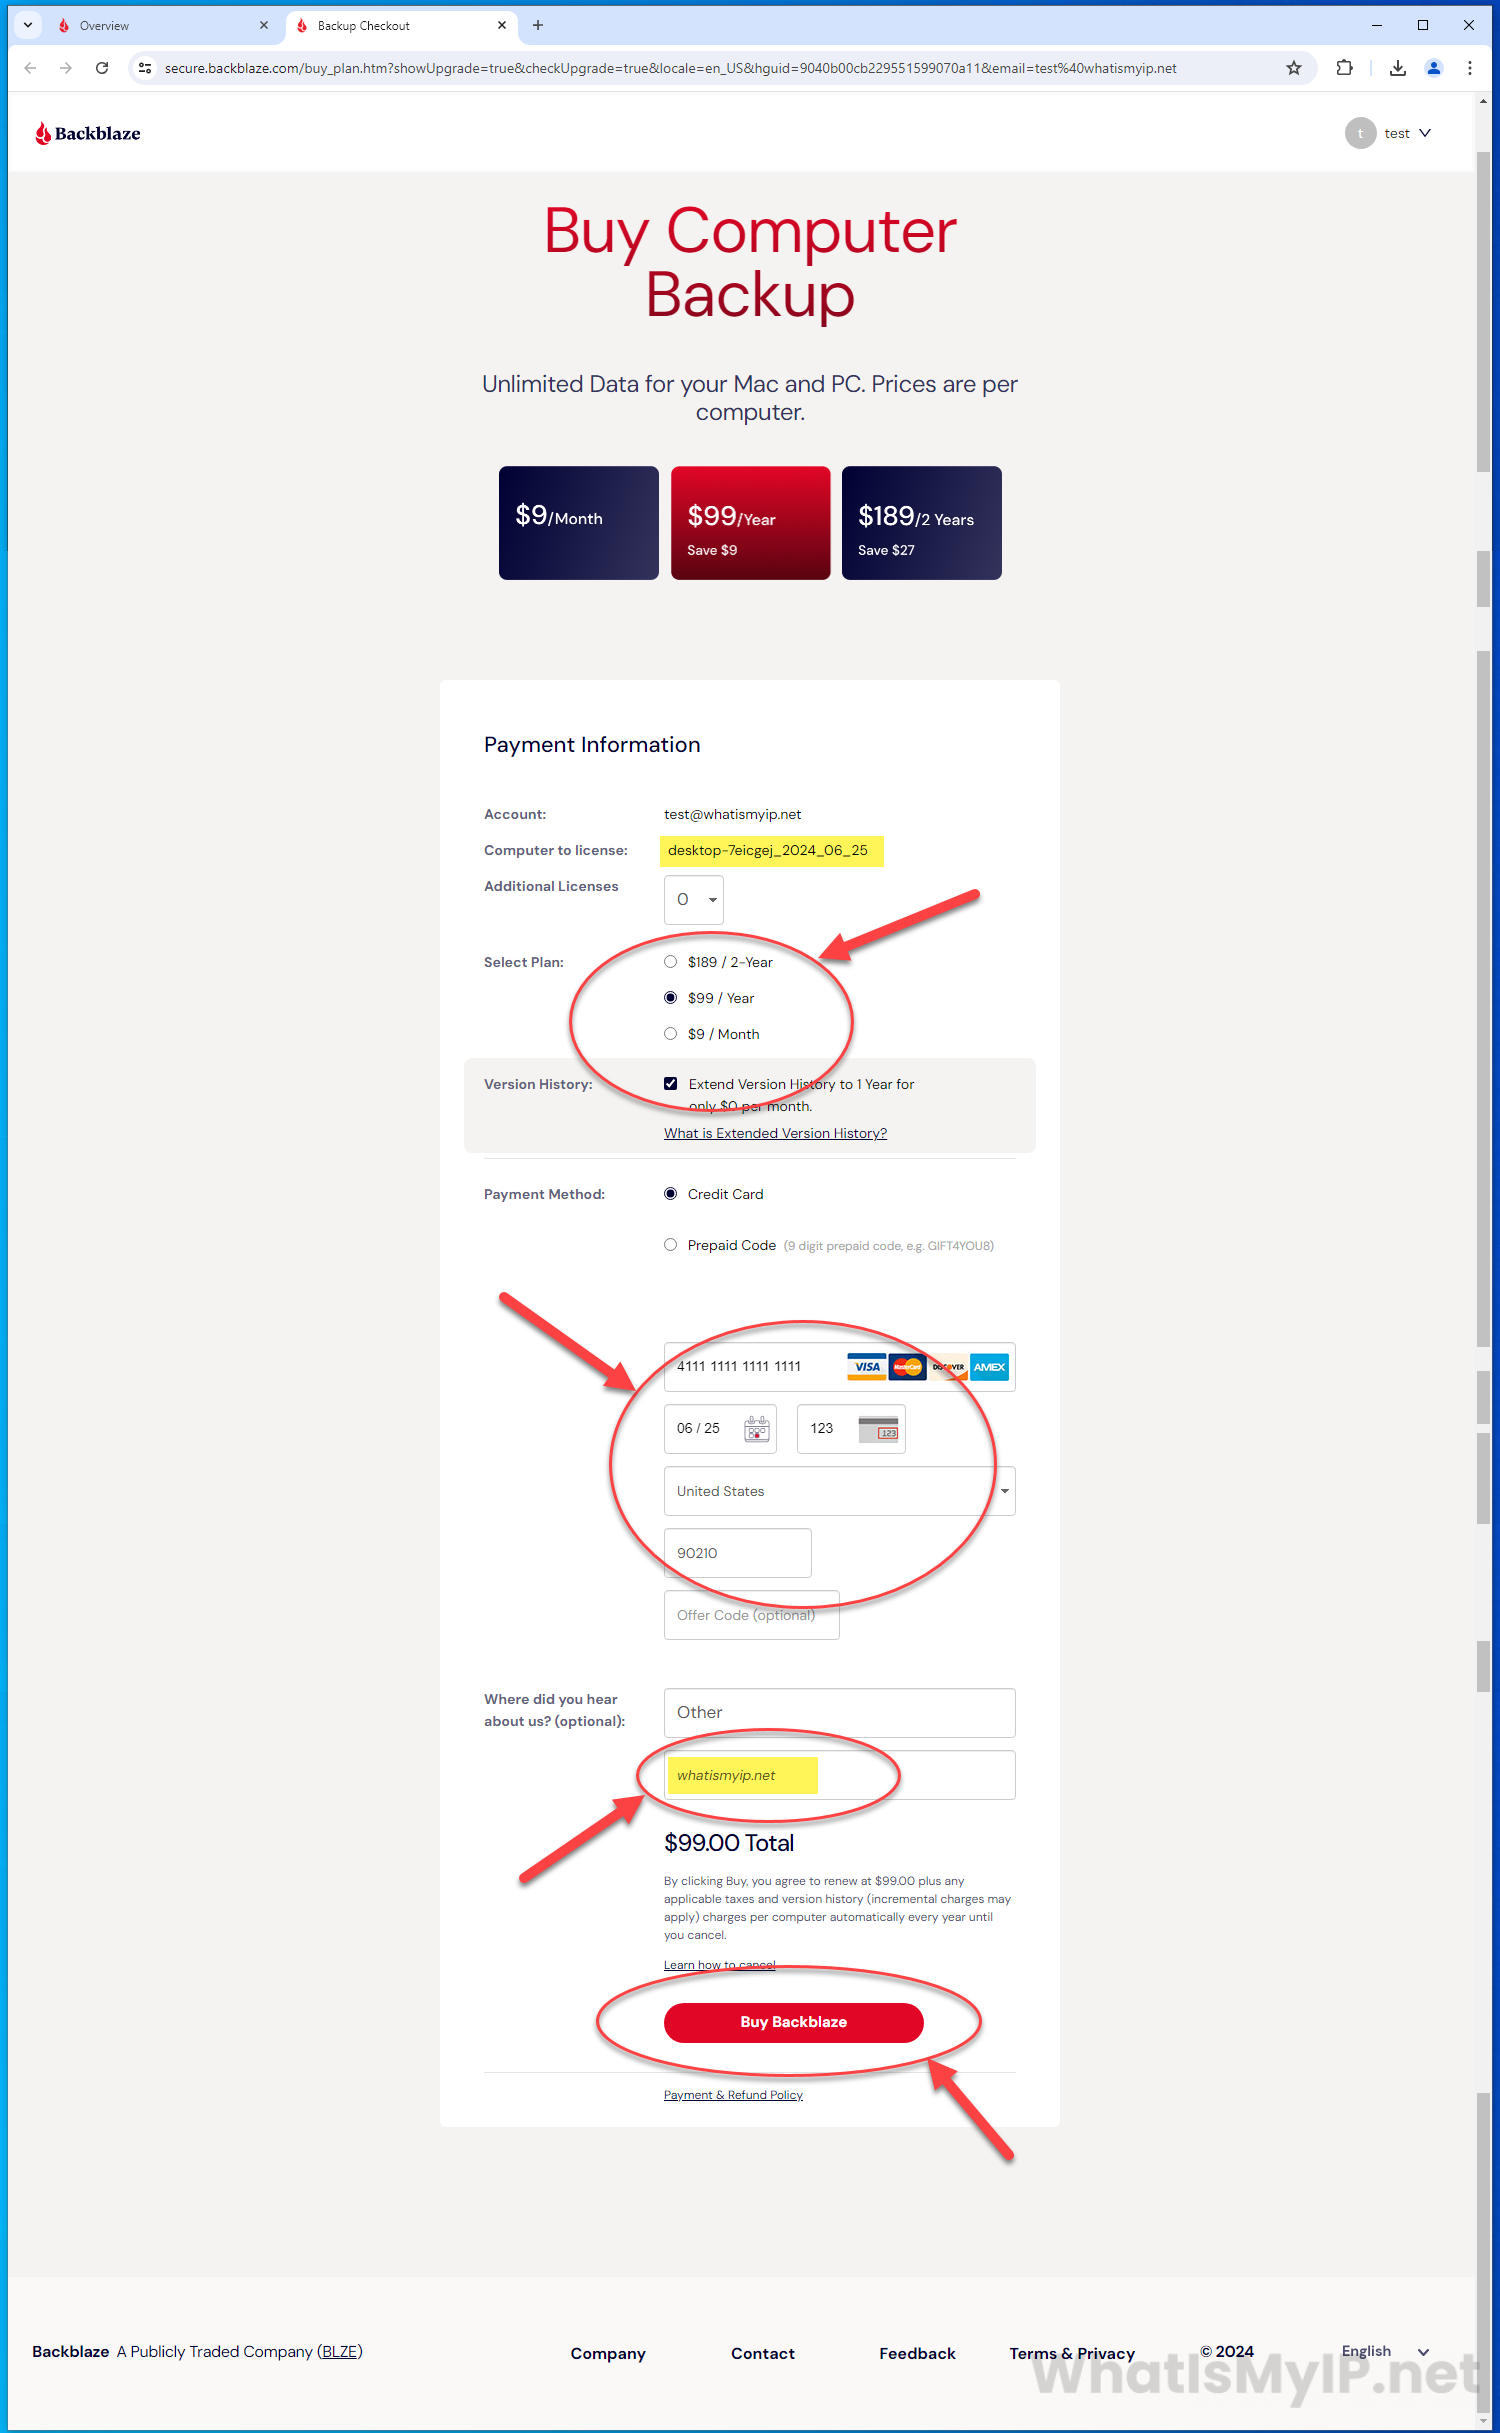
On the Payment Page you will see the Licensing options that Backblaze offers.
Their pricing plans are very simple and very affordable for ease of mind.
• $9 a month
• $99 yearly (Save $9)
• $189 for 2 years (Save $27)
Here you will select which Plan you would like and enter your Credit Card details under that section.
On the last section, they will ask you where did you hear about Backblaze. Please select Other from the dropdown and under it type in WhatismyIP.net in the text field.
All that’s left is to hit the “Buy Backblaze” button to finish up the billing process.
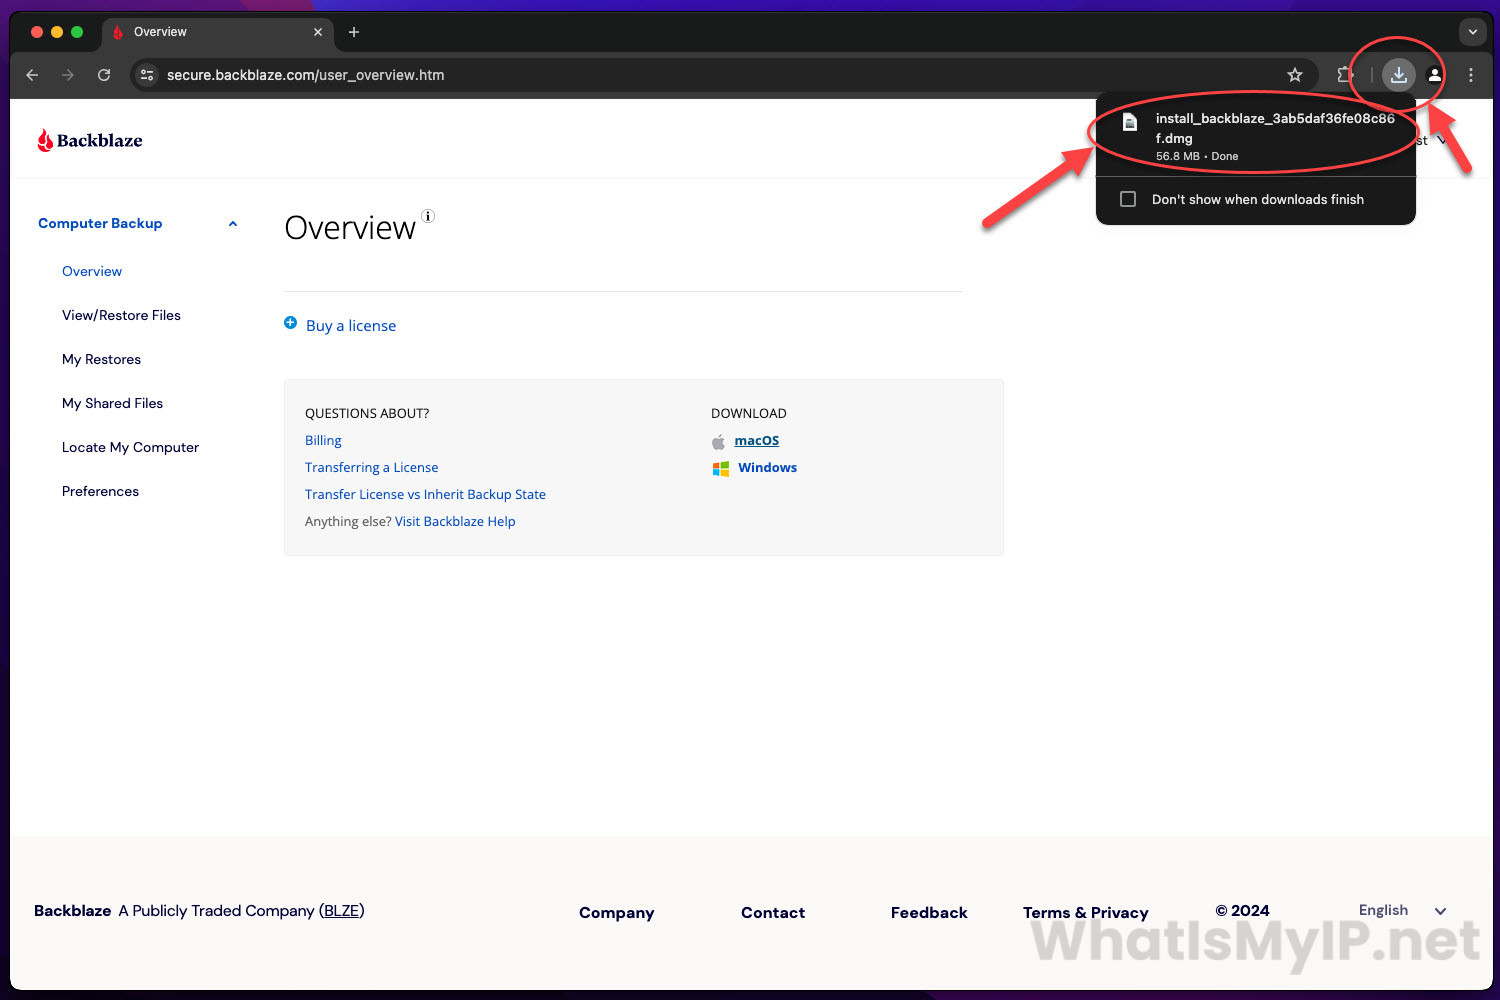
Step 1
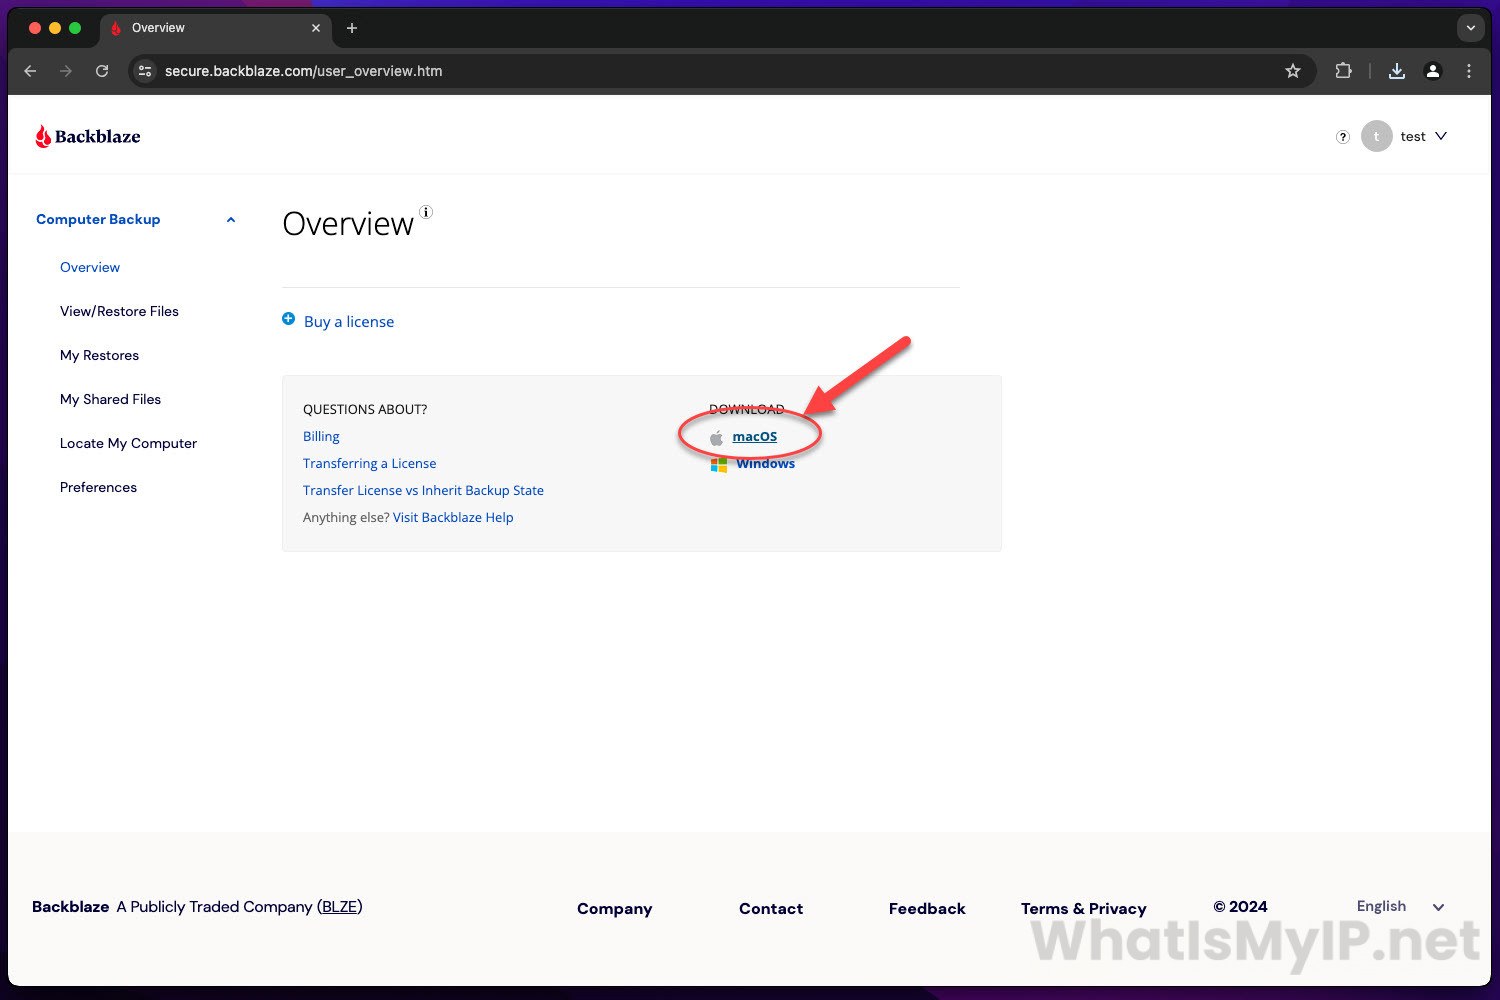
Download the Installer
Once you are signed into your account, on the Overview you will see a section called “DOWNLOAD“. You will need to click on the “MacOS” link to start the download of the Backblaze MacOS Backup Client.
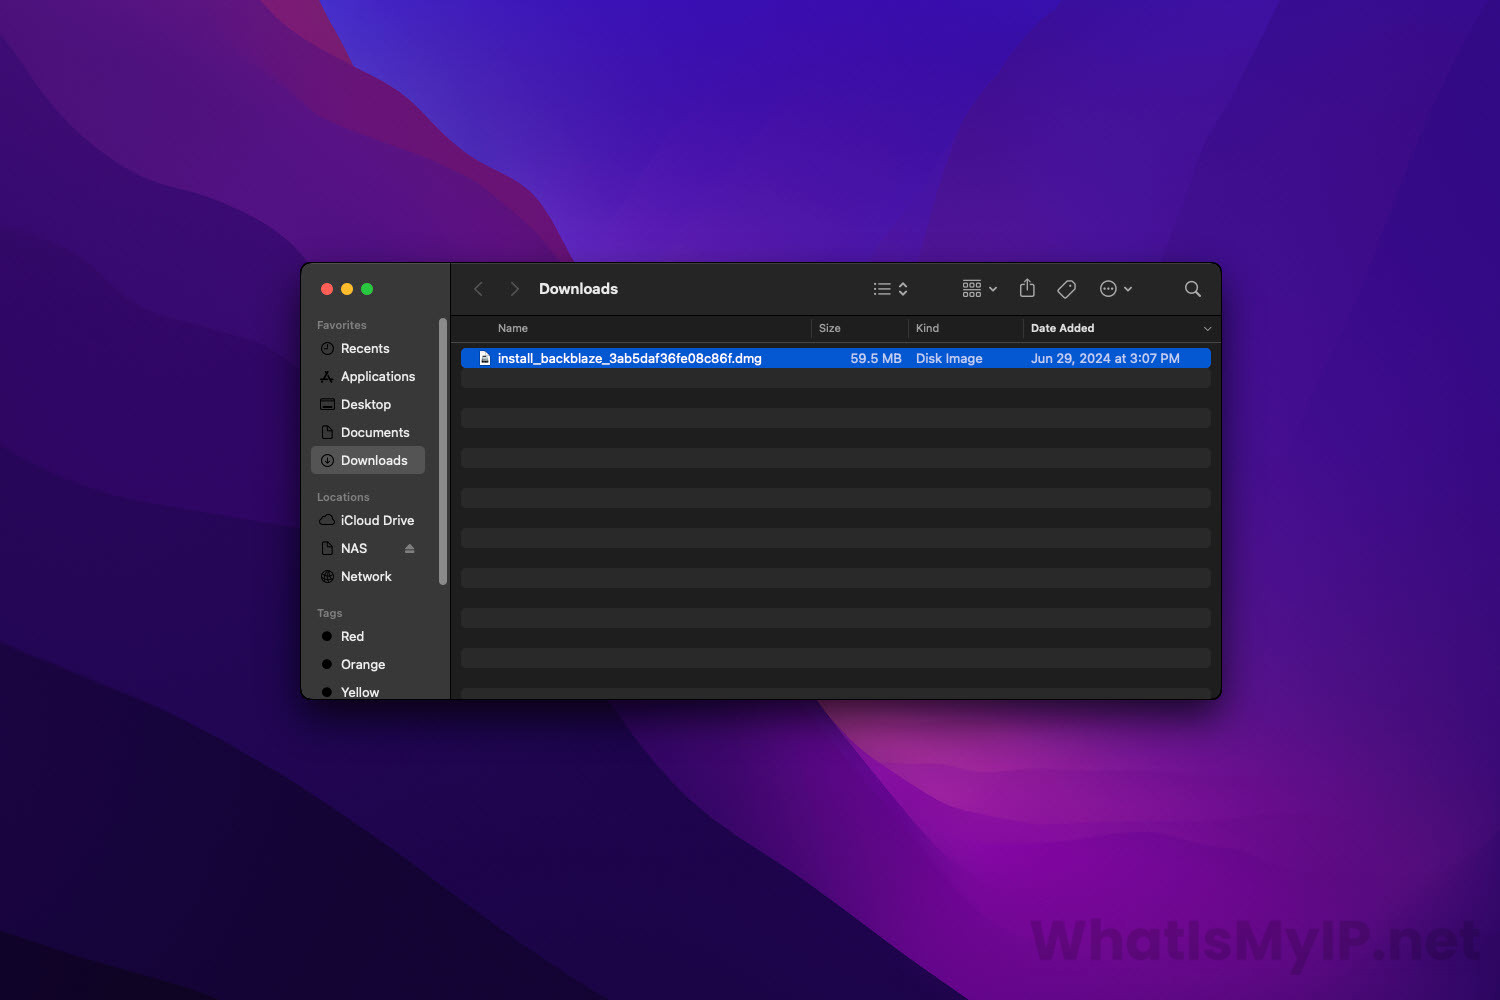
Step 2
Start the Installation
Once the file has downloaded, click on the Download icon on your browsers toolbar and you will see the downloaded file in the list. Right click on the name of the file and click on “Show in folder“. Once the folder it opened with the file that just downloaded, double click on the file which should start with install_backblaze name. The install process should start.
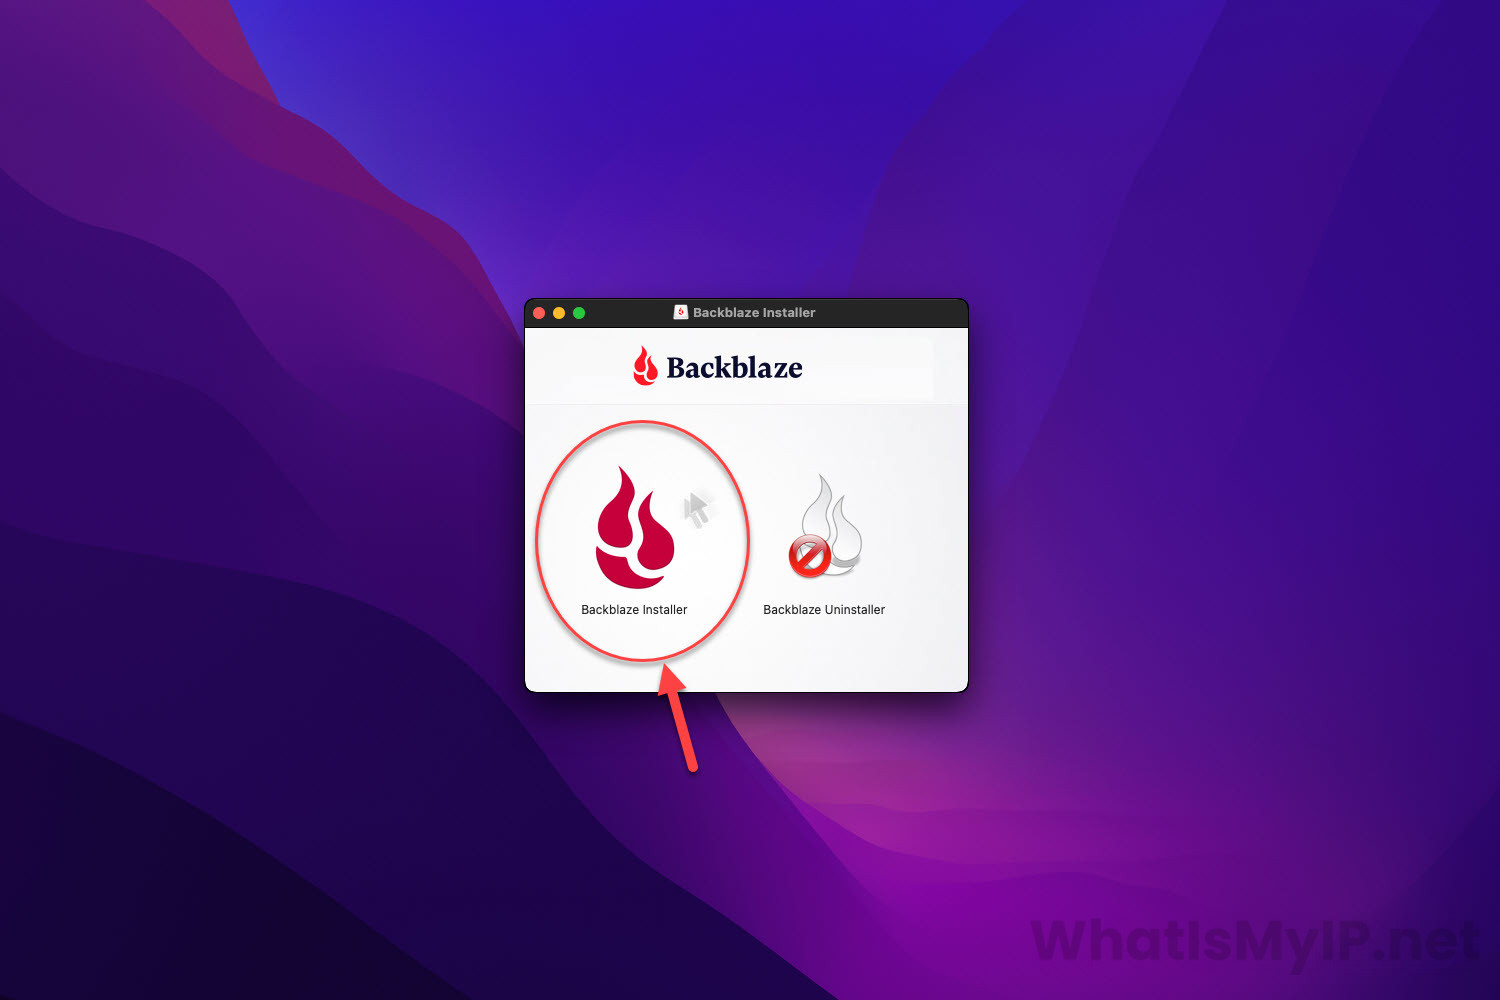
Step 3
Backblaze Installer
You will get a windows that has “Backblaze Installer” and “Backblaze Uninstaller”. Double click the Backblaze Installer to begin the process.
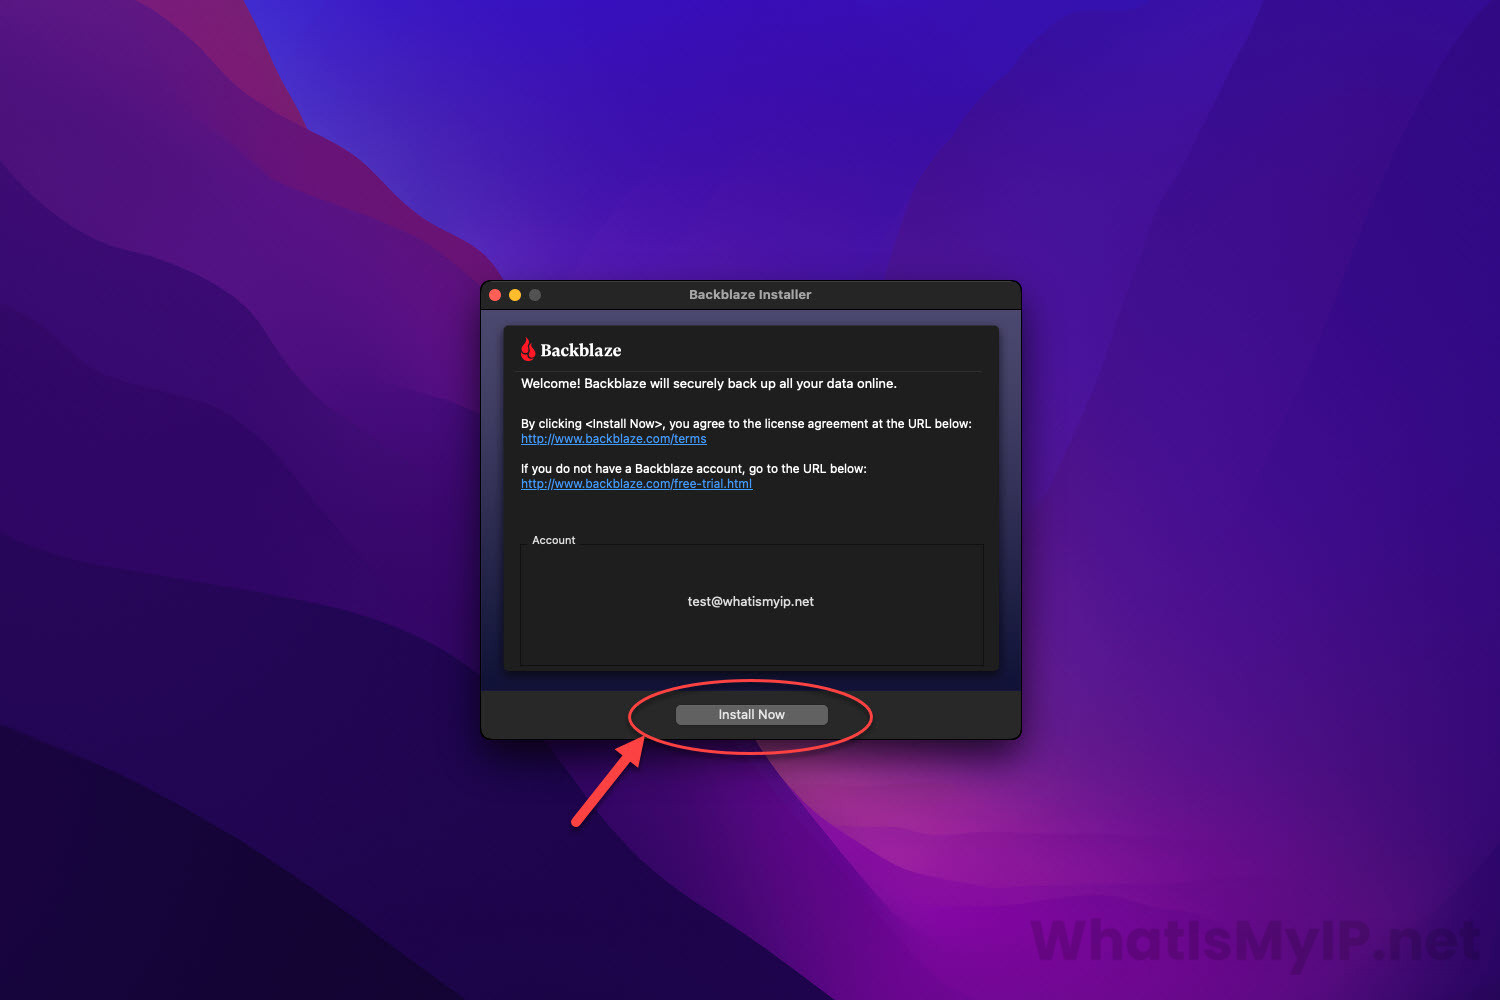
Step 4
Start Installation
Once the Backblaze Installer begins, you will see a box that will show you your account email address and a “Install Now” button on the bottom. Click that to start.
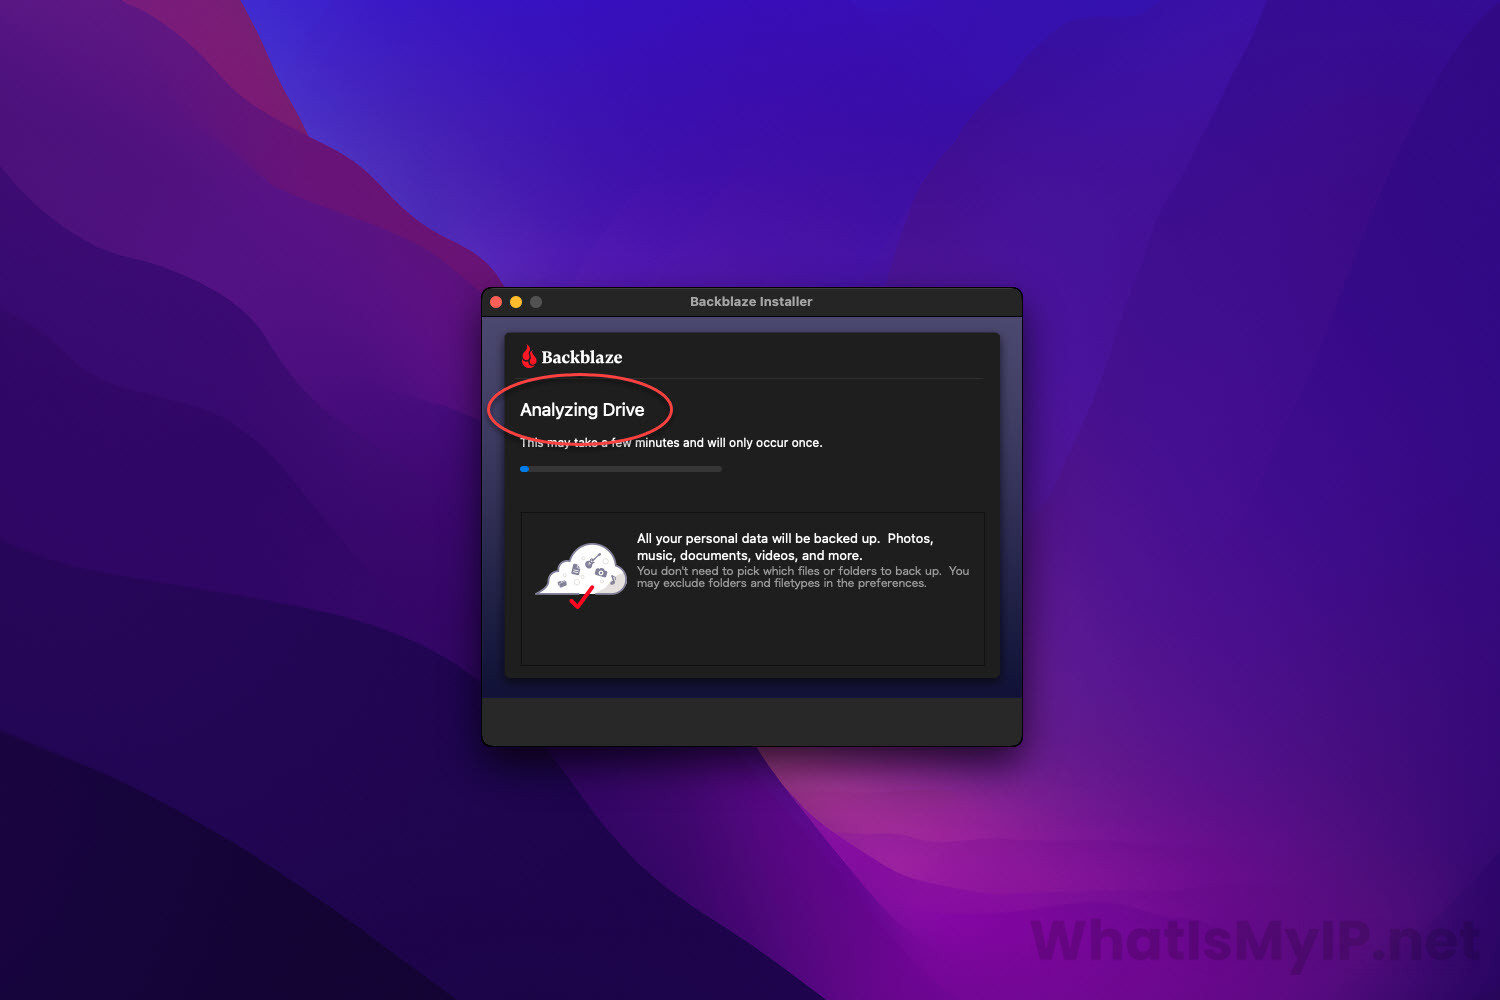
Step 5
Analyzing Drive
At this point the installer will run through some analyzing of some data and also your hard drive. This should take a few minutes.
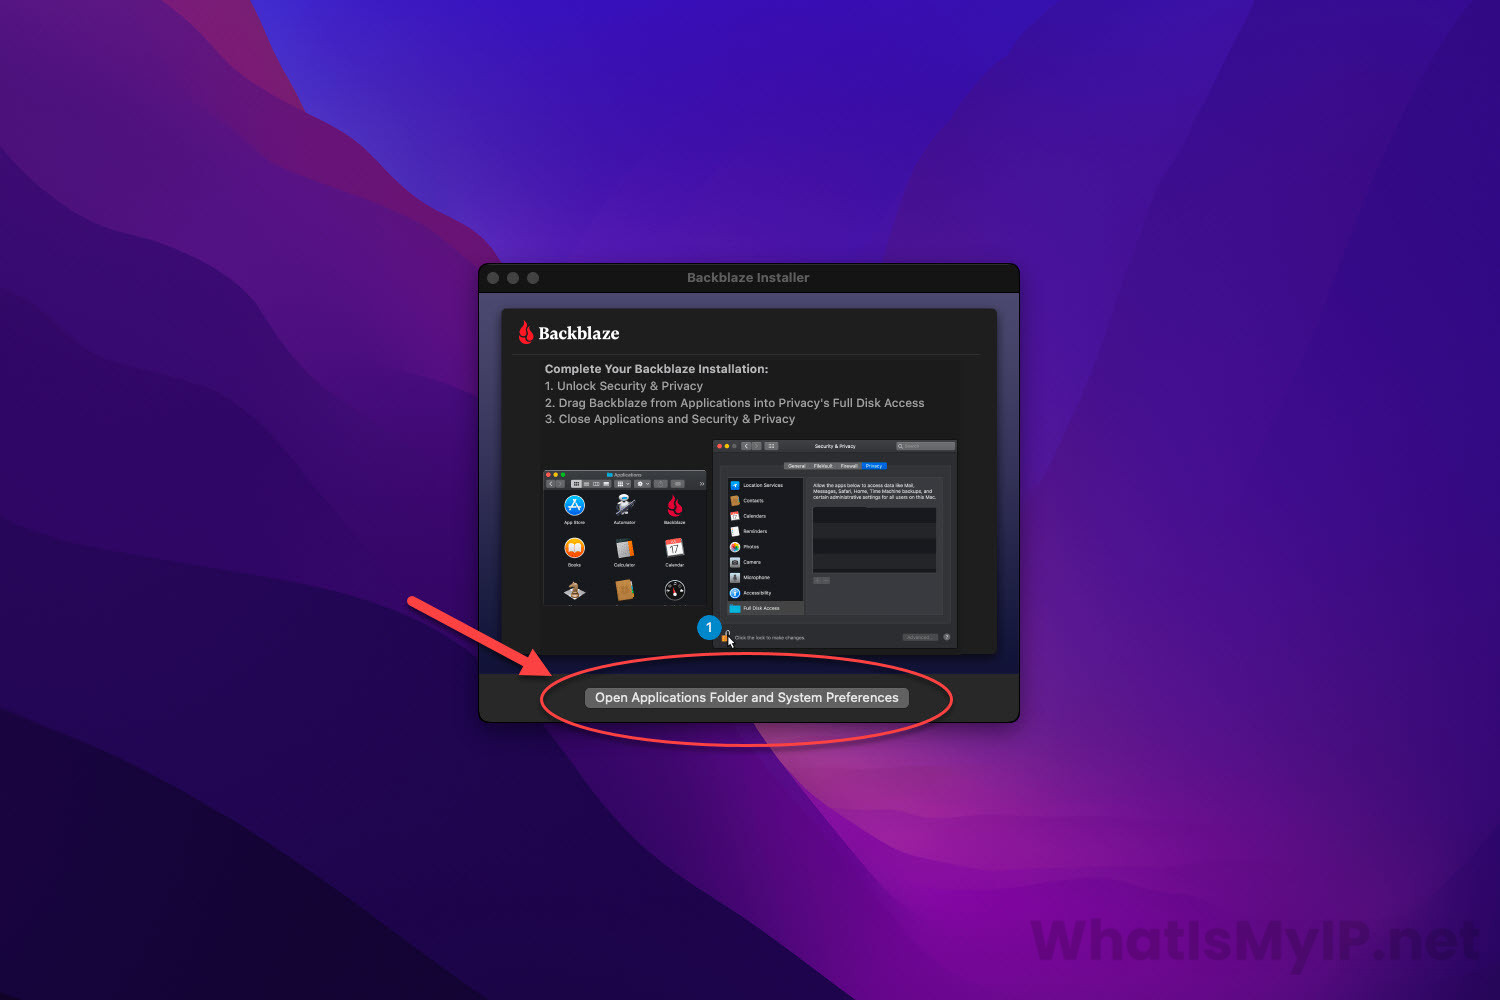
Step 6
Grant Permissions
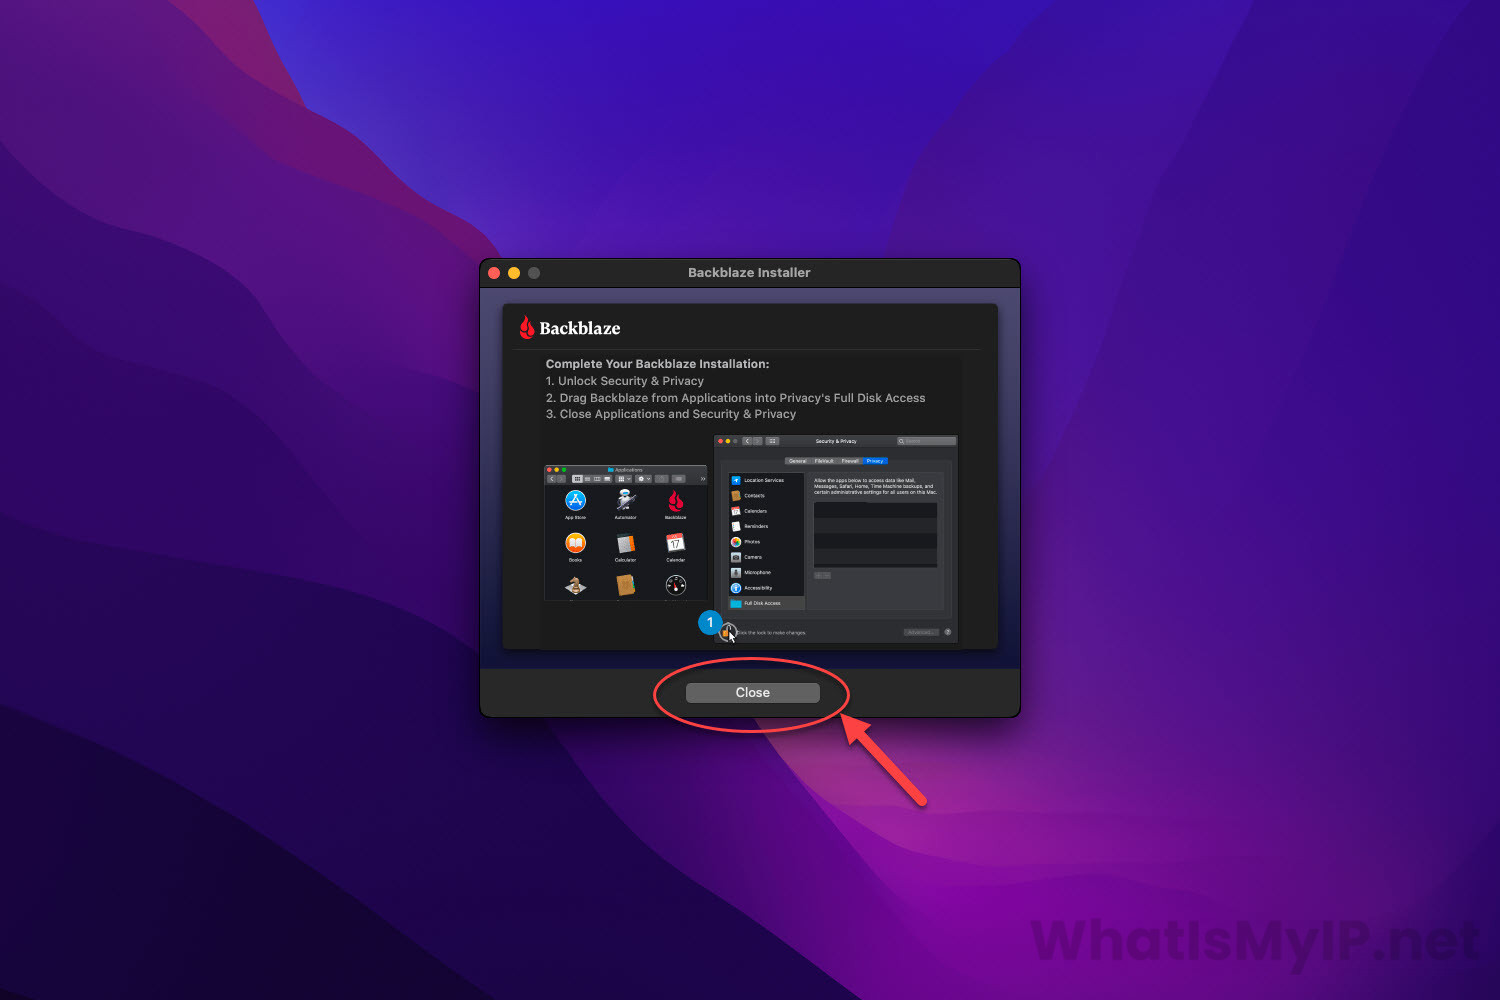
On this screen, the installer will ask you to grant the Backblaze client permission to access your hard drive. You will need to click on the “Open Applications Folder and System Preferences” and grant the Backblaze Client Full Access. Once that is complete, click the Close button to continue.
Step 1
Initial Launch
With the Backblaze Personal Cloud Backup, there really isn’t much to configure. Once installed it already started the initial backup process. You can launch the control panel from the top task bar and you will see the progress on the main window. For some basic settings, you can click on the “Settings” button to open a new window so you can do some changes.

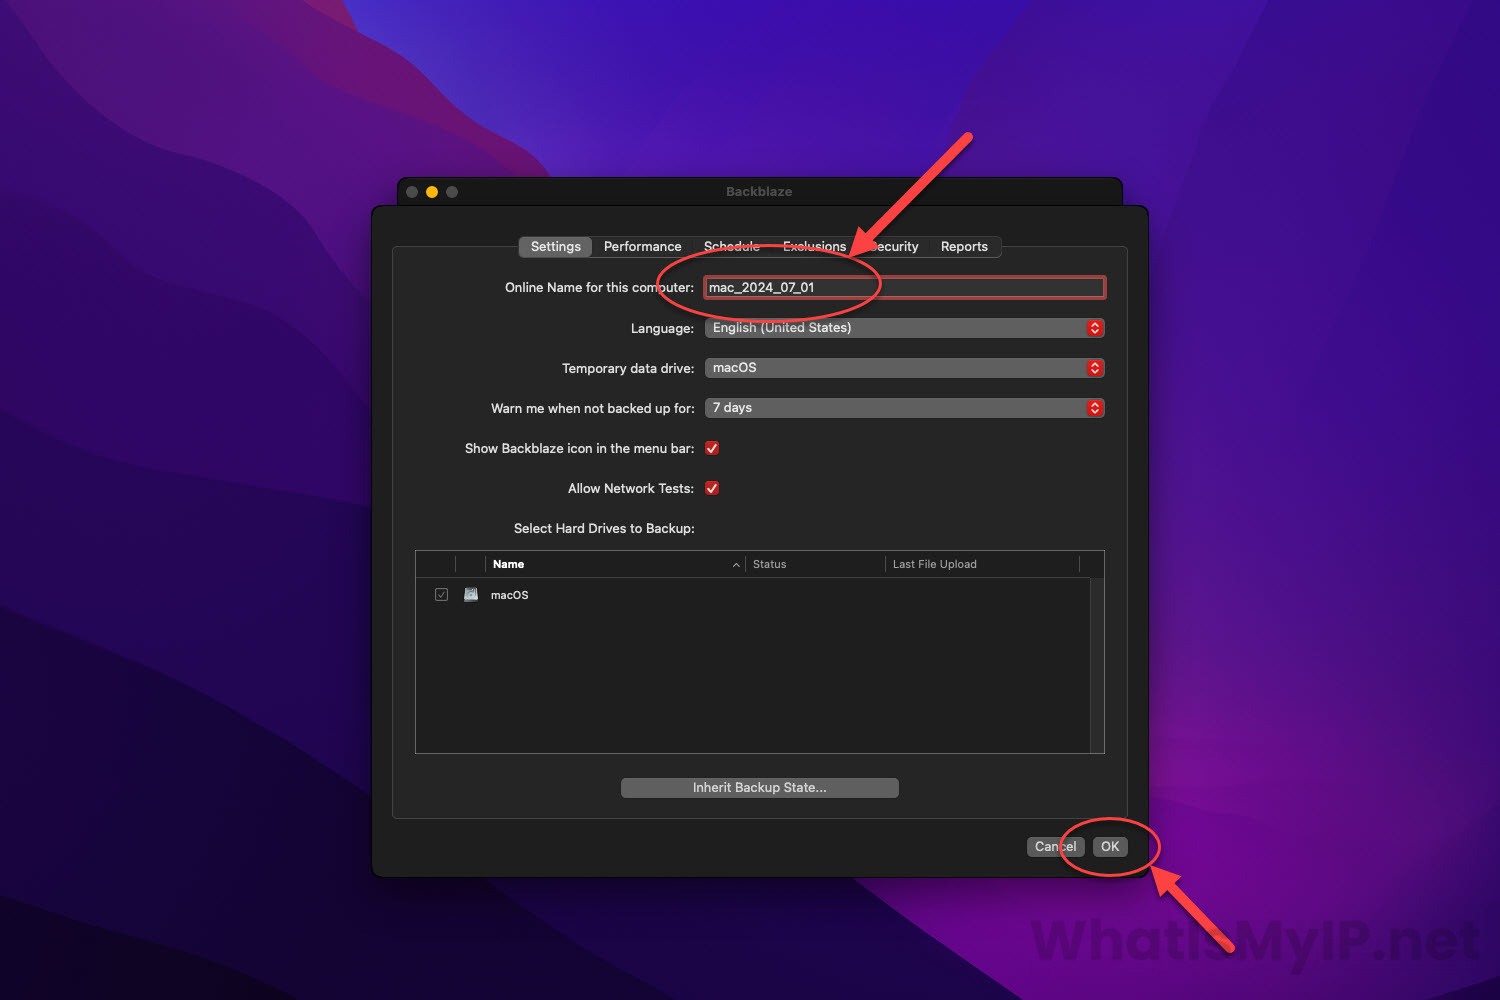
Step 2
Settings
In the settings area you will see some tabs at the top which gives you control over some aspects of the client. The only one I would recommend changing is on the settings tab, the “Online Name for this computer” so you will be able to tell on your account which is which. The other settings can be left default if you like or you can read the official Backblaze documentation on them and change to your liking.
Step 1
Restoring Backup Files
When it comes to restoring files, there are multiple ways of going about it. It really depends on the amount of file you are restoring which Backblaze has made it easy for which ever way you need. We will walk through restoring a few files so you can see the easy process. On the Control Panel, you just click on the “Restore Options…” button to open the restore screen.
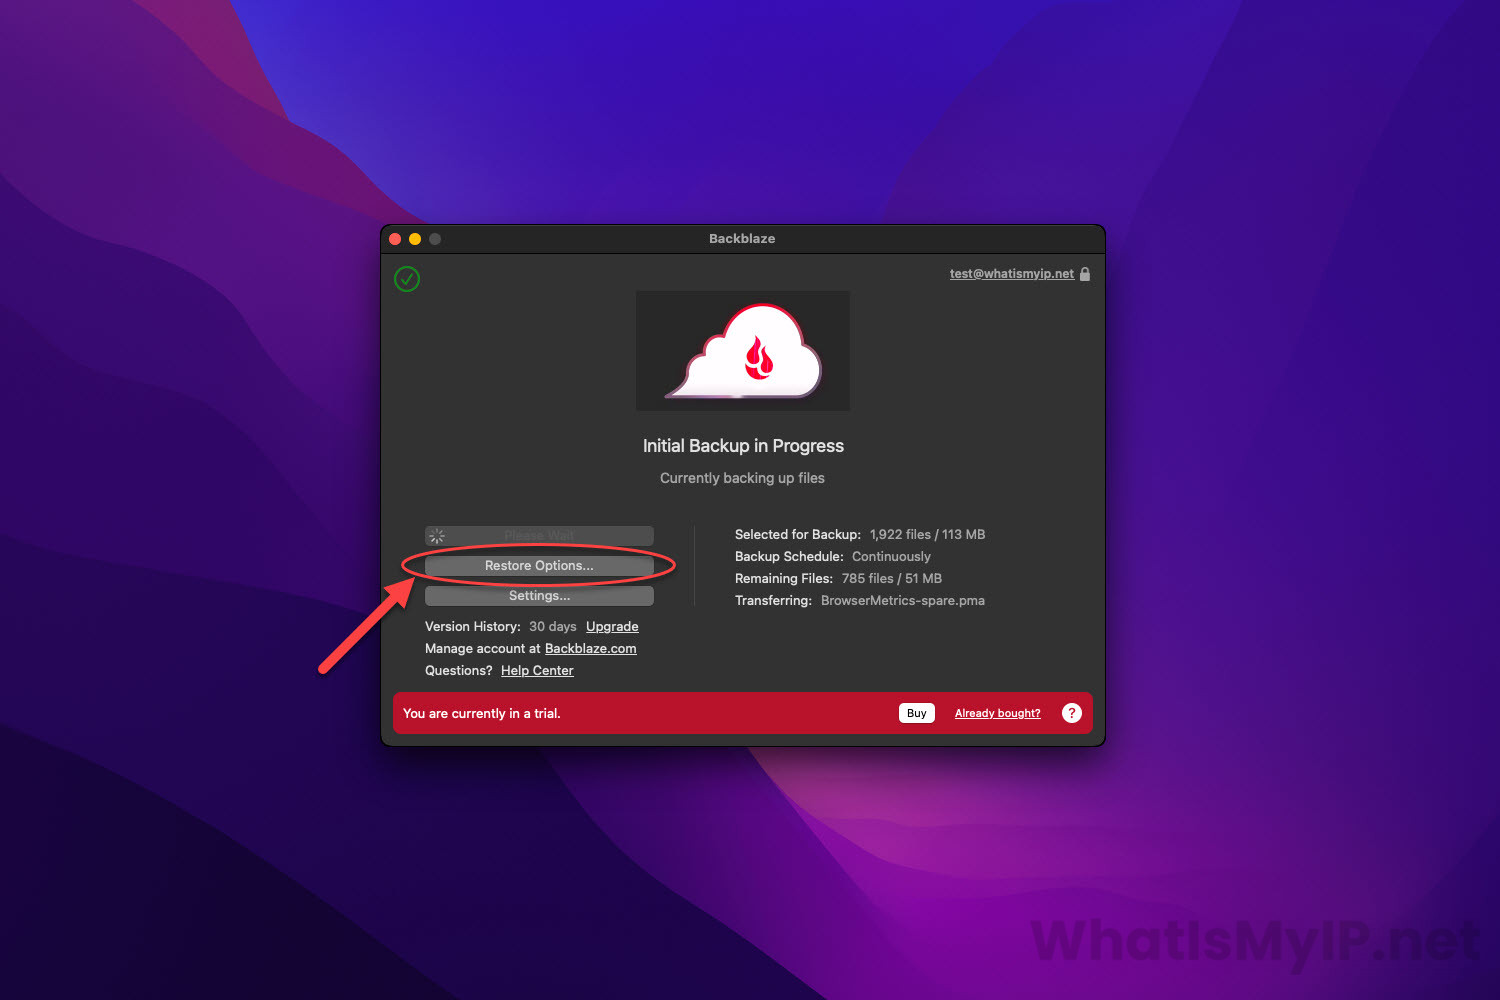
Step 2
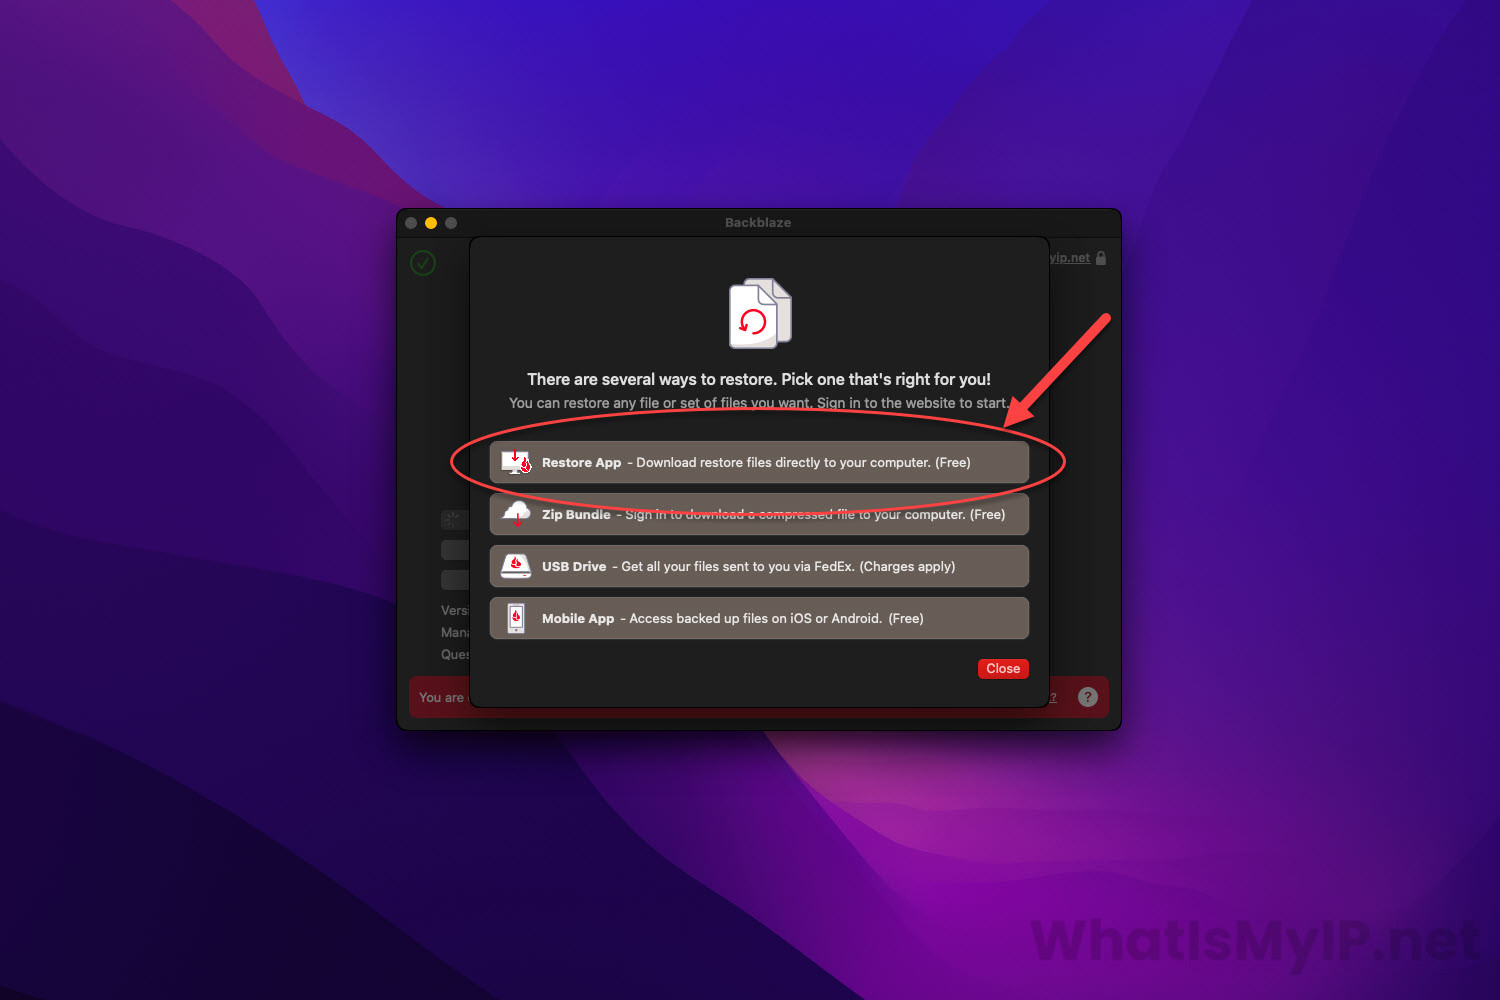
Restore Options
On this screen you will see 4 different restore options. We will be using the first option to restore which is called the “Restore App“. It will let us choose from which backup date and which files we would like to restore and to where. You would just click on the first section to get started.
Step 3
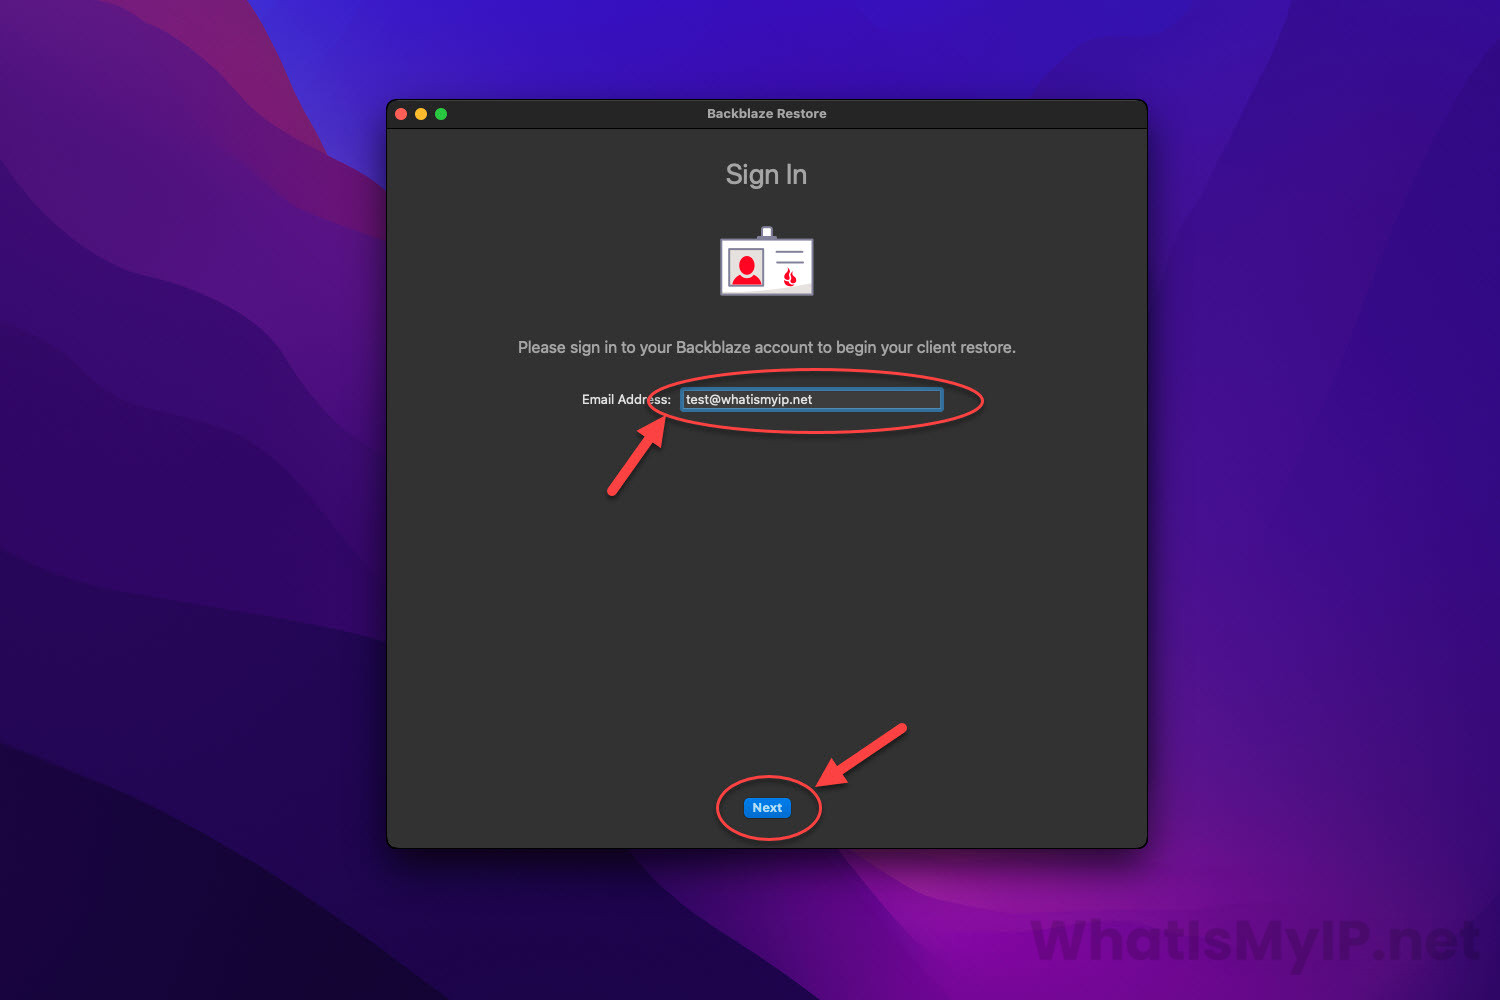
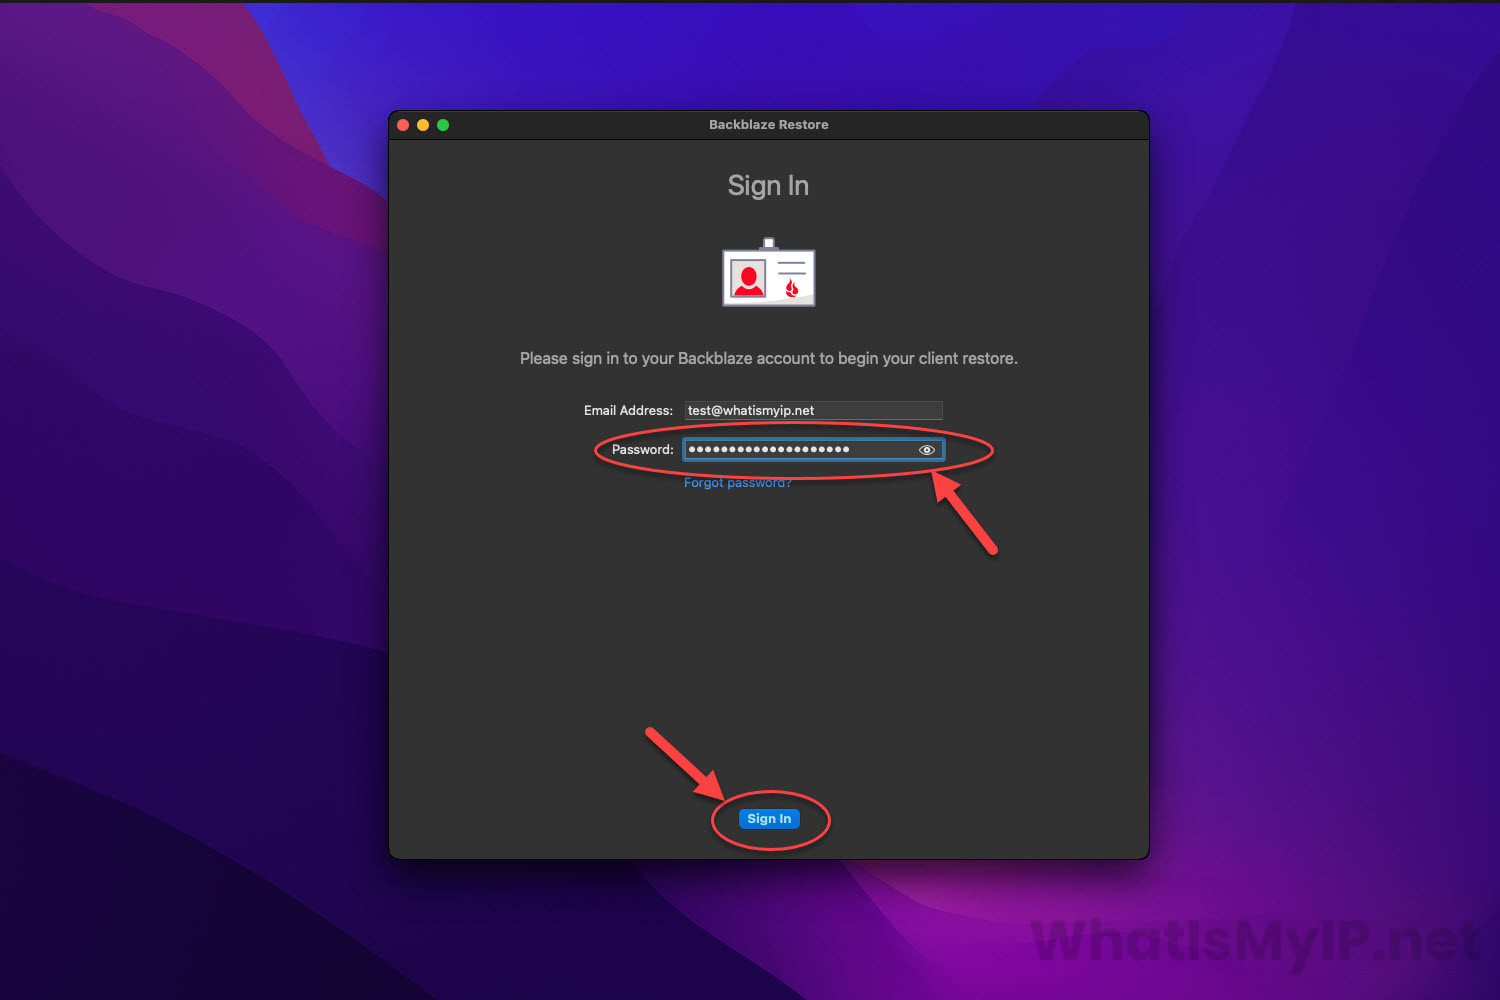
Restore App Sign In
Since the restore app is it’s own piece of software and you can always use it to restore other accounts as well, it will ask you to sign in to the account we will be restoring files from. Enter your username and password of that account. Then click “Sign In” to continue.
Step 4
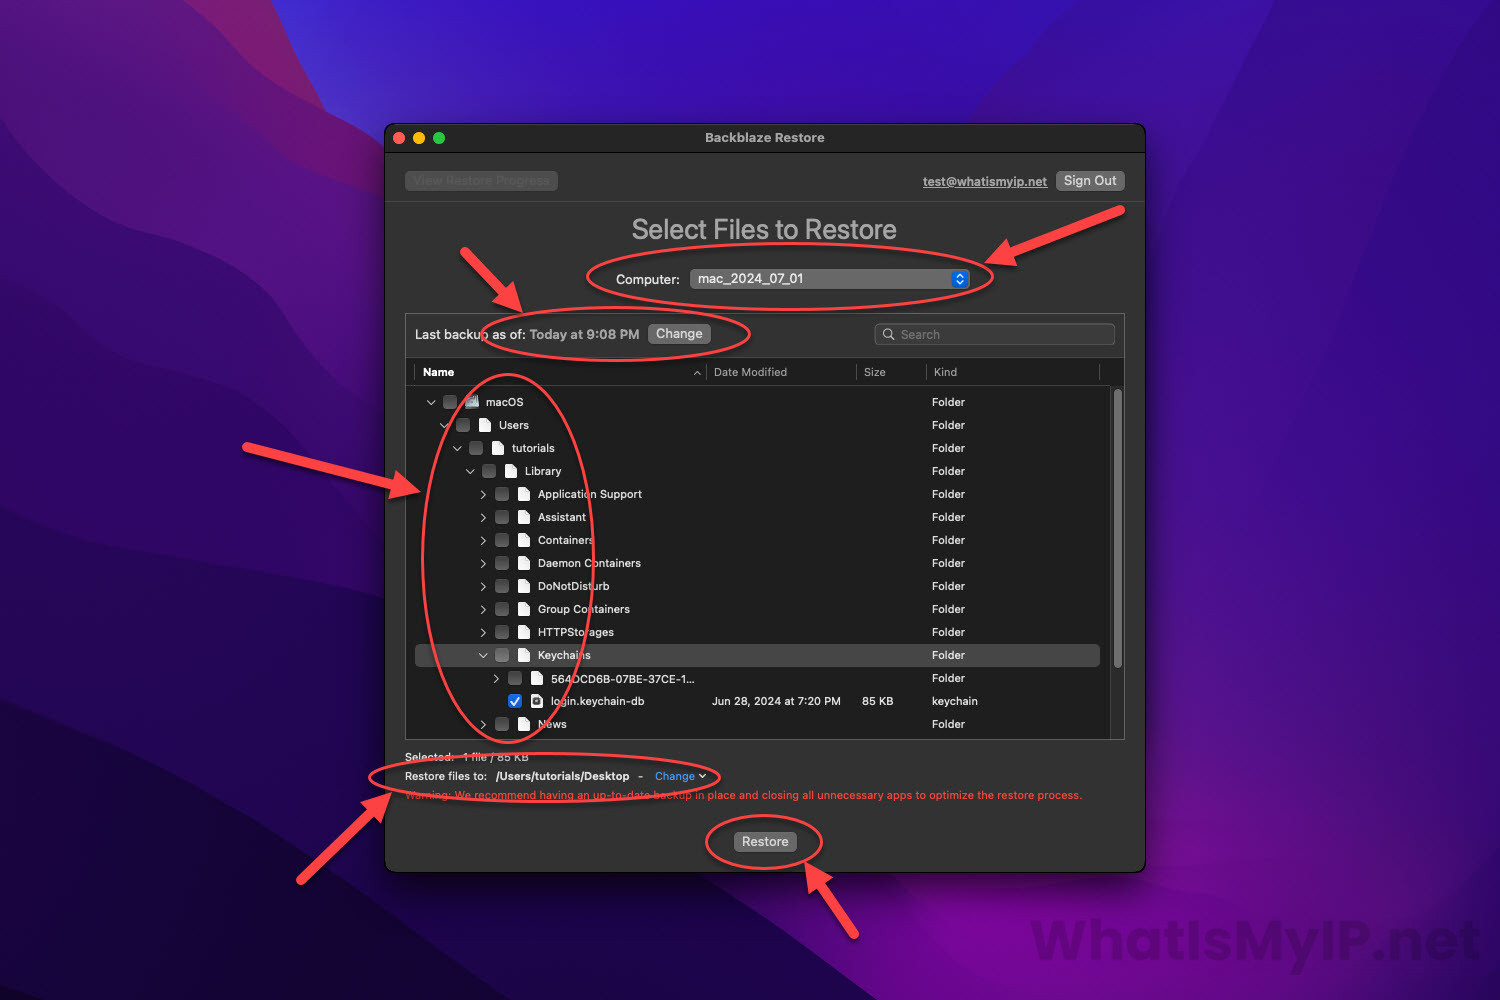
Select Files to Restore
On this screen you will be asked which files from which backup dates you would like to restore. At the top, you can select which Computer files you are restoring.
• On the left hand side of the window, you will see the date pulldown of all your backups from the last 7 days (by default). Under that you will also see your computer file structure tree and you can select where you want to drill down too.
• On the bottom you will see the files in the selected folder. It will have all the files that have been backed up from that folder. You can select the files you would like to restore from there by checking the boxes next to the filenames.
• On the bottom, you will see how many files you have selected to be restored as well as where you would like to restore the files too. You can select the dropdown and either select a Folder, Same location and skip identical files, or Same location and overwrite identical files. We will select a folder for this tutorial and put it on our desktop.
• Once you have all the files selected that you would like to restore, click the button “Restore” on the bottom to continue with the restore.
Step 5
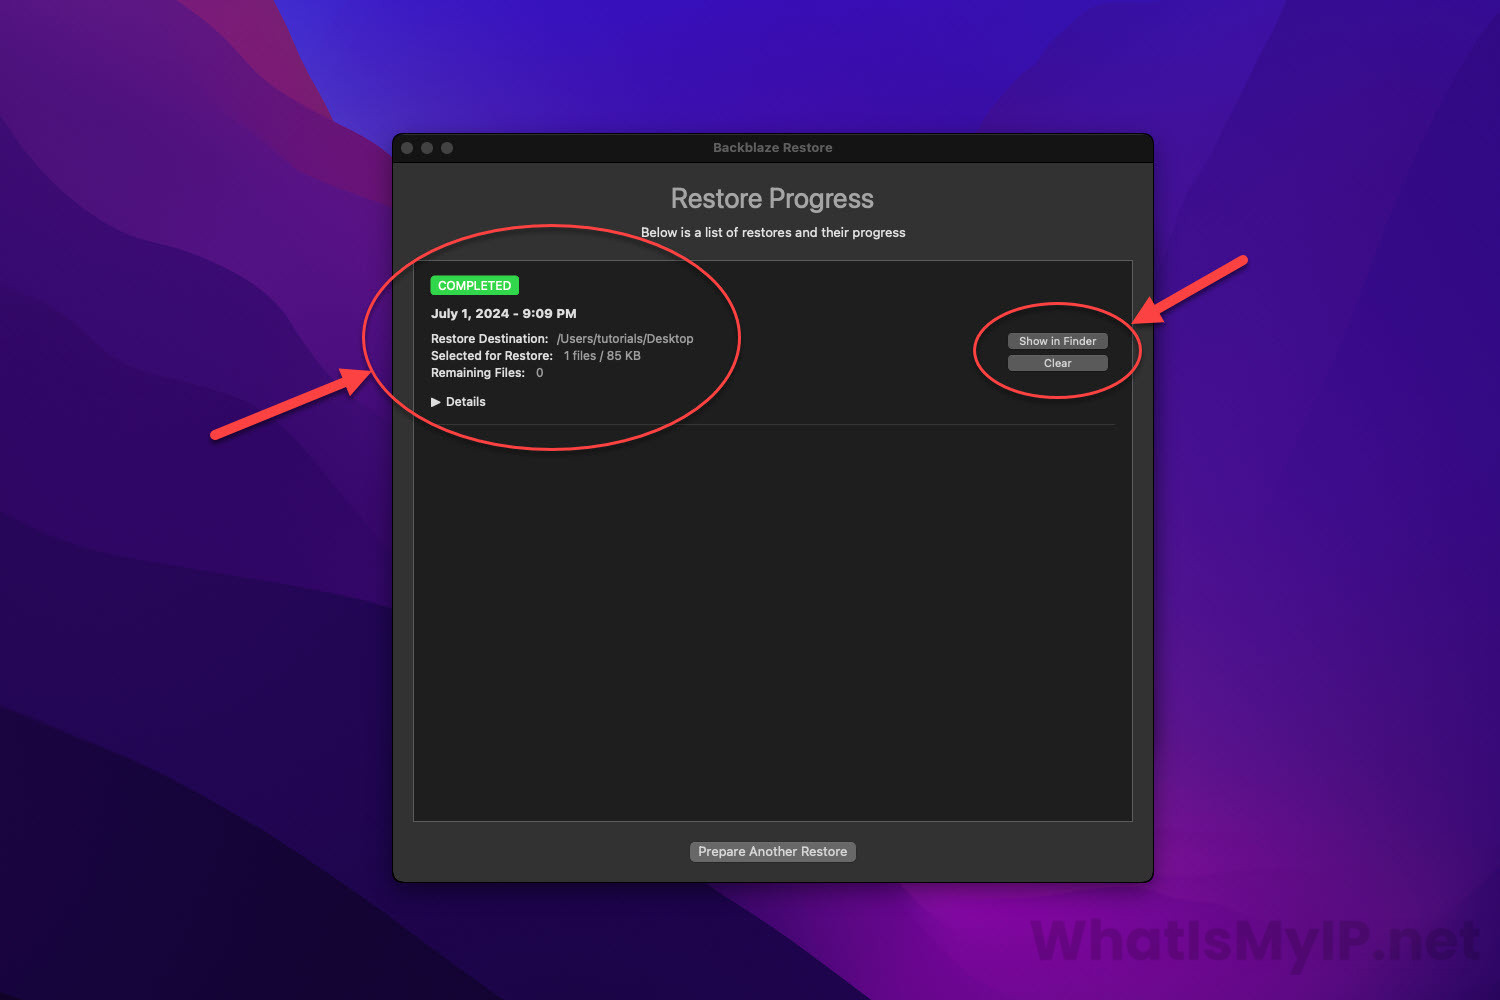
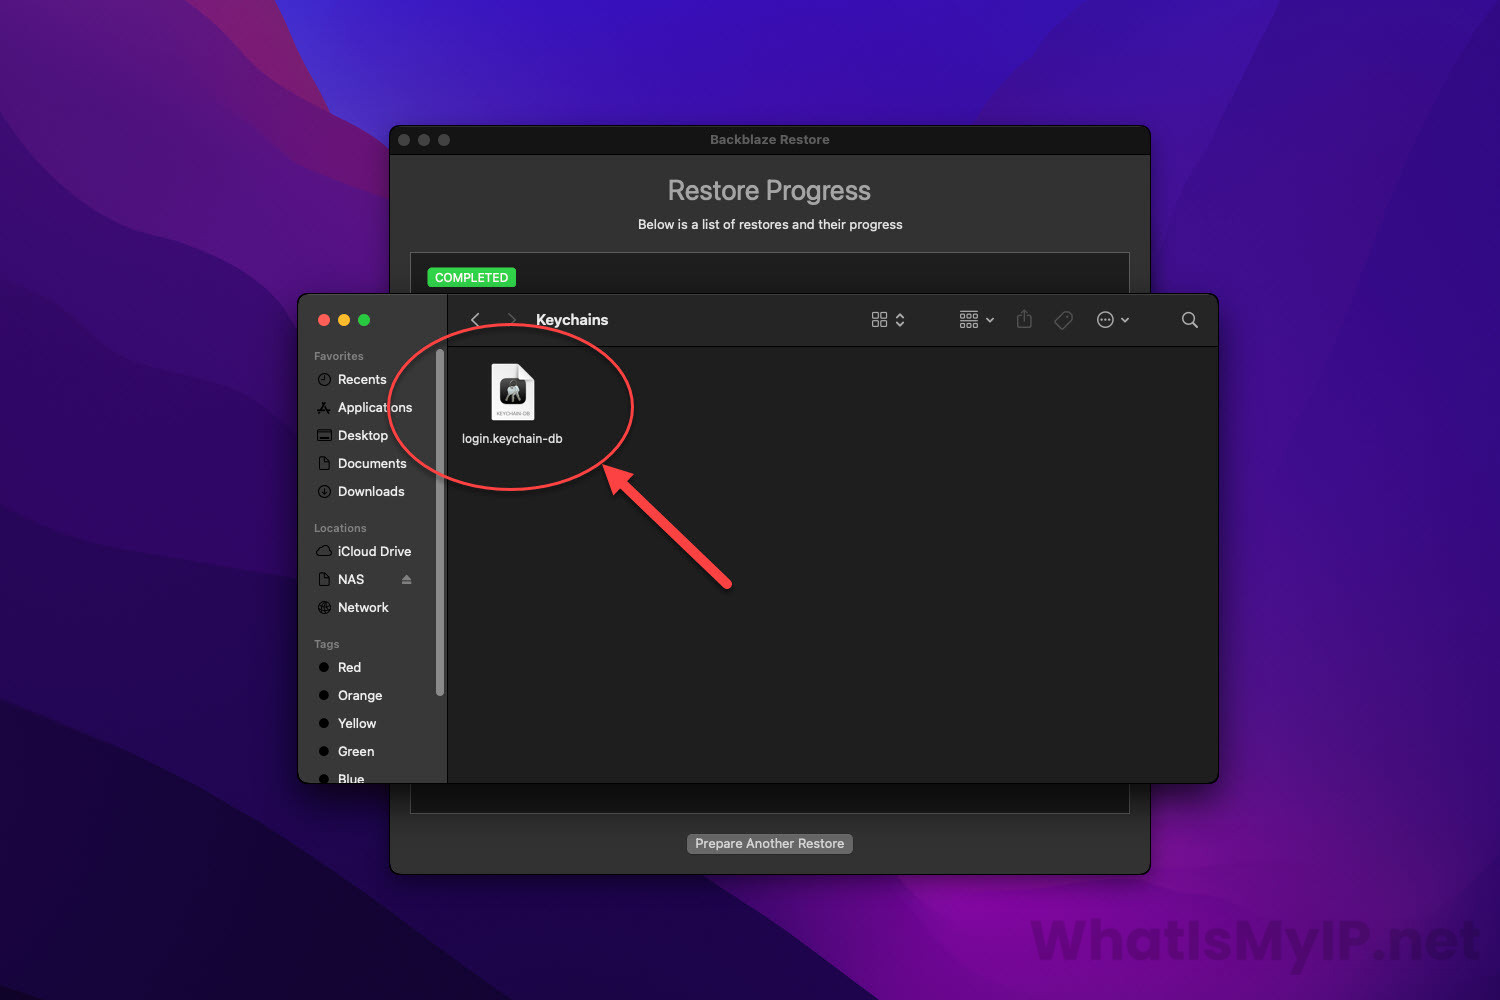
Restore App Complete
Once you hit that Restore button, it will open a new window that will show you the progress of the restore. Once complete, it will show you when it restore completed, where the files were restored too, and how many files were restored. You can also click on the “Show in Folder” to open the folder you restored the files too. At this point you can either close this window or Prepare Another Restore on the bottom.
Step 6
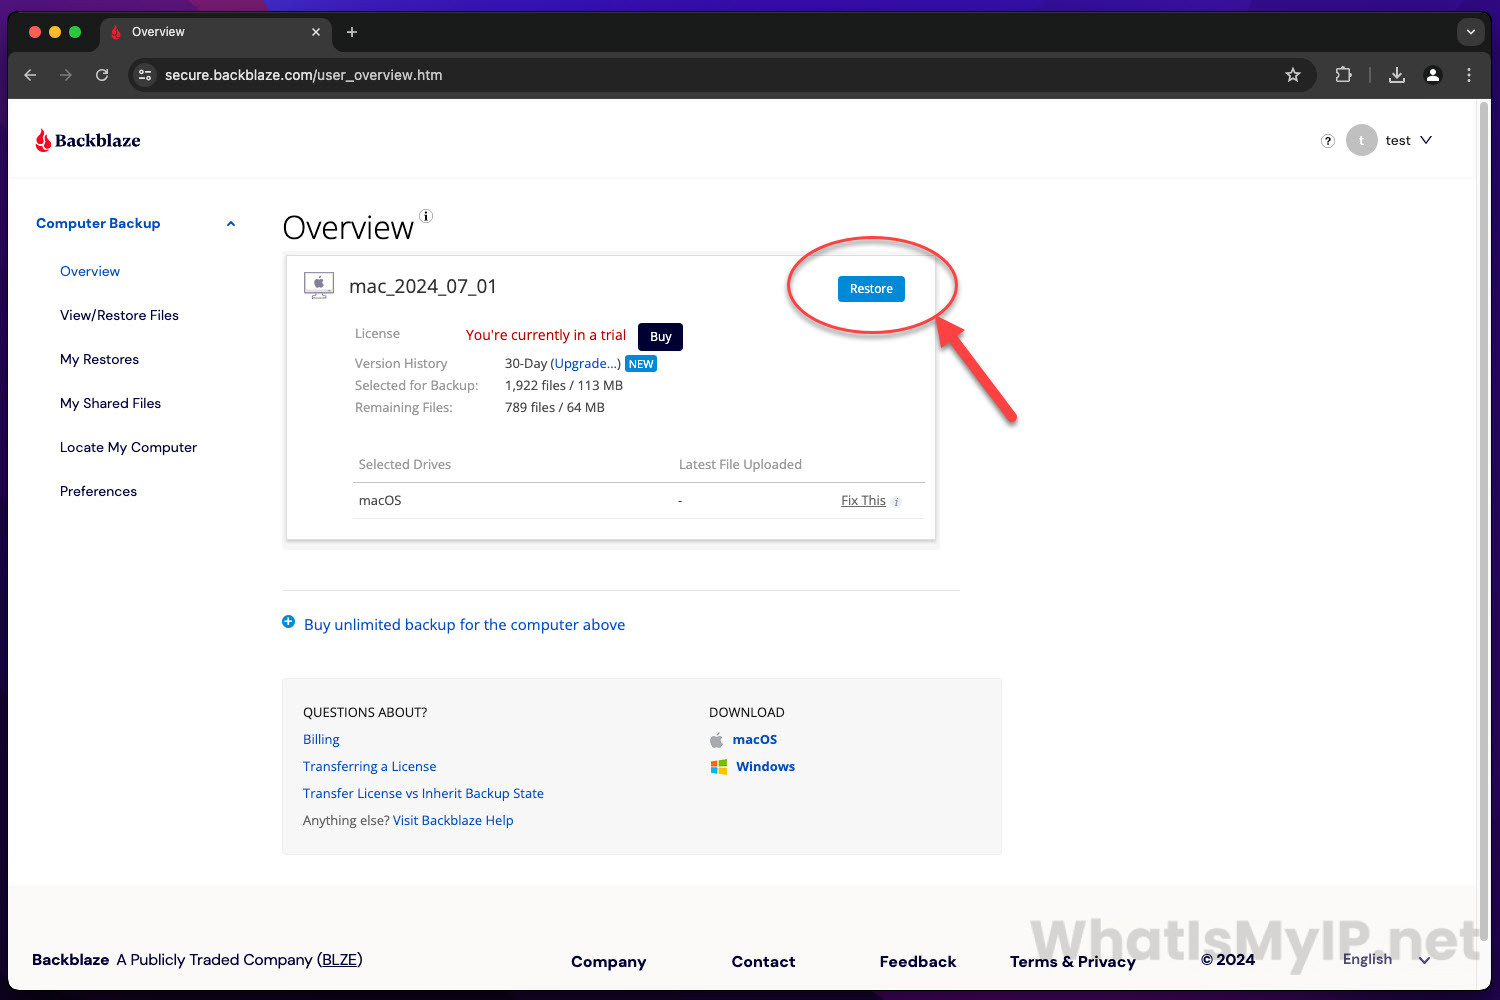
Restoring from Web Browser
You can also do a restore of backed up files from your web browser. Her we will show you what that looks like as well. It is very similar to the Restore App from above. Open your account on the web browser and in the Overview tab, you will see your computers listed in the middle that have been backed up. Next to the name of the computer you will see a button “Restore“. Click that button to get started.
Step 7
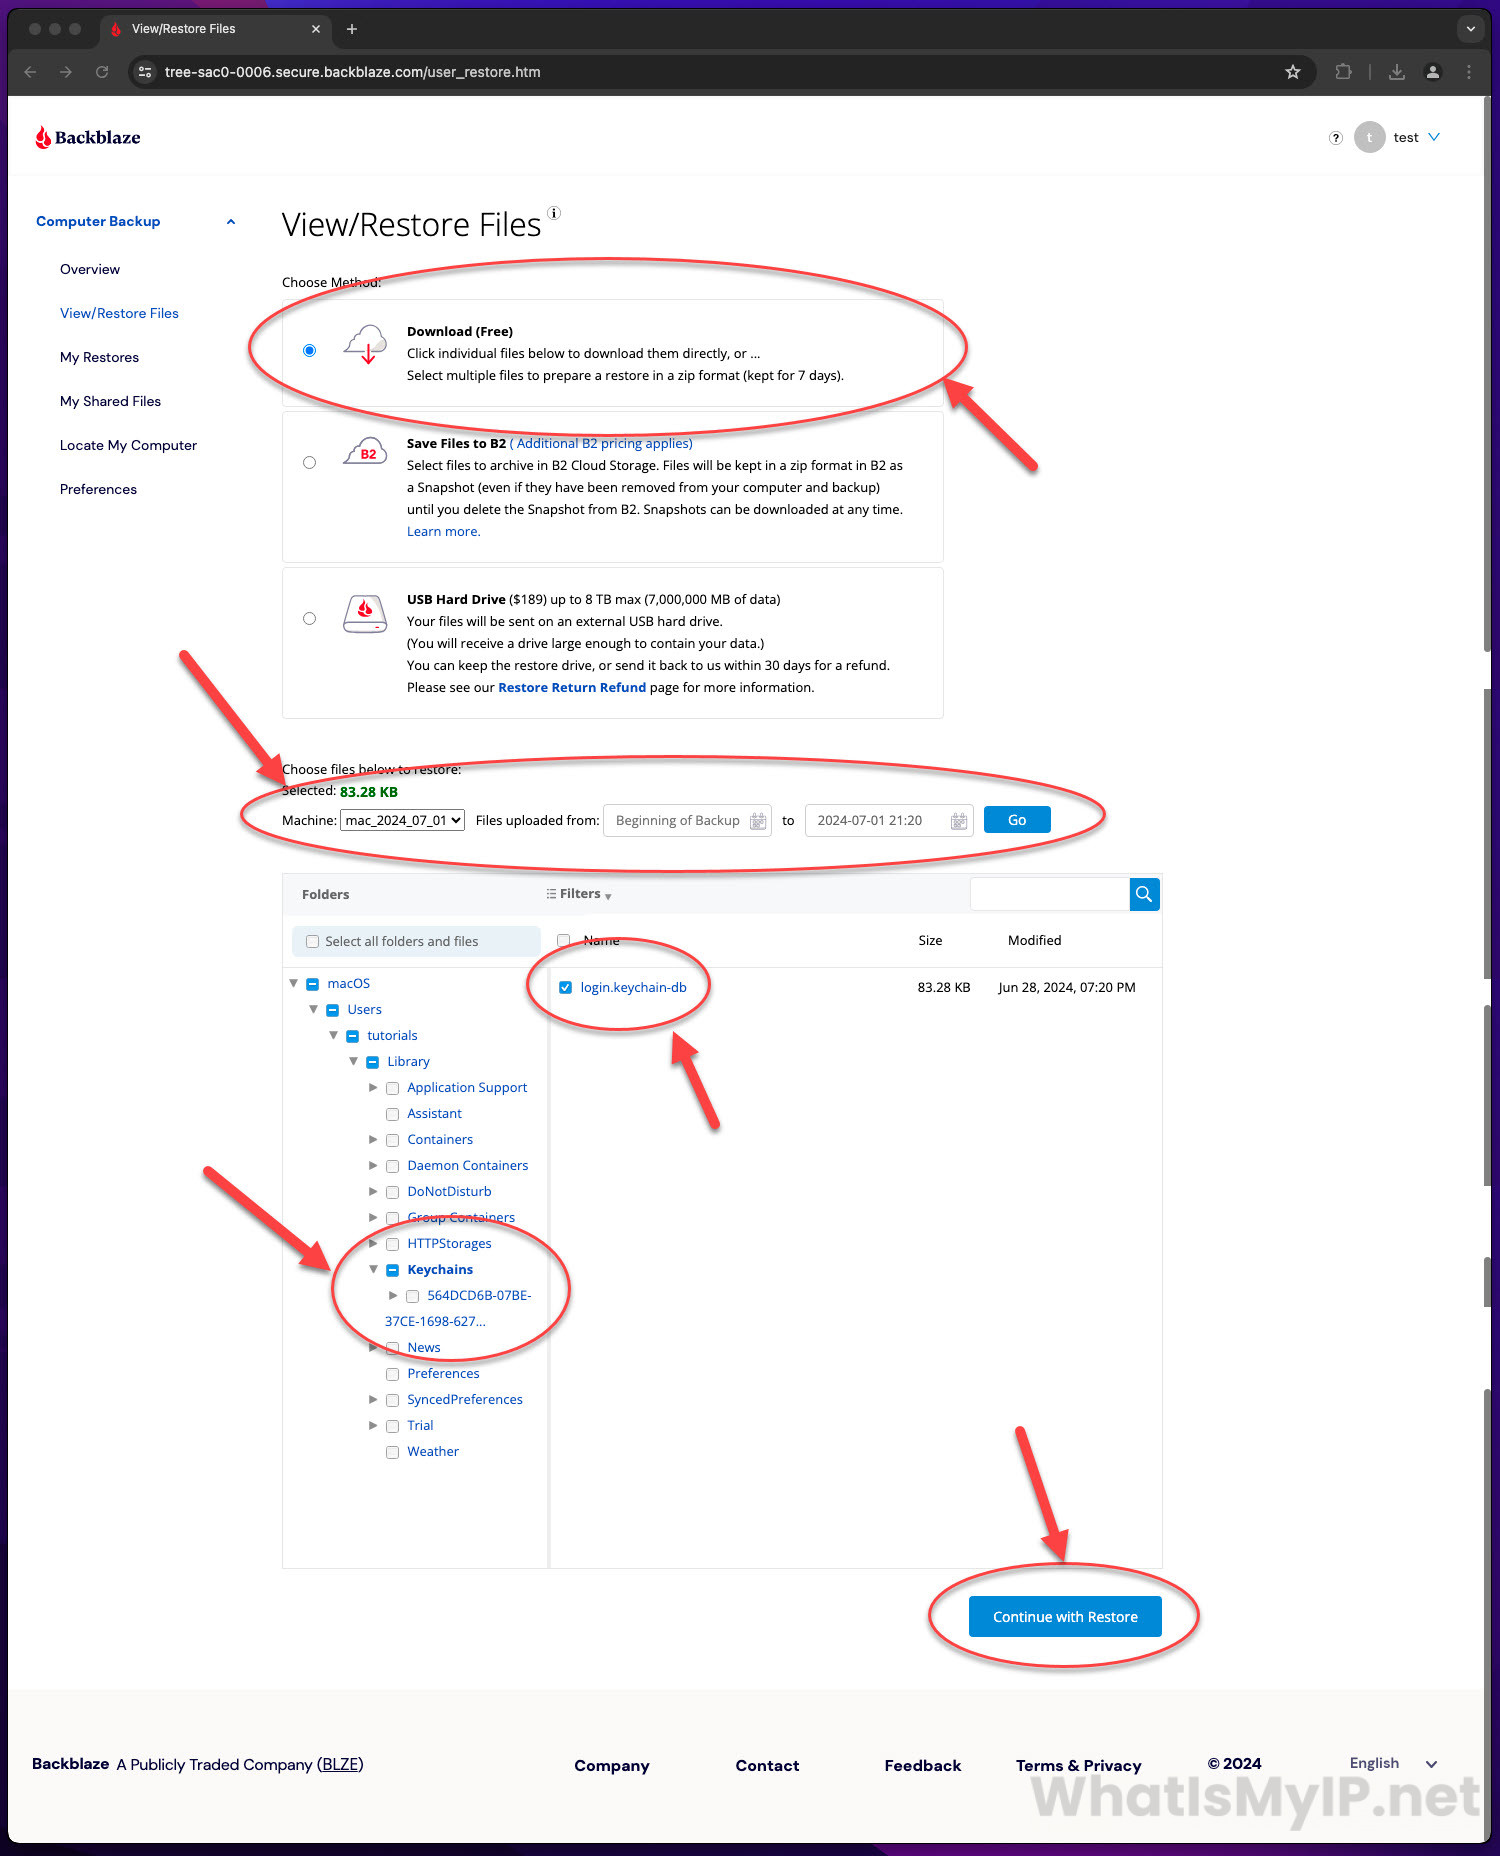
Selected Files to Restore on Browser
On this page you will have 3 options at the top on how you would like to restore files. For this tutorial, we will show you the first option which is called “Download“. Just check off that option and scroll down a little and you will see the same file structure tree again for your backups. You will see the ability to change the computer, backup date, and select the files you would like to restore. Once you have selected the files, click the “Continue with Restore” button.
Step 8
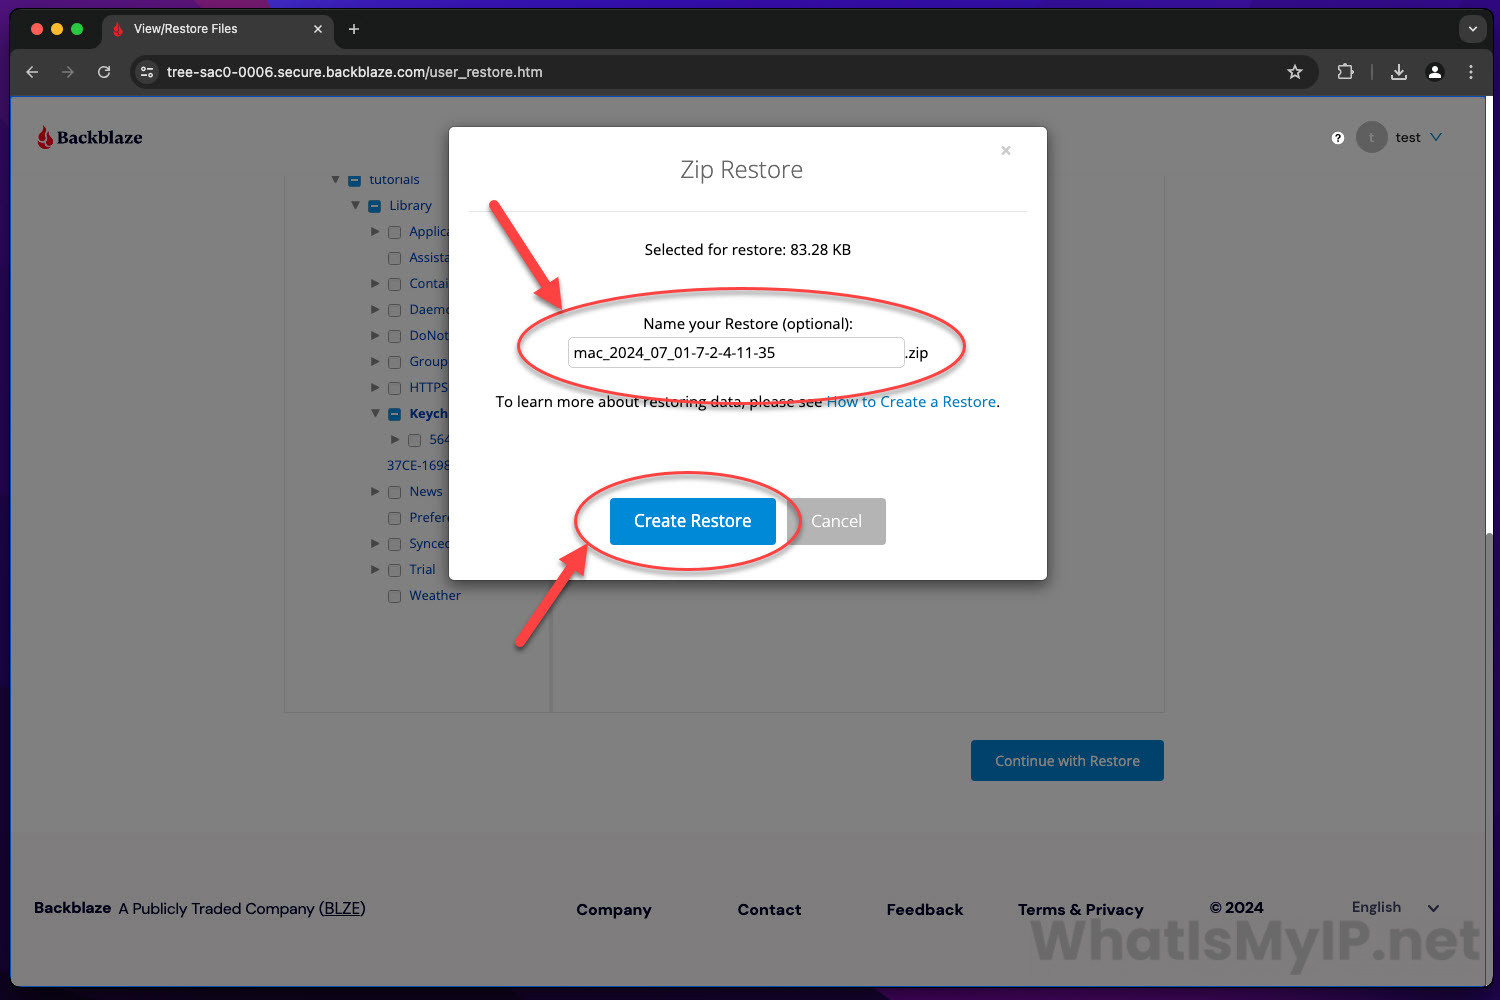
Browser Restore Options
You will get a popup of what you would like to name this restore or you can leave it default. Click the “Create Restore” once you can ready. This will set the restore and get it going for you.
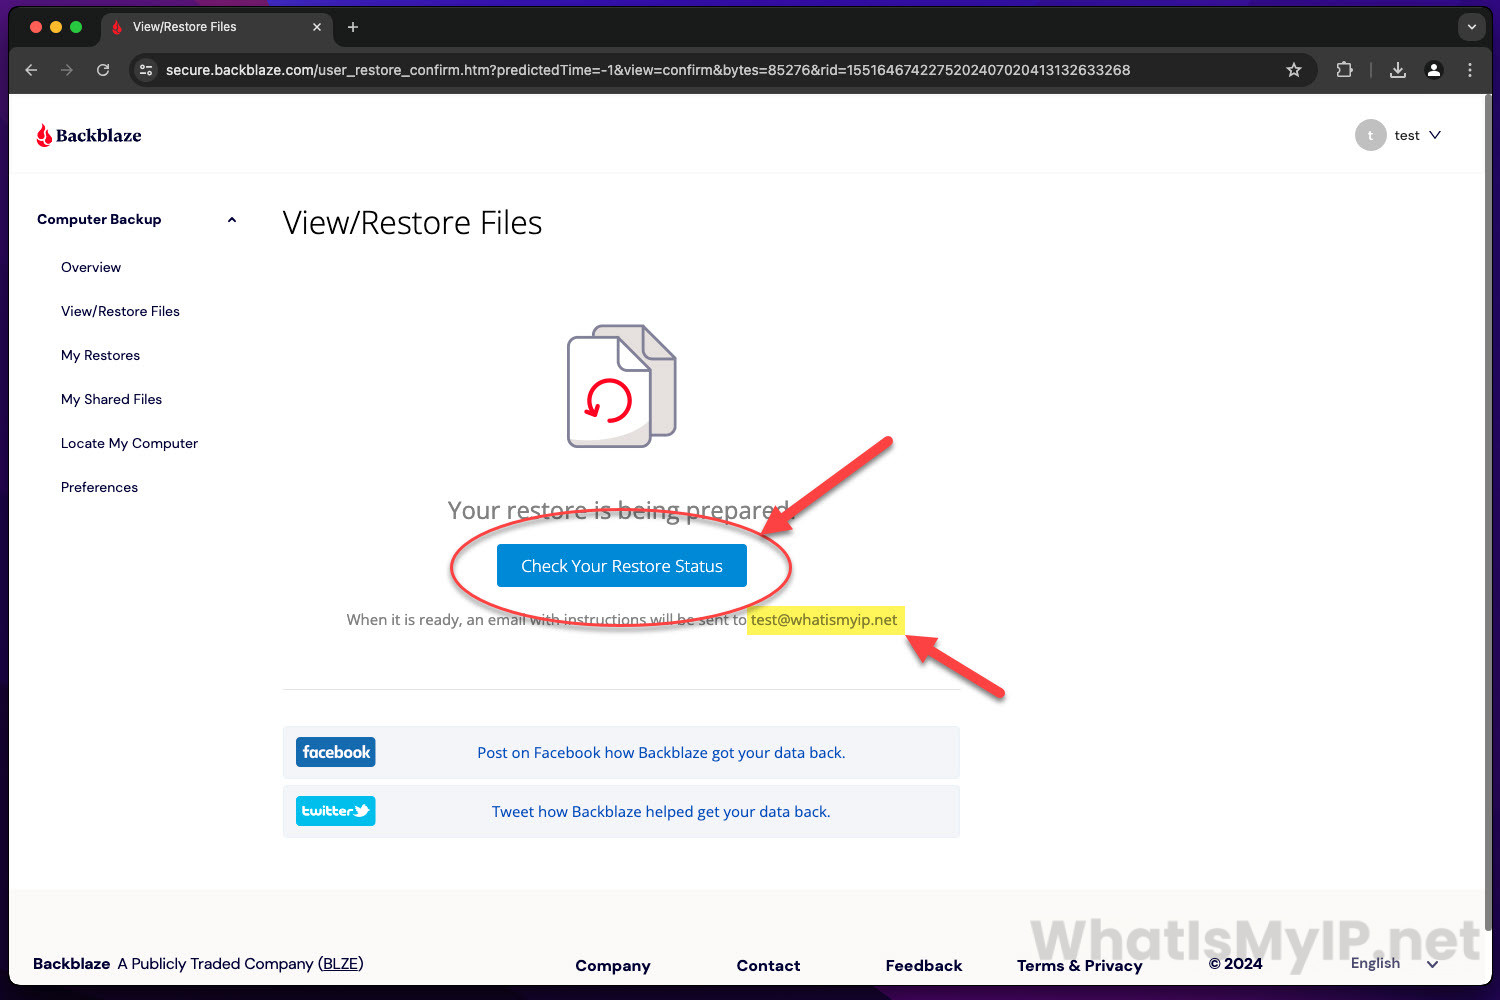
Step 9
View Restored Files
On this page you will see a message that your restore is being prepared. If there are a lot of files, you don’t have to wait on this page, you will get a email once the restore is ready. You can also click the “Check your Restore Status” button if you would like to see the progress.
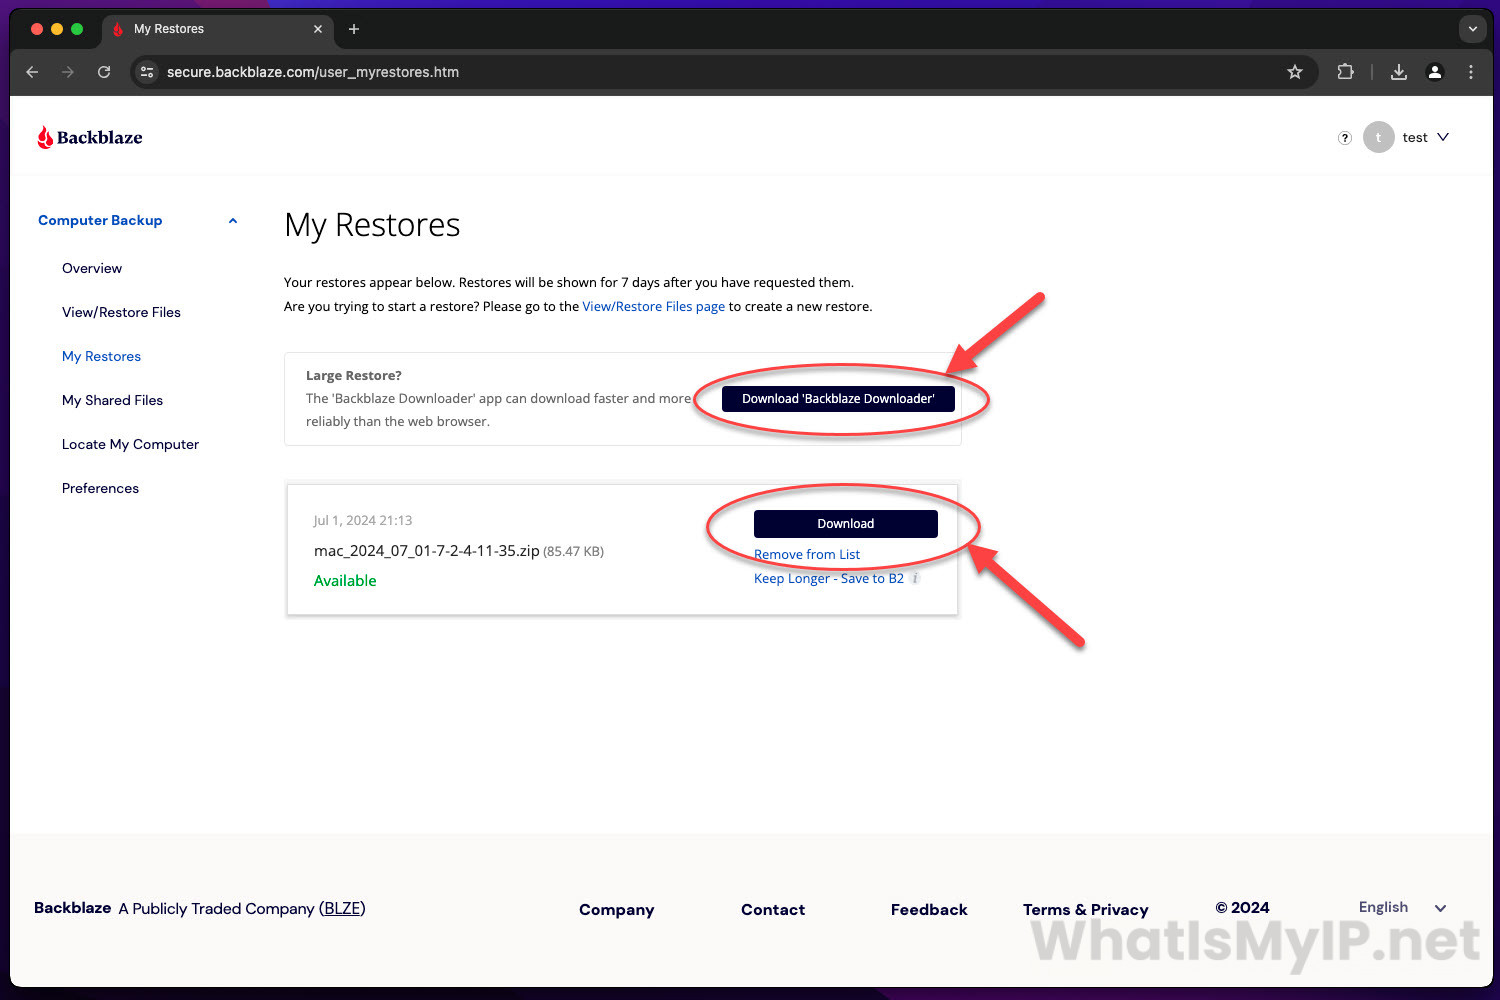
Step 10
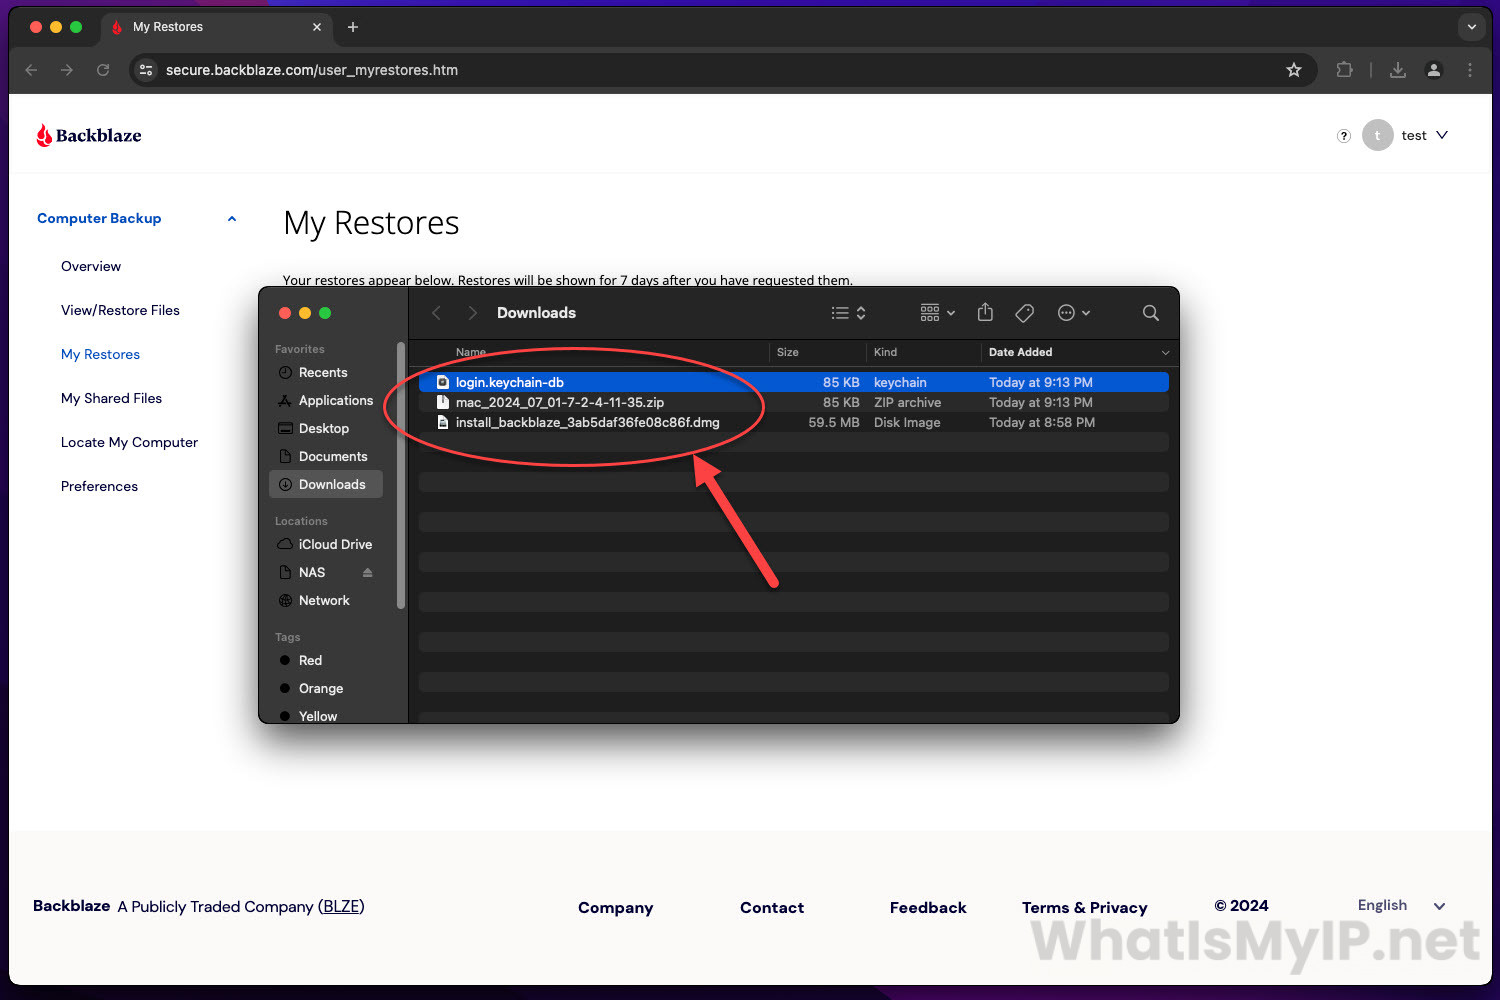
My Restores
On this page you will see all the restores you have created for your account. These restores will be available here for 7 days from when you requested them. Now if your restore is complete, you can click on the “Download” button next that restore and it will download the zip file of all the files you requested in that restore. You also have the option to download the “Backblaze Downloader” app which is good for larger restore files.
Step 1
Pricing and Billing
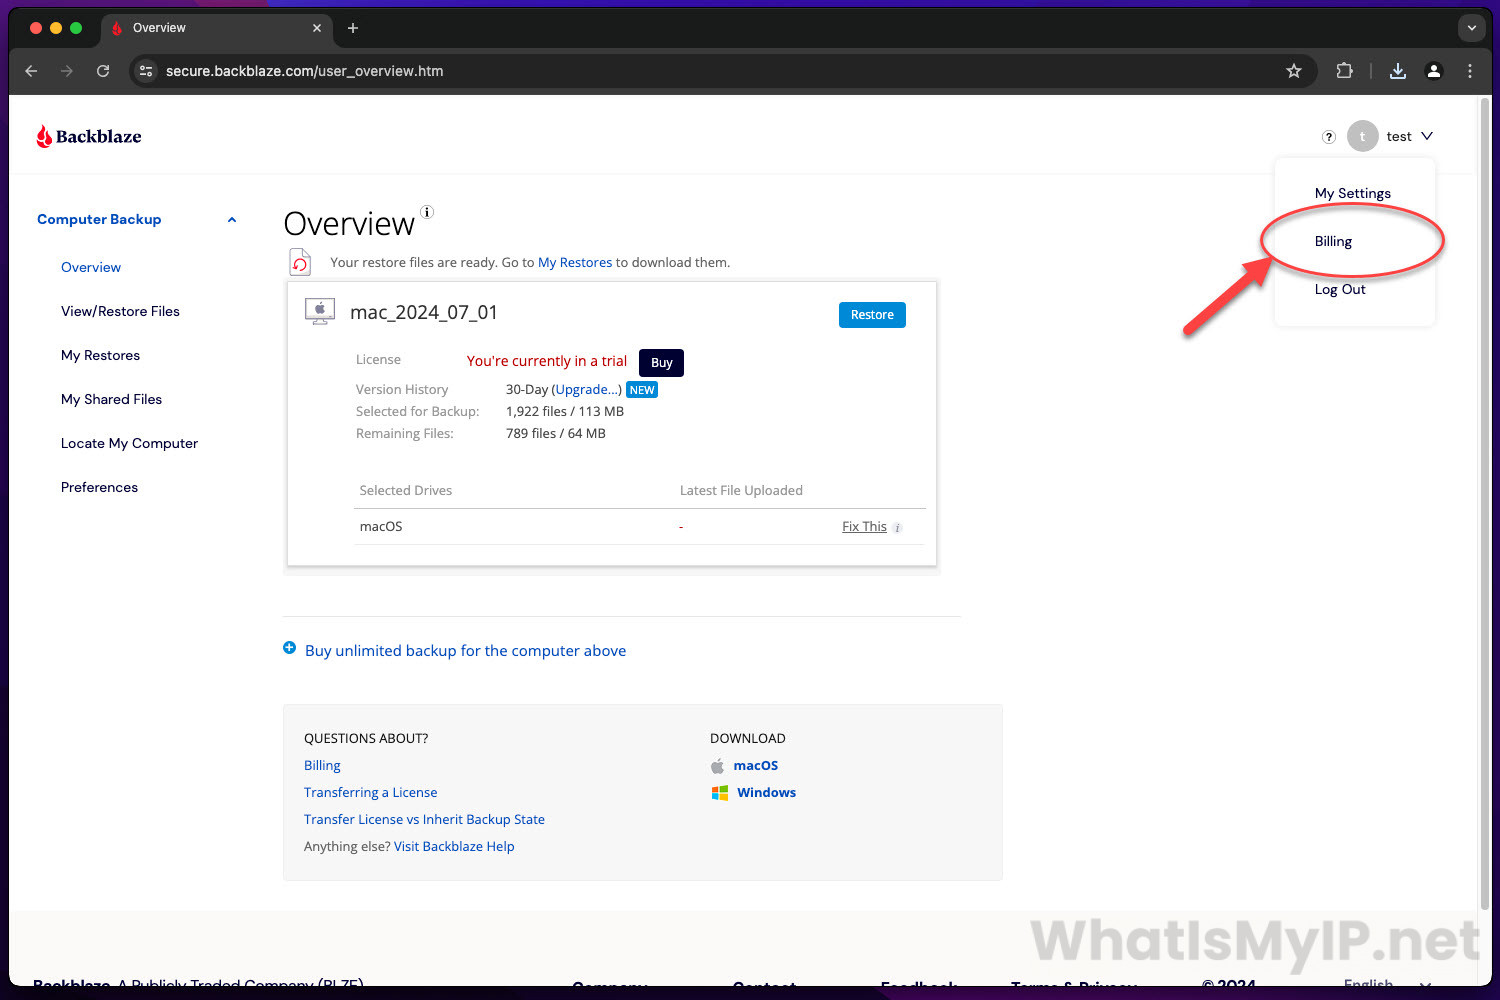
Your new Backblaze account will be fully functional for a limited time while you are on trial. In order to keep everything working smoothly, you will need to purchase a license for ever computer you are backing up. On the main account page, you can hover over your name at the top right and click on the “Billing” link to go over to the Billing section.
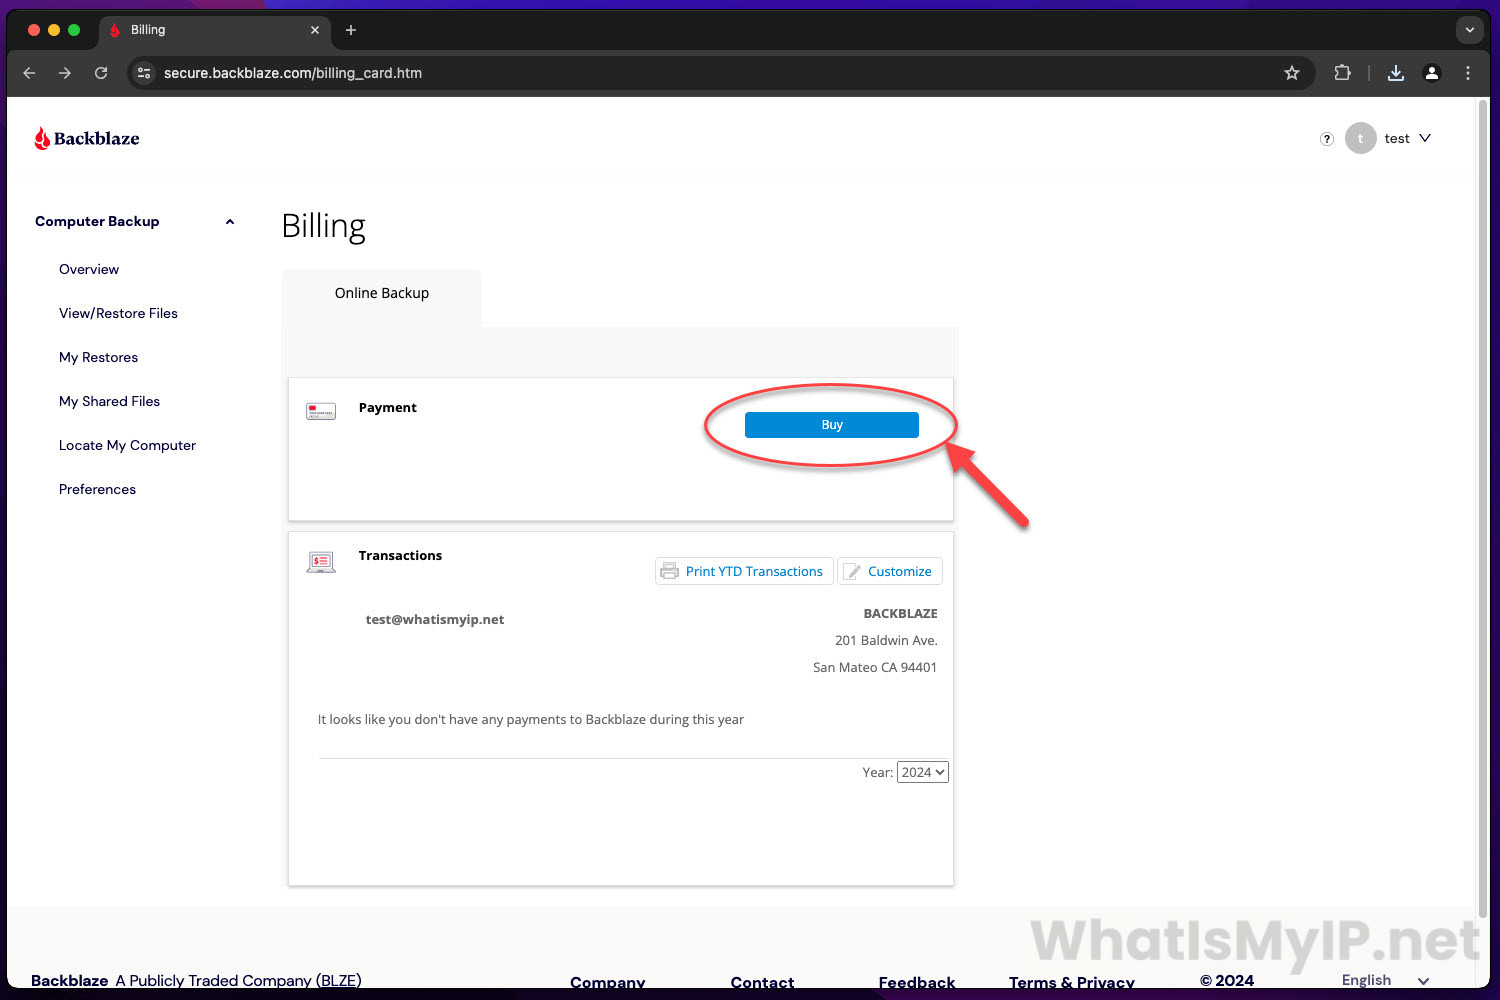
On this page, you will see a Payment section at the top and next to it a button “Buy“. Click the buy button to be redirected to the payment page.
Step 2
Purchase a License
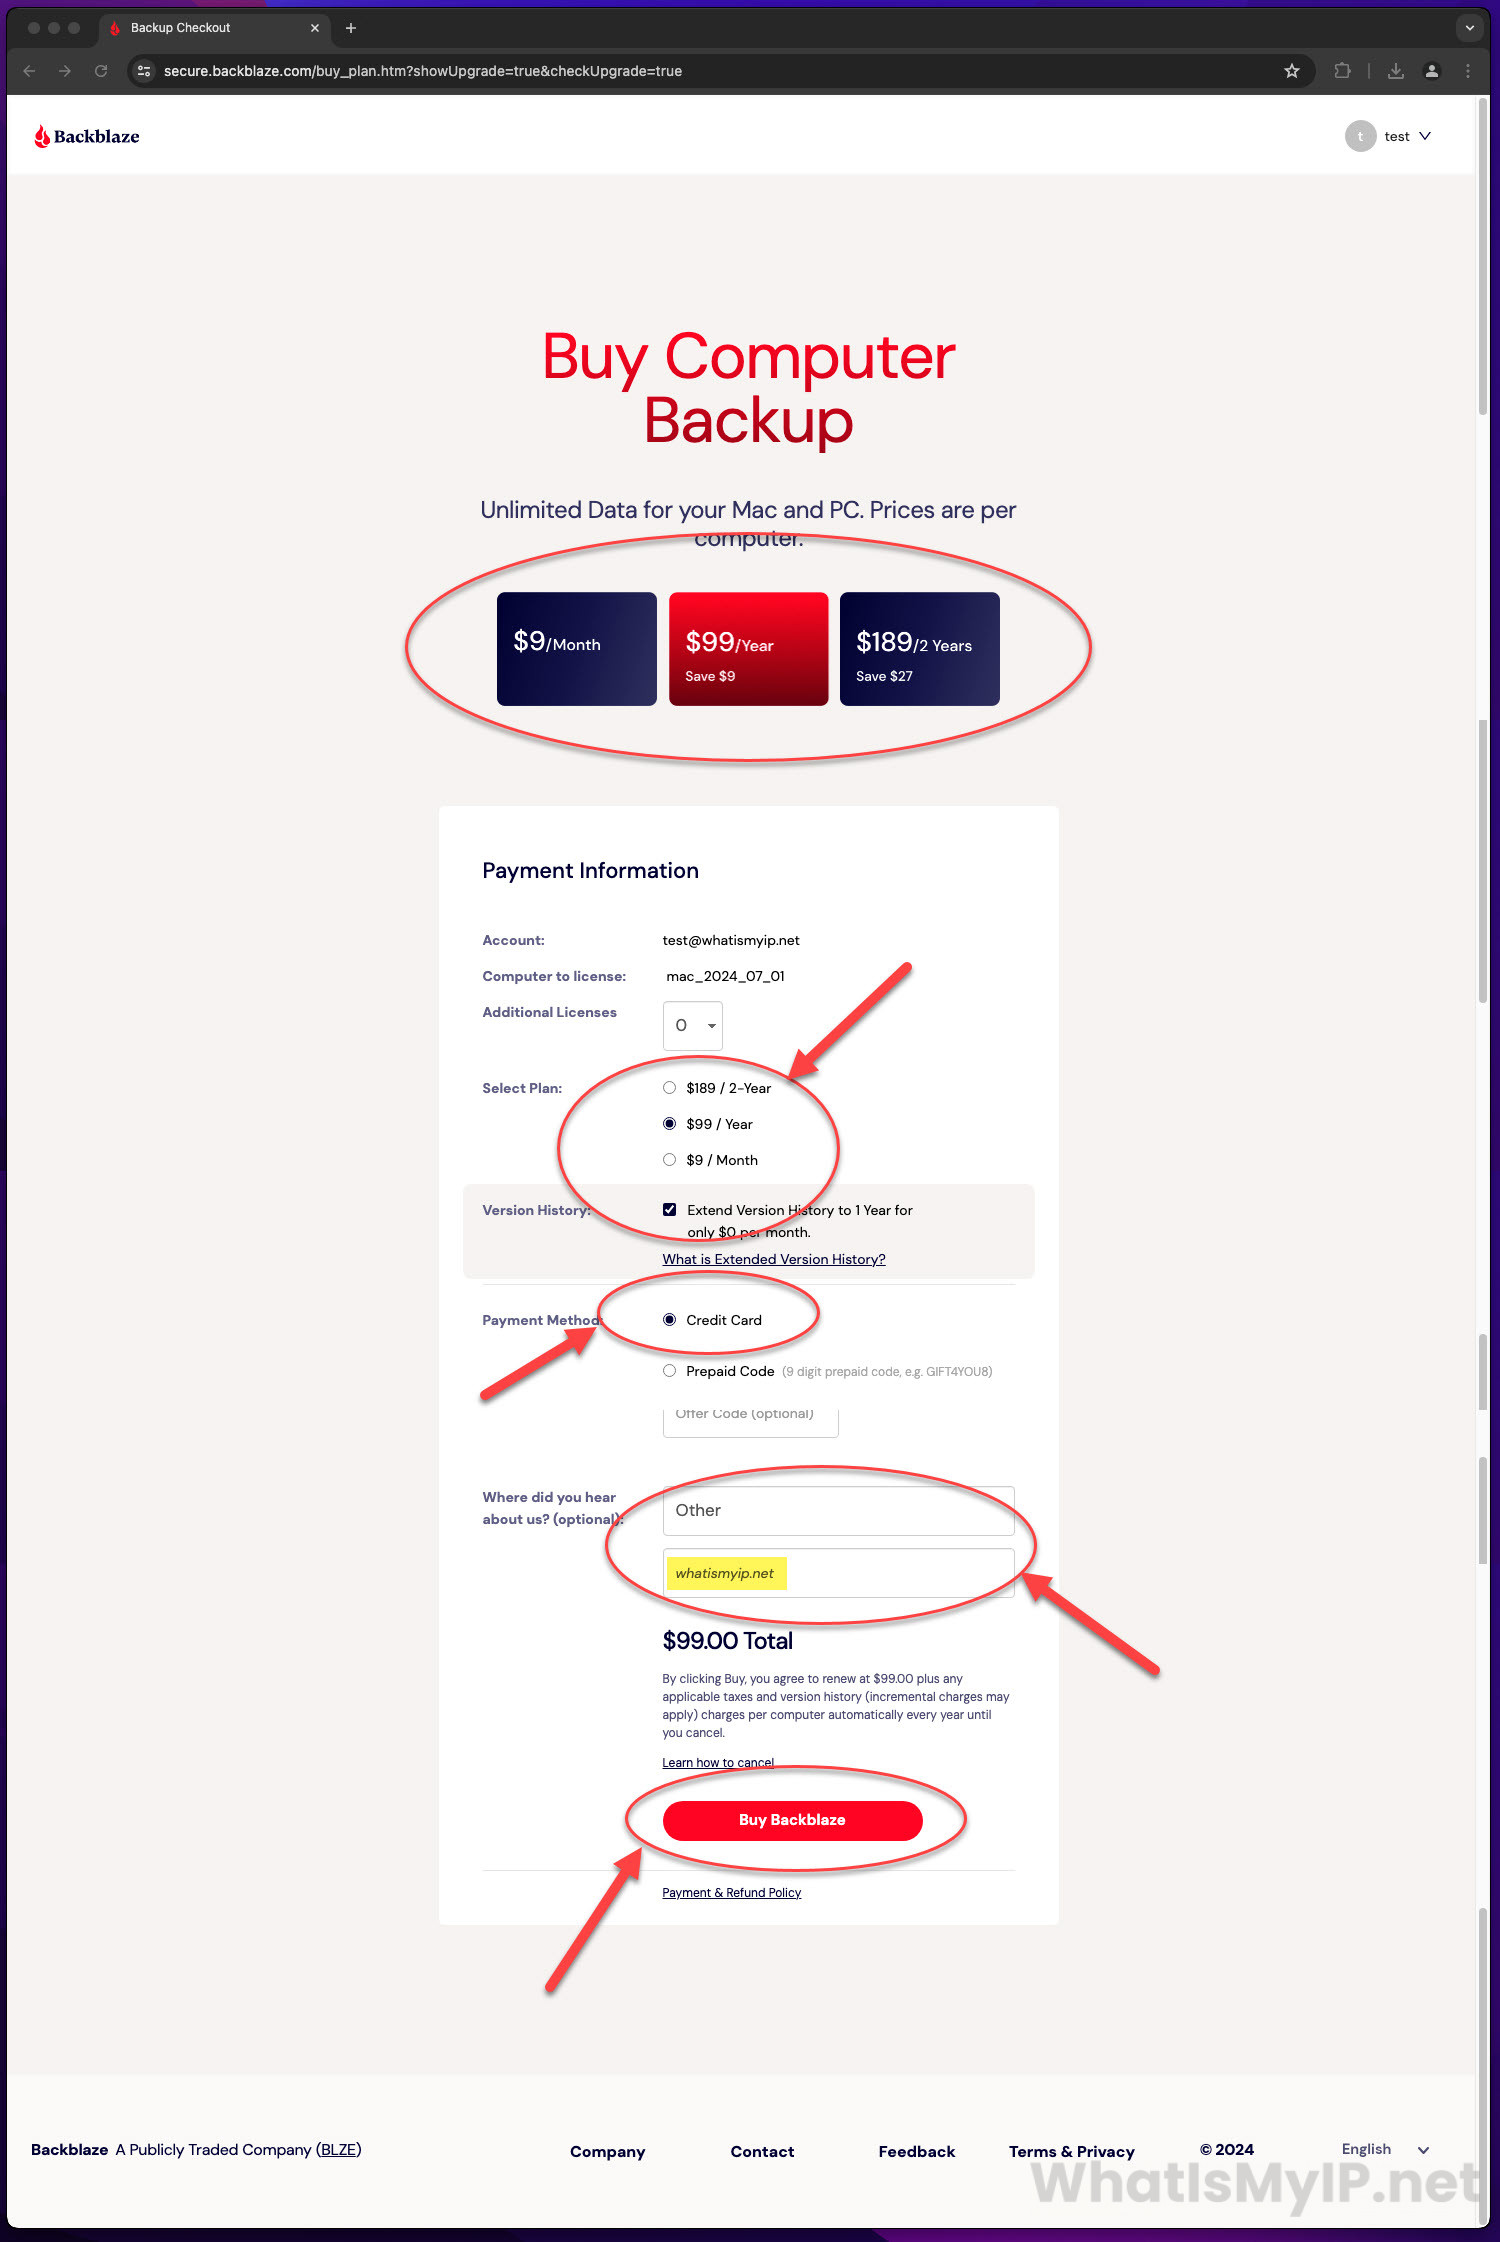
On the Payment Page you will see the Licensing options that Backblaze offers.
Their pricing plans are very simple and very affordable for ease of mind.
• $9 a month
• $99 yearly (Save $9)
• $189 for 2 years (Save $27)
Here you will select which Plan you would like and enter your Credit Card details under that section.
On the last section, they will ask you where did you hear about Backblaze. Please select Other from the dropdown and under it type in WhatismyIP.net in the text field.
All that’s left is to hit the “Buy Backblaze” button to finish up the billing process.
Backing up your personal computer with Backblaze Cloud Storage is a simple and effective way to protect your valuable data. With automatic backups, unlimited storage, and easy restoration options, Backblaze provides peace of mind knowing your data is safe. Follow this guide to set up your backups today and ensure that your digital life is securely preserved.